The screen-printing process derives its name from its key component—the screen. The screen consists of a strongly made wood or metal frame and a fine woven mesh stretched tight and securely glued or otherwise attached to the four sides of the frame.
A good frame has the following characteristics:
• slim enough to fit in the clamping device of the press system
• strong enough to withstand the pressures of the stretched fabric.
• constructed so water and cleaning do not affect it or interfere with the mesh tension or adhesion.
Originally, screen-printing meshes were made of silk, hence the name silk screen printing, and the Greek root for silk, seri, which gives us the European terms serigraphie, serigrafica, or serigraphy. In modern usage the screen meshes are made of precision woven polyester or, for some applications, metal.
Advertisement
Frames types
Frames come in three main forms: rigid wood, rigid metal, or retensionable. Understanding the primary differences between these frame types will help you select the best on for your applications.
Wood The original and still the easiest and cheapest type of frame to make is wood. Wood frames are still used heavily in the garment industry, for hobby and art printing, for small jobs, and in non-critical large-format work. Early screen-printing with wood frames used staples or cord-in-groove for mounting hand-tensioned mesh. But hand stretching does not allow adequate or even mesh tensioning, and it is not recommended because of the problems slack screens create during coating, printing, and reclaiming.
Metal Thin profile aluminum or steel frames are superior to wood due to their resistance to warping or bowing, their resistance to water, their light weight, and longer usable service life. They are most commonly found in print operations with automated printing equipment or where quality printing is a requirement. Many are manufactured to fit common press sizes, or as custom creations to fit specific jobs or formats. Mesh is pre-stretched and glued to the frame using a special stretching device.
Retensionable A number manufacturers offer retensionable frames, sometimes referred to as roller frames (Figure 1). On these frames, mesh is attached using a locking strip and tightened on the frame itself using two wrenches. One wrench rotates the entire the side roller of the frame, and the other tightens a locking nut which holds the frame at the desired tension.
Advertisement
Retensionable screens replace the need for a screen stretching device, which is usually only found in larger shops or as a service from suppliers. It allows a screen that has lost tension after initial use to be re-tensioned, and it gives the individual printer or shop the ability to create a new, tensioned screen in minutes. This is especially useful in production situations and economical once the frame is paid for.
The mesh
Specially woven screen-printing meshes are available in many different types to cover specific applications and production requirements. Fabric printing re-quires a coarse weave to allow more ink to pass through. Halftone or fine-detail printing requires a tighter weave to hold stencil detail. Electronic and specialized printing requires a metal or polyester/metal hybrid screen that can be heated electrically to facilitate ink flow with thermal ink systems. All meshes must be able to withstand tensioning, stand up to squeegee action, and be impervious to water and reclaiming chemicals. Monofilament polyester has replaced silk as the most widely used fabric in screen printing today.
Mesh count is the term used to describe the number of threads per inch. Meshes range from 40 threads/in. (very coarse, with large openings between threads) up to 400 threads/in. or more. European measurement is in threads per cm. The thread count, thread thickness, and mesh opening measurements are sometimes stamped on the side of the mesh (Figure 2).
Meshes need to be stretched to achieve their potential mesh opening sizes, but be aware that meshes can be off by up to 10% on thread counts, due to the variables of the manufacturing process and individual stretching parameters. For accuracy, measure the mesh count after final stretching (Figure 3).
Advertisement
The printer needs to select the proper mesh for the individual job. Fabric printers might use 80- or 110-thread/in. fabrics for applications where they need to lay down white or light colored inks on dark fabrics. As the mesh count rises, the amount of ink flow and deposit thickness decreases. In graphics applications on non-porous materials, less ink is required for coverage, and higher mesh counts above 300 threads/in. allow finer images and details to be printed. Printing halftones requires specific combinations between line screen and mesh count, or destructive moiré patterns occur.
Some inks have specific characteristics that put limitations on mesh counts. UV inks require thin ink deposits for proper curing and won’t dry in the screen, so mesh counts above 305 are used. Ceramics printing requires the coarse particles of glass frit that make up the ink to pass through the mesh openings, so meshes in the 110–255 range are used. Other applications and suitable mesh count ranges are listed in the sidebar “Mesh Recommendations by Application” on page 33.
Mesh tension
Tension is measured in Newtons/cm, using a device that can be placed on the mesh during tensioning. In general, the higher the tension reading, the easier and better the printing result. A tight screen provides the following advantages:
• It allows the use of less off-contact when printing, which results in better registration, and a sharper print.
• Less pressure is required to print through a tightly stretched screen than a loose one. Although this sounds counterintuitive, it’s because under-tensioned screens require more lift or off-contact in order to print sharply. The increased lift then requires more squeegee pressure, causing folding of the blade, blurring of the print, and stencil breakdown.
• A properly tensioned screen will last longer than an under tensioned one.
• A properly tensioned screen is easier to coat, reclaim, and expose with good stencils.
A hand-stretched and stapled screen can only be tensioned to 1 or 2 N/cm, unevenly. Compare that to some printers using 40-N/cm screens. It’s a safe bet the print quality is reflected in the mesh tension. Can I say enough about this? Do you drive around with underinflated tires? Retensionable screens in the smaller sizes are cheap…do yourself a favor and ditch the cord and stapler!
Limitations on stretching
If tighter is better, then why not stretch the screens to 50-100 N/cm?
• The mesh can only take so much ten- sion, and then it rips, delaminates from the frame, or is easily torn during printing.
• Another factor is the frame’s ability to resist bowing or warping because of the tension. This problem increases as the size of the frame increases. Generally, smaller frames can handle high tension (30 N/cm or more). However, once frames reach sizes over 3 feet in any dimension, tensions in the 15–25 N/cm range are common. Extra large frames actually have braces and sup- port structures to stop bowing.
• Some meshes (high tension, low elongation) have been developed to counteract the first problem and allow higher tensioned screens, but it is always best to follow the manufacturer’s or suppliers’ recommendations for proper mesh tension level.
Frame size
Proper frame size is determined by the printed image. The squeegee should have a run-on and run-off area of a minimum 4 in. to the inside of the frame from the image, and side clearance of at least 3 in. from either side of the squeegee to the inside of the frame. An image 11 x 15 in. would require a minimum frame size of 17 x 23 in. for a problem-free print. Usually, the more space around the print, the easier it is to get a good printing result. Tightly jammed images on screens that are too small end up causing production problems, including blurred edges, missed edges on the print, and distortion.
Halftones
When printing halftone images, a rule of thumb for determining correct mesh count to use is 3.5 x halftone line count to get the minimum mesh count. For example, a 65-line halftone image would require a 230-thread/in. mesh or higher. The higher the mesh count, the better the reproduction of the image on the stencil and the print and the less chance of moiré patterns. Avoid any directly divisible mesh/halftone combinations (e.g., 75 line halftone screen on a 300-thread/in. mesh) as this will also cause interference patterns on the stencil and the print. Also keep in mind that yellow mesh is often recommended for high resolution printing with halftones. The reason why is discussed in the section on color mesh that follows.
Sawtoothing and sharp edges
Coarse meshes will cause sawtoothing on the printed image. This is a result of the stencil being unable to bridge the gap between threads. Capillary and Indirect stencils, because their edge is actually below the mesh, print sharper lines. Photopolymer-based emulsions (one-pot, SBQ type) are sharper than diazo-based or regular emulsions because they form their molecular shapes in straighter lines.
Other mesh considerations include the following:
• Monofilament meshes clean and reclaim better than multifilament
• Meshes with the designation 6XX, 10XX, etc., are using an old silk measuring language,which does not readi- ly translate into threads per inch. Under no circumstances use silk.
• Mesh becomes more expensive the higher the mesh count.
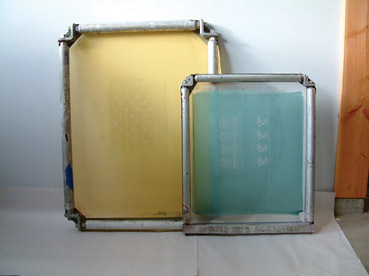
Colored mesh
When you get different fabrics in the higher mesh counts, you will notice there are white meshes and yellow meshes, many in the same counts. Generally, whites are cheaper than the dyed/colored mesh. So why use yellow?
When exposing a positive on white mesh, especially halftones and fine lines, you may notice the edge definition and the quality of the image is rougher than the positive. This is due to light bounce. The white threads reflect light in different directions and produce soft edges on the stencil. Yellow mesh minimizes this effect and produces sharper images. This is not so critical on coarser meshes where details are bolder—i.e., for T-shirts or basic designs with flat colors. It does become critical in halftone or fine-detail printing.
Note that stencils on white meshes expose faster than those on yellow mesh fabric. You should adjust your exposures to take this into account.
Rips and tears
The following recommendations will help you deal with mesh rips and tears:
• Avoid pressing against the mesh along the frame and glue joint, as this can cause the mesh to delaminate from the frame. The adhesives are very strong side to side, but will give way when pulled up (shear vs. tear strength).
• Pinholes or small rips in mesh can be carefully taped on both sides. Thin gold Mylar decal material makes good patch material (Figure 4), and stencil place ment and care can allow the printer to work around a hole and extend the useful life of the screen.
• Don’t print over sharp edges of plastic, metal, glass, or paper, or you will wear out the stencil, and the screen mesh. Tape over wear points on the underneath side of your stencil to protect screens from ripping.
Mesh opening vs. ink flow
The amount of opening between the threads in a screen is one of the factors that determine the ink flow through the screen. As mesh counts get higher, the thread diameter also comes into play. New mesh technology has produced finer threads, allowing larger openings between them, even in the higher mesh counts.
Screen care tips
The following screen care suggestions will help you prolong the life of your screens:
• Once properly tensioned, new mesh should be chemically scrubbed and degreased before use, to allow the stencil to adhere properly.
• Whatever the stencil system, the screen must be cleaned and degreased before each use. Failure to do a proper degrease on the mesh can result in the stencil delaminating or breaking down during the print run. Failure to clean the screen before re-use leaves ghost images and blockages that will haunt your next stencil and cause problems in future prints.
• When not being used for printing, screens should be stored to avoid being accidentally ripped or damaged. During printing, avoid contact with knives or other sharp objects.
• If screens are cared for properly, they can be used over and over, sometimes for years and thousands of impressions, before requiring replacement.
• The two main reasons for replacement are blocked openings that will not come clean and ripping or delamination of the mesh.
• It’s always a good idea to mark the mesh count and age of the screen on the side of the frame, and institute a rotation and replacement system to ensure that screens are always in good shape for printing.
Selecting the right frame and mesh and preparing your screens properly will put you on the path to quality printing more effectively than any other procedure you can perform in the screen-printing workflow. So give your screenmaking process the time and attention it deserves. n
Mesh Recommendations by Application
APPLICATION
MESH COUNT (threads/in.)
Graphics printing
Line artwork 230 –305
Halftone screens up to 70 lines/in. 305–380
Halftone screens from 70-133 lines/in. 380 –420
Objects (plastics, etc.)
Opaque areas 255–305
Halftone and fine lines 305–420
Garment printing
Glitter 25–60
Flock adhesive 45–125
Puff-up colors 55–125
Overprint 80 –110
Pigment ink printing,areas/lines 110 –175
Plastisol transfer 125–305
Universal fabric 125
Plastisol direct 125–305
Pigment inks, half-tone 155–255
Sublimation transfer 195–305
Textiles, flat films
Heavy décor fabrics (terry cloth, denim) 45–123
Smooth, dense fabrics (table cloths, curtains) 110–155
Light, porous material 195–305
Ceramics
Glaze printing, coarse, embossed effect 15–55
Glaze printing, medium to fine 55–155
In and under-glaze (direct printing) 110–255
Decals
Areas/lines 195–380
Fine lines/half-tone 255–420
Gold and luster inks 305–420
Glass
Automotive glass
Black surrounds for rear/side windows 125–195
Antennas 195–255
Silver paste (defroster) 195–255
Architectural glass
Windows, doors 55–195
Mirrors 195–305
Cosmetic bottles
Inks 195–305
Precious metals 305–380
Beverage
Bottles, glasses 125–305
Household
Ovens, etc. (masks) 110 –175
Ovens, etc. (lines and half-tones) 195–255
Lampshades, furniture 125–255
Advertising
Shop signs 110 –195
Printed circuit boards
Overlay solder mask 30 –45
Photosensitive solder mask 60 –175
Membrane keypads and overlays
Insulation lacquer 90 –175
Silver conductive paste 125–175
Adhesive 125–195
Transparent windows 305
Andy MacDougall is a screen-printing trainer and consultant based on Vancouver Island in Canada and a member of the Academy of Screen Printing Technology. If you have production problems you’d like to see him address in “Shop Talk,” e-mail your comments and questions to andy@squeegeeville.com.
Editor’s note: This article is was adapted from a section of Andy MacDougall’s new book, Screen Printing Today: The Basics, published by ST Media Group Int’l. The book will be available beginning in mid-November 2008 through ST’s book department and can be ordered online at http://bookstore.stmediagroup.com.


 Case Studies2 months ago
 Art, Ad, or Alchemy2 months ago
 Andy MacDougall2 months ago
 Columns3 weeks ago
 Editor's Note2 weeks ago
 Thomas Trimingham2 months ago
 Marshall Atkinson2 weeks ago
 News & Trends1 month ago