Thomas Trimingham
Art Meets Automation: Streamlining Prepress
Shops don’t often look to their prepress department as a place to become more efficient, but that doesn’t mean they shouldn’t.
WHEN SHOP OWNERS discuss automation, they usually think of the screen printing press. Every rotation and squeegee stroke is similar to the last one, a predictable action that creates a predictable result. The blank shirts go onto the press in the same position, and they come off the dryer belt with a beautiful print on the surface that looks the same on every shirt.
Art generation, though, is a far less predictable process and attempts to automate it can go awry thanks to variables in the artwork and limitations in the graphics software. The most common method of automating art production is to create scripts and macros in software like Photoshop or CorelDraw. Using these tools can help speed up art production, but care must be taken to avoid unexpected results that end up costing time instead of saving it. The best results are often achieved by having a clear idea of what you can automate and what you cannot.
A good rule to follow when you decide to automate is to look at your shop and start by analyzing three areas in your art department:
• Art intake and creation
• Art approval and revision
• Separations
Art Intake and Creation
How you create, receive, and prepare art for production is one of the most neglected processes when it comes to automation, and a place where many shops can improve. There are a couple of areas to consider. If your shop is one of the lucky ones with customers that consistently reorder similar types of artwork, then a hot folder system could be a worthwhile addition. These work by attaching commands to a folder on your server so that specified steps are run automatically when a file is added. Files can be duplicated, renamed, and even processed into production, depending on how predictable the type of file is and how well the system can be set up for it. If your shop gets a wide variety of files and they come in from a lot of different sources, then this may not work for you, but there may come a time when knowing how to set up and run a hot folder system could come in handy.
 Another area to investigate is artwork creation. One common time saver you can consider is to create premade art templates that can be quickly modified. If you create the template properly, a whole page of designs can be automatically developed in seconds from a software script that applies text to each design.
An advanced process could include both hot folders and templates, enabling you to add a mascot and have it automatically generate a design (or even a group of designs) using the original file information. These files would then be saved into a separate folder for finished designs.
Art Approval and Revision
Many shops lose a tremendous amount of time revising files and sending them out for client approval. Automating these areas will not only save time, but also increase the throughput of your entire shop by getting orders into production faster. This, in turn, will push more capacity back into the art department so more orders can be turned around.
The simplest way to make art approval and revision more efficient is to identify what steps are the same on almost every job and figure out how to turn them into shortcuts. Common examples include setting up artwork onto popular garment backgrounds, adding in job information, and converting the final design into a PDF or JPEG image for an email attachment. The biggest differentiator between an initial art approval and a revision is to clearly, prominently mark every email to eliminate any confusion.
 To automate your art approval process, you can set up a couple of macros in your design software. When one macro button is pushed, it will resize the finished artwork that is selected and put it in the proper position on a virtual garment. Another button would quickly add a job information bar to the bottom of the image, and after customizing this information to your needs, a final macro button would convert the resulting image into an emailable file that can be rapidly sent to the client.
A final consideration is to have swipe files for your email server. These allow you to format standard approval requests into text blocks that are selected and popped into emails in one step so that sending an art approval is a matter of seconds from start to finish.
Automating Art Separations
It’s still common practice for shops to do their separations manually, but some software scripts are available that can produce successful output. Most of the time, these systems rely on separating files for a fixed set of colors that are included in the presets, so there can be issues separating colors that lie outside that range.
A different way to tackle automating the separation process is to break it up into pieces. This allows the artist to make the best use of automation in areas of the design where it makes sense, and adjust other sections manually instead of trying to force commands where they don’t fit.
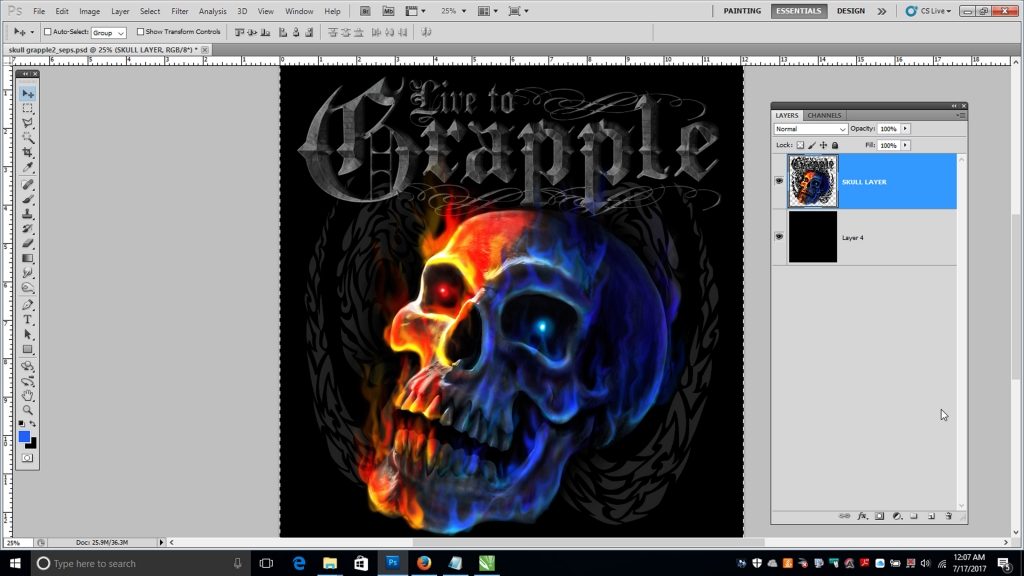
 Before separating any file for screen printing, it’s important to discuss the basics. The main reason to automate separations in the first place is that the artwork is fairly complicated – and it is a bitmap (or Photoshop) file and not a simple vector file that could be rapidly output. The next consideration is that the file should be properly prepared for the separation process. This includes checking the file resolution to make sure it is adequate and removing any background from the active image elements in the file. Making sure the file is prepared correctly will ensure that your scripts will influence the file in the right way, without unexpected outcomes. It’s important to always create a duplicate file in a backup folder prior to running any automated processes, just in case something goes wrong and you need to start over.
In Photoshop, you can program a group of commands by recording them with the Actions palette. Although you can record a lot of commands in a row this way, the process does have limitations and it takes quite a bit of trial and error to create a fully functional and versatile script. Fortunately, the time invested will pay off in a big way over time.
Once the file is prepared, you can then apply different scripts depending on the type of artwork and garment. Here are a few of the most common scripts that can be applied to popular design styles.
 Underbase scripts A good underbase script will place white under any bright, primary colors in the design while leaving any solid black areas out of the screen. It’s good to have different densities available inside this script so you can properly address a black shirt, which requires a little less underbase in neutral tones and darker colors, or a brightly colored shirt like a red or royal blue, where the underbase will need to be very solid so the shirt color doesn’t damage the image hue.
Black outline scripts These define a black outline in the image and create a knocked-out background so that other colors can be trapped by the outline. Obviously, not every image has a strong black outline in it, but when it does, this script can come in handy.
Advertisement Color recipe scripts These scripts are popular separation sets that can be quickly applied to designs that have similar color requirements. Designers would choose the recipe that matches the most prominent colors in a design. It can be particularly useful to have a recipe for flesh tones, metal, wood, bright neons, and different tonal color hues that can be time-consuming to address individually. A lot of shops that use the index separation method use color recipes that are saved as custom color tables, and that enable designs to be split in less than a minute. Depending on how the color table is applied, these scripts can allow the files to be revised quickly as well if a few colors seem a little off.
Tonal color scripts In Photoshop, you can apply a script command to images that are based on the same color family. A good example is an “Old West” sepia tone image that is applied to a wanted poster photograph, turning the design into a bunch of reddish brown shades. This tonal image can be rapidly separated using the color table/index separation method, or using the QuadTone commands. Either of these methods can create a fast separation using a tonal script that is preprogrammed into the software for a specific color blend.
Highlight white scripts These scripts pull a highlight white screen out of an image and save it as an additional color channel. Although this is a simple enough thing to do, it can save 30 seconds to a full minute. Minor savings add up if you’re separating a lot of files.
Four-color process scripts These can be saved versions of four-color process separation commands that you can reuse depending on the type of image that is being separated. You can have one four-color process separation script for a design that has a lot of pastels, and another for art that has a lot of rich primary colors. Some separation experts will also use an expanded gamut process separation script so they can minimize dot gain in lighter colors (for a five- to seven-color process image, for instance).
The key thing to remember whenever you’re attempting to automate your shop, whether you’re addressing art intake, approval, or separation: Learning how to execute a series of commands in one step is a learning process that takes patience. It will yield the best results only after you have practiced using the solution many times on a lot of different artwork. But once these shortcuts are working and in place, the time savings will start to build and can become an enormous benefit.
Let’s Talk About It
Creating a More Diverse and Inclusive Screen Printing Industry
LET’S TALK About It: Part 3 discusses how four screen printers have employed people with disabilities, why you should consider doing the same, the resources that are available, and more. Watch the live webinar, held August 16, moderated by Adrienne Palmer, editor-in-chief, Screen Printing magazine, with panelists Ali Banholzer, Amber Massey, Ryan Moor, and Jed Seifert. The multi-part series is hosted exclusively by ROQ.US and U.N.I.T.E Together. Let’s Talk About It: Part 1 focused on Black, female screen printers and can be watched here; Part 2 focused on the LGBTQ+ community and can be watched here.


Inkcups Announces New CEO and Leadership Restructure

Hope Harbor to Receive Donation from BlueCotton’s 2024 Mary Ruth King Award Recipient

Livin’ the High Life


Bulletins
Get the most important news and business ideas from Screen Printing magazine's news bulletin.

-

 Art, Ad, or Alchemy1 month ago
F&I Printing Is Everywhere!
-

 Case Studies1 month ago
High-Density Inks Help Specialty Printing Take Center Stage
-

 Andy MacDougall1 month ago
Functional and Industrial Printing is EVERYWHERE!
-
 Editor's Note1 week ago
Livin’ the High Life
-

 Columns2 weeks ago
8 Marketing Mistakes Not to Make When Promoting Your Screen Printing Services Online
-

 Thomas Trimingham2 months ago
“Magic” Marketing for Screen Printing Shops
-

 Marshall Atkinson1 week ago
How to Create a Winning Culture in Your Screen-Printing Business
-

 News & Trends1 month ago
What Are ZALPHAS and How Can You Serve Them in Your Print Business?