Garment Printing
Published
15 years agoon
Whether you are new to garment decorating or an experienced printer, it’s critical that you pay some attention to that not-so-simple tool of the trade, the squeegee. Don’t think of the squeegee as merely a strip of polyurethane; instead consider it in a more holistic sense that includes knowledge about material options, squeegee maintenance, and use of the squeegee on press.
Whether you are new to garment decorating or an experienced printer, it’s critical that you pay some attention to that not-so-simple tool of the trade, the squeegee. Don’t think of the squeegee as merely a strip of polyurethane; instead consider it in a more holistic sense that includes knowledge about material options, squeegee maintenance, and use of the squeegee on press.
While I’m not an expert on polyurethane or the squeegee-manufacturing process, I am an experienced printer and owner of a high-volume contract-printing shop that specializes in a range of printing techniques. Our success is based on producing high-quality prints while optimizing press efficiency. Although we put tremendous effort into our prepress and setup procedures, that work is negated if we are not printing with properly selected and well maintained squeegees. Moreover, if our press operators do not understand correct use of the squeegee, all is for naught.
Squeegee selection
The first step is to determine what types of squeegees are most suitable for your operation. The main factors to consider are material types, blade profiles, durometer, and cost.
Material Throughout the history of the squeegee in screen printing, many materials have been used, from natural rubber and neoprene to what is most commonly used today: polyurethane, commonly referred to as urethane. Urethane has become the standard squeegee material for its excellent abrasion resistance, durability, and performance with a wide variety of ink systems. Other factors contributing to urethane’s popularity are the relatively low cost of the material and its widespread availability.
There are different types of urethanes available. The two most common in North America and Europe are Methylenebisdiphenyl Diisocyanate (MDI) and Naphthalene Diisocyanate (NDI). MDI is the more common of the two and generally provides a very good performance/cost benefit. NDI provides the most chemical and abrasion resistance, but it also comes at a higher price than MDI.
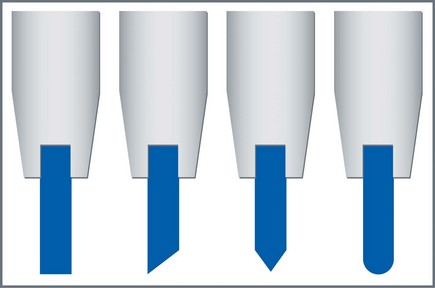
Profile Squeegee profile describes the shape of the squeegee blade. The most common profile in textile screen printing is a straight edge, although many other options are available, such as single bevel, double bevel, bull nose, and others (Figure 1). These other options are widely used in other forms of screen printing but are not commonly used in garment printing, with the exception of a few specialty applications. For textile-printing relevance, all squeegee references in the rest of the article will be focused on the traditional straight or square-edge squeegee profile.
Durometer
Durometer is the measurement of the hardness of polyurethane squeegee material as measured on the Shore A scale. The higher the measurement of durometer the harder the squeegee is. Single-durometer blades consist of a single piece of urethane material at a specific hardness, generally in the 60A-90A durometer range. Dual-durometer blades consist of two layers of urethane of different durometer values, such as 50A/80A. Triple-durometer squeegees are a sandwich of three layers of urethane of different durometer levels, for example 75A/90A/75A. Each of these blade types is depicted in Figure 2.
The single-durometer squeegee is most commonly used in garment decorating. If you have ever purchased a new automatic press, chances are it was shipped with single-durometer squeegees. The main reason for the popularity of single-durometer squeegees is cost, which is typically much lower than for dual or triple durometer blades. This is very unfortunate because the benefits of using dual- or triple-durometer squeegees are many. This is not to say that single-durometer squeegee cannot be used effectively; they are just more difficult to use in terms of controlling deflection as pressure is applied dur-ing printing. Pressure on press can lead to squeegee rollover, which means that as the squeegee is printing it flexes so severely that it no longer shears the ink. Instead, it smashes ink through the mesh as the squeegee hydroplanes over the surface of the screen (Figure 3).
The concept behind the triple-durometer squeegee is that two soft edges with hard backing between help to control deflection as squeegee pressure is added, resulting in optimum ink shear at high stroke speeds. A dual-durometer squee-gee is similar to a triple durometer one in that a very soft edge is supported by a hard backing. I have found the dual-durometer squeegee to be effective and versatile as both sides of the squeegee can be used for different printing applications. But overall, I strongly recommend the use of triple-durometer blades for best results throughout a range of printing applications.
Price
After doing your research and finding the most appropriate type of squeegee for your operation, purchase it at the best price from the most reliable distributor. Controlling costs is critical for all screen printers, but do not base your squeegee selection on price alone. If price is your main consideration for squeegee selection, do not read any further; instead, proceed immediately to your production floor and carefully observe your printing operation. If you are objective, you will no doubt find other areas for cost savings that far outweigh the upfront savings of purchasing squeegees on the cheap.
Before selecting which squeegee type to purchase, I encourage you to consult with different manufacturers on the various products they offer. They should be able to help you assess your printing needs and match a product based on its performance and associated benefits. Remember, the key is to find the most appropriate product for your operation. What may be the most suitable product selection for a high-volume shop with very sophisticated printing equipment may not be the same for a lower volume or manual printer.
Squeegee maintenance
As with all equipment and tools of the trade, proper care and maintenance of your squeegees is imperative. We will start with cleaning.
Cleaning If you do not have a recirculating tank, also known as a parts washer, I strongly suggest investing in one. This device is ideal for cleaning squeegees for several reasons. First, it keeps waste ink from ending up in the trash, where it does not belong. It also can be used with a variety of cleaning solutions. Additionally, parts washers are offered in various sizes, and they can be purchased or leased from a range of suppliers. I recommend leasing one and paying for a supplier service contract. A service contract is beneficial because it can be tailored to meet your needs, it typically puts the machine under warranty, and most importantly, it puts the safe handling and removal of chemicals in the hands of the chemical supplier.
In my shop we use an aqueous solution for squeegee cleaning. It is an eco-friendly, non-flammable, non-hazardous product. I not only feel more comfortable with my employees handling this solution, but I also have found it to be just as effective as harsh solvents. Another benefit is that it is non-abrasive, which helps extend squeegee life.
Operation of a parts washer is simple: squeegees are cleaned using a brush attached to a hose, which lightly sprays chemical through the bristles of the brush (Figure 4). Although operation of the parts washer is simple, it is still critical that the operator be thorough and remove all ink residue.
The results of improper cleaning can be costly. For example, imagine you used a squeegee to print red ink, gave it quick cleaning, and then used it later to print white ink. Residual red ink from the hastily cleaned squeegee will inevitably cause contamination of the white, which you’ll notice as red streaks appearing on your now misprinted shirts. To fix the problem, you’ll have to swap out the squeegee for another or clean it correctly. You’ll also have to dispose of the contaminated ink in press. And you’ll lose valuable production time as you stop the press to deal with the problem.
The point is that you have to think about how thoroughness impacts your costs. If you are the experienced printer reading this article, and you think that this section does not apply to you, think again. More than likely, this scenario occurs on a somewhat regular basis and your employees either don’t understand or don’t care about the impact of this kind of carelessness. Simply put, cleanliness saves time, energy, and money.
Sharpening I cannot stress the importance of owning, and more importantly, regularly using a squeegee sharpener in your facility. I believe that if you own an automatic press (or any press, for that matter) you should also own a squeegee sharpener. If you do not own a squeegee sharpener, take a walk onto your production floor, and watch a job printing on press. Pay attention as the squeegee strokes across the screen. Take a moment to inspect the squeegee side of the screen; do you see a thin layer of ink coating the emulsion? Use your finger to touch the residual ink coating left on the screen, do you see a noticeable amount of ink on your finger? If so, your squeegee requires sharpening. You can also inspect your squeegees by running your thumb across the squeegee blade. If you cannot feel the ridges of your finger print, your squeegee requires sharpening.
Will a dull squeegee still push ink through a screen? Of course it will. The problem is that dull squeegees require excessive pressure during printing and a slower stroke speed to properly shear ink. Excessive squeegee pressure can lead to a multitude of problems, including poor image detail, misregistration, and more. Slower stroke speed generally results in slower overall production, which means you’re not operating efficiently. Properly sharpened squeegees, on the other hand, allow for increased production efficiency and better print quality through minimal squeegee pressure and a faster print stroke.
When it comes to squeegee sharpening, you have two general types of sharpeners from which to choose: grinding-wheel systems and knife-cutting systems. Grinding wheel sharpeners are the most used variety in the screen-printing industry. They operate on the principle of running a grinding wheel spinning at a high speed down the length of the squeegee blades printing edge. This type of machine is widely available in a range of sizes in both manual and automatic models (Figure 5). In contrast, knife-cutting systems use a razor or knife-like blade to cut away a thin strip of the squeegee edge, thus creating a new sharp edge (Figure 6).
There are pros and cons to both methods. Although the grinding-wheel method works quite well, I have found that it requires more operator skill than the razor-cutting method. Finding a compatible grind wheel/squeegee material combination is essential for best results.
I find the razor-cutting method to be simple, quick, and accurate, requiring very little operator skill. In my opinion, it also produces a sharper edge. Additionally, it does not produce the poly urethane dust left behind by the grinding-wheel method. However, knife-cutting systems remove more material during the sharpening process, which may lead to more frequent squeegee replacement. I encourage you to research both methods before making an equipment purchase.
Replacement Inevitably, after your squeegees have gone through enough cycles of cleaning and re-sharpening, the material will have to be replaced due to material degradation and/or material loss. Although squeegee replacement can be expensive, the expense is marginalized when considering the ROI achieved through increased print speeds and image quality.
Squeegee on press
Your squeegee settings on press are crucial and a key part in optimizing press performance. This is where the rubber hits the road (no pun intended) and, ultimately, where your press operators need to be most skilled. Because of the variables from shop to shop, press to press, and the general variables associated with ink, mesh, and substrate, there are no exact answers about what your squeegee settings should be. Rather, there are simple principles that, when followed, will result in better print quality, consistency, and efficiency. These principles include squeegee angle, squeegee pressure, and squeegee stroke.
Squeegee angle Angle adjustments can be made to produce different print results. Generally the idea is that the greater the angle (relative to perpendicular with the screen), the heavier the deposit, and the lower the angle, the thinner the deposit. There is no right or wrong setting here. What you are looking for is the appropriate settings with respect to the substrate, ink, mesh, and squeegee durometer, and the desired print characteristics. What you need to do here is to consider all of the typical variables in your shop and use them to establish a zero point for your squeegee angle. This means the angle at which all of your squeegees will be set before setting up a job.
In my shop, we print with a range of squeegee angles from 5-30° of perpendicular, but most of our jobs fall in the 10-15º range, with an occasional adjustment up or down 5º. Therefore, we have established our zero point as 10°. Establishing a zero point for squeegee angle is a process of trial and error. But once you determine it, document the setting and implement it as part of your standard setup process.
Squeegee pressure Press operators love squeegee pressure. It seems to be the answer for most on-press issues. The reality is that adding squeegee pressure is only a quick fix, rather than a so-lution for a bigger problem. Don’t get me wrong, sometimes adjusting squeegee pressure is the solution. But all too often, it becomes excessive, misused, and printers form the habit of maxing out squeegee pressure.
Excessive squeegee pressure leads to screen breakdown, wear and tear on your press, misregistration, excessive dot gain, poor image detail, and a host of additional problems. The goal is to print with minimal squeegee pressure. To determine your zero point for squeegee pressure, follow these steps;
1. Load an imaged screen (preferably a full size image of approximately 12 x 12 in.) onto your press, and load ink onto the screen. I suggest using your most commonly used all-purpose white plastisol, making sure the ink is thoroughly mixed.
2. Load a new squeegee along with a floodbar into the print carriage. Be sure that your floodbar is adjusted so that it barely makes contact with the mesh. Make sure that the contact is even from side to side.
3. Set your squeegee angle to the zero position you established earlier.
4. Flood the screen and print onto test fabric to lubricate the mesh. Repeat several times, making sure that your screen is flooding properly.
5. Reduce your squeegee pressure to your press’s minimum setting (note: if your press is equipped with both manual and pneumatic squeegee pressure adjustments, set your manual pressure to 75% and leave it there. From here on out, all pressure adjustments should be made through the air pressure regulator, which should be set at zero to start).
6. Select your most commonly printed substrate, preferably in a dark color (you will need several pieces). Load the garment/fabric onto the platen, making sure that the grain of the fabric is perfectly straight.
7. Flood your screen and print. Chances are, your squeegee didn’t even make contact with the screen, which is okay.
8. Increase your pressure by small increments and print after each adjustment. Do this until your squeegee makes contact with the screen, but does not completely clear ink through the mesh.
9. Load a new piece of fabric, increase your pressure by a small increment, flood and print.
10. Repeat this process, using a new piece of fabric for every print. This is most important because you need to make sure that you are printing directly onto the substrate with each print stroke, rather than printing onto wet ink, which will skew your results.
11. Continue this process until you can successfully clear ink through the screen with a single print stroke. Successfully clearing the screen means you can inspect the open area of the mesh and you will not see any ink left in the open area. Likewise, inspect the printed substrate for even and complete ink coverage.
12. Load a new piece of fabric and perform another print cycle, carefully inspecting the squeegee as it is stroked across the screen; you should see very little flex in the squeegee. If there is a dramatic flex creating squeegee roll-over, an angle adjustment is in order and you will need to start over. Again, inspect both the screen and printed substrate. If the results are sufficient, document the squeegee pressure settings and adjust all of the printheads to match.
This is your new zero point for squeegee pressure. Of course, pressure adjustments will need to be made as variables change from job to job or throughout a print run, but now you have a starting point. Make sure that you implement the step of returning squeegee pressure to its zero point as part of every job setup.
Squeegee stroke One of the many benefits of modern automatic presses, specifically those equipped with electric printheads, is the ability to print with a high speed, consistent squeegee stroke. The result in production is faster printing, better quality, and consistent output. The same factors mentioned before must be considered when determining squeegee stroke speed: substrate, ink, mesh, squeegee durometer, and the desired print results. The general idea is to maximize press speeds by running your stroke as fast as possible without compromising image integrity. Faster stroke speeds can translate into better image detail, cleaner lines, and increased opacity with respect to the factors listed above.
It is crucial to determine a zero point for your squeegee stroke speed. Doing so also is a process of trial and error and is relative to the typical factors in your shop and the squeegee settings outlined above. What is most important is that once determined, the settings should be documented and used as part of every job setup.
Unlike angle and pressure, stroke speed is almost guaranteed to adjust from its zero position as the print run proceeds. This is because your zero position will be a relatively slow squeegee stroke speed to ensure that you achieve proper ink shear while your inks are in a high viscosity state. This will adjust upwards as your ink viscosity reduces on press allowing for proper ink shear at a higher stroke speed.
Getting sensible about squeegees
Now that you have taken the time to expand your squeegee consciousness, it’s important to apply this knowledge to your printing operations. Make sure to document your zero points, and then train production staff to use the information correctly. The time you invest in developing a comprehensive understanding of the squeegee will be more than paid back through higher quality and increased productivity.
Have a comment about this article? E-mail it to the editors at screen@stmediagroup.com.
Tom Davenport
Tom Davenport is founder and CEO of the Motion Company, a full-service contract apparel based in Sacramento, CA. With 14 years of industry experience, Davenport has a broad knowledge of nearly every aspect of textile screen printing. He also offers training and consulting and promotes the open sharing of knowledge and information throughout the industry. Davenport is an active member of SGIA and other industry organizations. He can be reached at tom@motioncompany.com.


Subscribe

Magazine
Get the most important news
and business ideas from Screenprinting Magazine.
Most Popular
-

 Case Studies2 months ago
High-Density Inks Help Specialty Printing Take Center Stage
-

 Art, Ad, or Alchemy2 months ago
F&I Printing Is Everywhere!
-

 Andy MacDougall2 months ago
Functional and Industrial Printing is EVERYWHERE!
-

 Columns3 weeks ago
8 Marketing Mistakes Not to Make When Promoting Your Screen Printing Services Online
-

 Editor's Note2 weeks ago
Livin’ the High Life
-

 Thomas Trimingham2 months ago
“Magic” Marketing for Screen Printing Shops
-

 Marshall Atkinson2 weeks ago
How to Create a Winning Culture in Your Screen-Printing Business
-

 News & Trends1 month ago
What Are ZALPHAS and How Can You Serve Them in Your Print Business?