Prepress & Screen Making
Published
21 years agoon
Frequently, you face situations in which moiré is impossible to manage. One example is when an original image contains subject matter that generates moiré on its own. Some examples of moiré-generating images include mini-blind window coverings, wicker furniture, highly textured fabrics, screen doors, window screens, roof shingles or tiles, chain-link or picket fencing, and other images that include small, regular patterns. When a design includes such images, the bulk of the print might be moiré free, but in these image areas, the moiré is a disaster.
Frequently, you face situations in which moiré is impossible to manage. One example is when an original image contains subject matter that generates moiré on its own. Some examples of moiré-generating images include mini-blind window coverings, wicker furniture, highly textured fabrics, screen doors, window screens, roof shingles or tiles, chain-link or picket fencing, and other images that include small, regular patterns. When a design includes such images, the bulk of the print might be moiré free, but in these image areas, the moiré is a disaster. This month, I would like to share a fix for specific moiré issues of this nature, a solution that you can easily accomplish in Photoshop.
Moiré is nothing more that a repetitive interference pattern that occurs over a specific period or distance. In other words, moiré occurs when regular patterns are disrupted in a repetitive manner. The human eye picks up the repetition and perceives the variation as lines, bands, waves, or checkerboard patterns. You can almost plan to have moiré problems with subject matter containing a regular pattern that will be reproduced as a halftone image. The typical remedy is to change halftone frequency, angles, or both. But too often, this solution is of no avail because the regularity of the pattern is just too great to overcome.
Another common fix is to change the halftone type from conventional to stochastic. This may be a good solution, but printers often become trapped with the added grain and surface disruption that results. For example, if you were trying to eliminate the moiré in an automobile grille area, you would be able to cancel the pattern, but at the expense of the tonal smoothness of the painted finish of the car. You simply trade one problem for another.
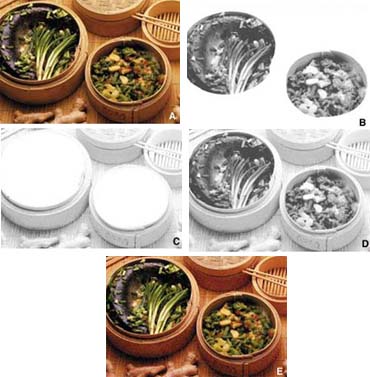
The solution presented here is the best of both worlds. The technique that I’ll outline will allow you to combine conventional halftones with stochastic halftones in the same screen. Combining those two halftone types is relatively easy to do, and can be done by just about any competent prepress technician. Here are the steps you’ll need to follow in order to make both halftone types work together Figures 1A through 1E show the effects of this process on a sample image:
1. Begin by making CMYK separations as normal.
2. Rename the original file as [<I>File-name</I>] <I>Wkg</I> to indicate that you will be conducting operations on a copy of the original file.
3. Duplicate each channel in the Wkg file. You will now have eight channels: CMYK plus copies of each channel.
4. Use the Selection tool in Photoshop to contain the problem area.
5. Save the selection.
6. With the selection loaded, delete the selected area from each of the CMYK channels. The deletion will leave a hole in the original CMYK channels where the problem area was located. Make sure that the background is set to white with an RGB value of 255,255,255.
7. Activate the copied channels so that they are visible (highlighted in the Channel pallet).
8. Load the selection (>Selection >Load Selection) and make sure the Invert box is checked.
9. Delete the background from the copied channels. The deletion will leave you with only the problem area in the copied channels–the opposite of what appears in the original CMYK channels.
10. Go to the Channels pallet and click on the disclosure triangle in the upper right corner of the pallet. Go to Split Channels. This will split the document into eight new, grayscale documents that can be addressed individually.
11. Apply whatever dot-gain correction you would normally add at this point to each of the copy channels (cyan copy, magenta copy, etc.). This is very important because you will not be able to accurately correct for dot gain after you apply the pseudostochastic effect that follows.
12. The first channel to work with is the cyan copy. Convert the cyan copy file under >Image>Mode> Bitmap. Choose a resolution around 240 and make sure that the method is set to Diffusion Dither. This will convert the grayscale information into a pseudostochastic bitmap file.
13. Repeat this process for each of the remaining copy channels (magenta, yellow, and black.)
14. When you have finished, select >Image>Mode>Grayscale for each of these channels. This step converts the bitmap back to a grayscale, even though there are no grayscale values in the image–only black and white.
15. Now the fun begins! You will use channel calculations to merge the two different channels into a new document. Go to >Image>Calculations. Select the original cyan channel with the problem area deleted as Source 1. Select the cyan copy channel as Source 2. Choose Blending method as "Multiply" with Opacity set at 100%. Put the result into a new document called [Filename] Fnl. This sequence marries the normal grayscale of the cyan channel with the pseudostochastic grayscale of the problem area into a new document.
16. Repeat these steps for magenta, yellow, and black, in that order. Following this specific sequence is crucial.
17. You will now convert this hybrid grayscale image into a new CMYK file using the following sequence: >Image> Mode>CMYK Color.
18. The final step is to output this document through your RIP as you normally would. No halftoning will take place in the altered areas because the pseudostochastic areas are only black and white. Conventional halftoning will occur in the grayscale areas of the original CMYK channels. The final film will show both conventional and stochastic halftones.
Making moiré go away
Combining traditional and stochastic halftones is a great technique for areas that have naturally occurring moiré. The method can also be used to greatly increase the apparent visual acuity of fine detail–images of leaves or grass, for example. When the image is printed, you will have the benefit of fine, moiré-free detail in the problem areas and smooth, continuous tones that are free from excess grain in the smooth portions of the image.


Subscribe

Magazine
Get the most important news
and business ideas from Screenprinting Magazine.
Most Popular
-

 Art, Ad, or Alchemy1 month ago
F&I Printing Is Everywhere!
-

 Case Studies1 month ago
High-Density Inks Help Specialty Printing Take Center Stage
-

 Andy MacDougall1 month ago
Functional and Industrial Printing is EVERYWHERE!
-

 Columns2 weeks ago
8 Marketing Mistakes Not to Make When Promoting Your Screen Printing Services Online
-

 Editor's Note2 weeks ago
Livin’ the High Life
-

 Thomas Trimingham2 months ago
“Magic” Marketing for Screen Printing Shops
-

 Marshall Atkinson2 weeks ago
How to Create a Winning Culture in Your Screen-Printing Business
-

 News & Trends1 month ago
What Are ZALPHAS and How Can You Serve Them in Your Print Business?