Articles
Published
10 years agoon
We all get caught in the grind of pushing orders through our businesses, and the quality of what we produce can be lost in the shuffle. Since improving a shop’s quality requires more than just a quick attempt, most avoid it and continue to churn out product at the same level.
We all get caught in the grind of pushing orders through our businesses, and the quality of what we produce can be lost in the shuffle. Since improving a shop’s quality requires more than just a quick attempt, most avoid it and continue to churn out product at the same level.
Yet, at the top end of the food chain, a few select companies are willing to go farther, creating prints that other companies struggle to produce and eventually claiming larger accounts whose business they earn through their quality. One of the big differentiators between the most innovative shops and the ones caught in the daily grind is the ability to print excellent halftones. By learning to print better-quality dots, these shops have created a higher level of trust with clients, positioning themselves to win more complex (and more profitable) orders.
Your shop can do this too. If you take a pause from pushing orders through the system and focus on your print quality, you can separate yourself from what your competitors are capable of doing and take your business to the next level.
Motivating a production staff to change and improve their processes can be difficult. It’s easier when you draw a clear connection between quality and profits, and illustrate how producing better prints will make more money for everyone. Once a company begins an initiative such as this, a variety of tools can be used to help monitor and encourage the progress—providing details of scrap percentages with charts in monthly meetings, for example, or using bonus plans for achieving certain production challenges each month. The end goal is to encourage each member of the printing team to take ownership of the plan to improve quality and look for ways to help make it happen.
In this article, I’ve identified eight ways that improving the quality of your halftone printing will make your company more profitable. Not every idea will apply to your company, but hopefully the relevant concepts will help you start discussions with your staff on why improving halftone quality is a worthwhile goal and how to go about doing it.
1. Better art approval will reduce your rejects.
Typically, printers will send clients a digital mock-up of what the printed garment will look like. Any halftone areas in the image will appear solid or very smooth due to the software and the high resolution of the monitor, so what the client sees on screen won’t be representative of the final product. The more jobs you print in a day, the more money you’ll save by standardizing the way halftones are handled in your art-approval process.
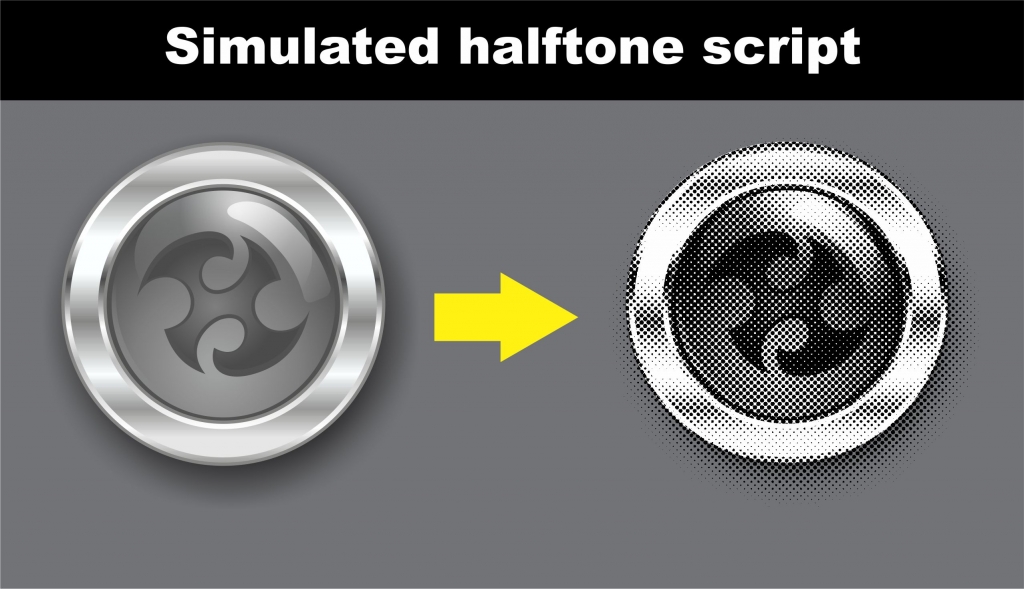
You can give the client a far clearer idea of what the design will look like on the garment using a simple script in your graphic-design software to simulate halftones. Obviously, your digital proof won’t be an exact replica, but using a real halftone pattern of approximately the same size as the dots in the production artwork can avoid a big issue later. You’ll avoid any surprises when the client sees the final shirts and wasn’t expecting the halftones to be noticeable or to affect the edges of the designs they supplied.
This extra step will also improve the sales dialog with your clients and help you suggest possible changes to the art that will make the design look better. You’ll also be able to build a higher level of trust in your online communications with your clients if you’re able to show them a more realistic representation of how a design will look on the printed shirt.
Note that this technique isn’t recommended for four-color process or simulated process jobs. Digital proofs can’t reliably predict complicated ink interactions and blends.
2. You’ll get big savings by reviewing film positives.
It all begins with the artwork. The halftone dots you print cannot be any better than the ones you start with on your positives. The first step to improving the quality of your printed halftones is to check the output from the computer that produces the positives. (Remember that for shops using computer-to-screen systems, the “positive” is the ink or wax that has been sprayed onto the emulsion-coated screen, and not a separate sheet of film, vellum, or other transparent material that is imaged separately and then placed on the screen during exposure to create the stencil.)
One of the barriers to producing good halftones is assuming that the so long as the software and printer appear to be functioning properly, the dots will be of a high quality. The truth is that many companies had better-quality positives years ago using imagesetters (or process cameras before that) than they currently do. Modern positives are often created through inkjet heads that spray an image onto a coated film or directly onto the screen. This means that the bigger dots we need for the screen-printing process are made up of jetted, smaller dots.
It’s important to understand the true image resolution of computer-to-screen machines and inkjet printers. Sometimes, the numbers in manuals are confusing or based on a software manipulation that doesn’t give the accurate number of dots per inch. The critical information to understand is what resolution is actually imaged onto the positive, not what the manufacturer claims is an apparent or simulated resolution. You should ask, “What is the size of the inkjet dots and how many of them are used to create my halftone dots?” The truth about the quality of a printer’s output can always be determined by viewing the printed dots under magnification.
The film may look perfect to the naked eye, but with even a small amount of magnification (10x or 20x), the dots can tell a different story. Fixing dots that aren’t printing well can be a challenge, but it’s important to know you have an issue in the first place. Sometimes the software isn’t working well with the RIP and the dots will have pixilated edges. Other times, the print head will be nearing the end of its life and the spray will be scattered, ruining the halftone edge quality. With film and vellum, the surface of the material may cause the dot edges to bleed or make the ink too transparent.
In order to create a halftone dot with great edge quality, an inkjet print head must be the right distance from the media and it must deliver a sufficient ink volume to produce an opaque image. The media must have the right absorption characteristics, and the software must be calibrated for the printer’s output. If you notice that your system isn’t doing a great job under minimal magnification, then your final halftone printing will likely exhibit some or all of these flaws:
1. Excessive dot gain, especially in dark shadows and highlights.
2. Unpredictable color shifts in simulated process and four-color process printing.
3. Tonal compression (the loss of small dots below 8% and merging of dots above 85%).
4. The need to use higher squeegee pressure to compensate for dot gain and poor printing consistency.
5. Continual art “adjustments” to modify halftones that gain too much on press.
The good news is that if you can fix your printer to create a quality dot under magnification, then you can avoid all five of these issues and many others not mentioned. (If you can’t, then you need to consider upgrading your imaging system.)
The key to achieving and, more importantly, maintaining the quality of your halftones is to establish a system to check them. If this one extra step saves a lot of film and screen revisions, then this alone will score a big win for your company.
So how does producing a high-quality dot on your positives save you money?
• When your printer is working correctly, you will use significantly less film and ink than shops that continually have issues with theirs.
• The added control of starting with a clean dot will allow you to print with the correct squeegee pressure, leading to fewer scrap shirts at the beginning and end of a longer print run because the prints won’t vary in quality.
• Screens will wash out easier, expose faster, and require less tweaking in order to maintain shadows and highlights. You won’t have to remake screens as often, saving labor and materials.
• You’ll have far less press downtime dealing with printed halftones that just don’t look right.
3. You’ll reduce costs by more closely inspecting your screens.
Once your printer or CTS system is working well and producing good-quality halftone dots, the next place is to look is screenmaking and screen exposure. By examining your screens carefully, you can catch additional flaws that will detract from your ability to recreate the halftone dots in the positive.
Three screenmaking steps are critical to successful halftone printing:
1. Inspect the mesh surface before coating the screen.
2. Check the emulsion surface before exposing the screen.
3. Look closely (under magnification) at the dots in the stencil after washing out the screen.
Regarding mesh, the biggest thing is having a well-tensioned screen that is clean and free of ghost holes. De-hazing the mesh will save you money because you won’t waste time and materials coating and exposing a screen that will not hold details well, forcing you to start over with a different screen. If you don’t use retensionable frames, it’s a good idea to mark specific screens that you know are well tensioned for your detailed halftone work and keep them separate from the ones that are more worn.
The emulsion surface of the coated screen must be smooth and of the correct thickness with no smears, lines, or drips. If the screens aren’t coated well, you may have trouble washing out the small dots in the halftone after the screen has been exposed. Improper coating can also cause the screen to break down during printing, with ink pushing through areas of the screen where it isn’t supposed to be. If you catch these mistakes before continuing, you won’t need to replace screens later in the prepress process or, worse, after the job has begun.
After exposure and washout, make sure that you’re produced a high-quality stencil by inspecting the edge of the dots one final time with a loupe and making sure that the stencil hasn’t been under- or overexposed. If everything looks good, you’re ready to set up the presses.
4. You’ll improve your quality and reduce waste by using screen tests.
A simple step to improving your halftone printing on a consistent basis is to include a gradient strip of halftone just outside the printed image on all of the screens. Although this will require more work in taping off the screen, it can be an invaluable test for press approvals because you will know right away if you have a problem. If the test strip doesn’t look good, then you can’t expect the halftones in the actual image to look good either.
The savings from screen tests comes through using them consistently. Even the best printers will have a screen come out badly now and again. Screen tests allow you to catch these occasional blips before you begin printing shirts that will have to be scrapped. You can also do test prints during the run if you’re concerned the colors may be shifting to see exactly what is happening with dot gain.
5. You can reduce screen and ink costs by simplifying jobs.
One simple point of savings to consider: If you know how to print a halftone well, you may be able to simplify the artwork and reduce the number of screens and colors without detracting from what the client wants the finished garment to look like. For example, you can create a wide variety of shades on a colored garment by breaking one image into dots of varying size and printing them in different values with just one screen. Using this concept can save money for you and your client, and make jobs go through the shop faster.
6. You’ll generate less scrap.
Scrap is the dirty little secret that printers avoid dealing with until the end of the year or inventory day. You can usually tell when printers don’t look closely at their positives or screens because they have a lot of misprinted shirts stuffed in boxes that they use as they set up their presses.
Taking the time to make sure you have quality screens and positives will trickle down to fewer mistakes on press. This can save you a lot of money, not just through the cost of the scrap garments, but also the production time of stopping the job, setting it up again, ordering and handling the replacement garments, and more.
Maintaining print quality over a longer halftone run can be a challenge because you must control a lot of variables to maintain consistency and efficiency. The goal is to use the least amount of ink you can to get a great print. Over a long run, excess ink will not always flash cure properly and if uncured ink is picked up by subsequent screens, the color will eventually shift. You can add extra flashes to help prevent this, but this can cause additional problems as heat builds up in the platens. The more experience you have running high-volume halftone jobs, the better your instincts will be on whether a design will print well or needs to be adjusted to avoid a lot of production problems.
7. Learning to print halftones well will make all your prints better.
This isn’t talked about often, but a nice by-product of learning to print halftones is that the same high-quality procedures you put in place will make your entire shop more efficient, cleaner, and more profitable. Your employees will become more detail-oriented and catch issues in the film, screenmaking, and press-check stages. Even when an order doesn’t have halftones, press operators and screen department workers will catch bad results more often. Jobs that involve small type, fine lines, and sharp details will have less scrap and fewer screen revisions. That means additional savings for you.
8. You’ll be able to compete for bigger, more profitable orders.
The proof of better quality is in the printing, and so are the profits. There is no better sales tool in screen printing than an amazing looking, high-end print that has excellent detail and great halftones. If a prospect is concerned about your company’s ability to handle its work (perhaps because its last printer wasn’t able to) and you send them an example of a great print, very little needs to be discussed after that. Great prints create opportunities for more business from all levels of customers and are a clear representation that you are not just another screen printer.
Shops that have mastered the halftone-printing process can easily engineer and print higher-level designs, enabling them to solicit bigger clients that request these types of products. The profit margin for this type of work is higher, and the clients expect and value quality results. They place larger orders, appreciate good service, and tend to be more loyal. Ultimately, you’ll be seen as a top-end printer that isn’t selling a commodity and can charge higher prices and work with better clients.
Thomas Trimingham has worked in screen printing for more than 21 years as an industry consultant, freelance artist, and high-end separator. He is an award-winning illustrator, designer, and author of more than 110 articles on screen printing art and separations. For more information, visit www.screenprintingartist.com.


Subscribe

Magazine
Get the most important news
and business ideas from Screenprinting Magazine.
Most Popular
-

 Art, Ad, or Alchemy1 month ago
F&I Printing Is Everywhere!
-

 Case Studies1 month ago
High-Density Inks Help Specialty Printing Take Center Stage
-

 Andy MacDougall1 month ago
Functional and Industrial Printing is EVERYWHERE!
-

 Columns2 weeks ago
8 Marketing Mistakes Not to Make When Promoting Your Screen Printing Services Online
-

 Editor's Note2 weeks ago
Livin’ the High Life
-

 Marshall Atkinson2 weeks ago
How to Create a Winning Culture in Your Screen-Printing Business
-

 Thomas Trimingham2 months ago
“Magic” Marketing for Screen Printing Shops
-

 News & Trends1 month ago
What Are ZALPHAS and How Can You Serve Them in Your Print Business?