Thomas Trimingham
Four Dye Sublimation Tricks to Brighten and Improve Quality
WITH THE INJECTION of performance fabrics and garments being developed for many niche markets, the demand for innovative ways to decorate them has drastically increased. Enter dye sublimation printing. The beautiful thing about this process is the lack of any “print feel” to the garment. Because it takes a white fiber and dyes it through heat and pressure, there’s no residual ink on the surface to create a texture or to block airflow. Many sport teams have moved toward sublimated apparel for training gear and uniforms because the garment retains all of the dry-wicking properties that an undecorated garment would, plus it’s a lot more colorful.
To create a sublimated product is a relatively simple process:
- The artwork is adjusted and sized in the computer for printing.
- The design is then printed as a mirror image onto a sublimation paper using an inkjet printer that has been loaded with sublimation inks.
- These inks are then trapped into the coating on the paper.
- Next, the paper with the sublimation print is aligned with the product area that is to be decorated. In the case of a garment, the shirt is either printed as pieces of fabric prior to being sewn together, or the print is applied to a finished T-shirt.
- If the garment is being decorated prior to being sewn, it’s likely a much larger image and print will be used. As a result, a much larger heat press will be needed to create the fabric piece for the front and back of the shirt. Often the sleeves are done at the same time to save steps.
- The aligned garment and print are then heat pressed at the right temperature and pressure to convert the solid ink on the coated paper into a gas that can penetrate the fabric fibers.
- Once the heat press is finished, the paper is peeled off of the fabric or garment and the print is ready to wear. (In some cases, a sublimated print may require additional heat or steps to properly “set” the dye so it doesn’t come out in the wash).
This process is almost always done on a polyester garment because it’s the best fabric for absorbing the dye into the fibers. There are some garments that have a cotton base with a polyester coating or poly fibers woven into the cotton to give printers additional options, but the optimal surface to sublimate is one that will completely accept the process of dyeing from the ink as it turns into a gas.
Assuming you’re comfortable with the basics of the process, and you have a clear idea of what types of garments you can do, it’s beneficial to consider a few quick tips to make your prints as good as they can be: learning the color progression of sublimation, adjusting your design comps to fit the products, using the nature of sublimation in your designs, and understanding outsourcing vs printing in-house.
Learning the Color Progression of Sublimation
For printers who may be first venturing into sublimation, it’s crucially important to understand how color is adjusted during the dying process. When color is absorbed through the fibers, there’s always a tendency for additional saturation and other color shifts to occur. A slight variation in the brightness of the fabric that will be sublimated can influence the final product, too. The fact is, white is almost never a balanced white. The white in a fabric will tend to be slightly blue or magenta or even green. The slight tint to your white surface can show up in a subtle sublimation print and make your lighter colors shift slightly in accordance to their tendency.
This is why sublimation prints are often intentionally brighter and created with richer colors as these will show less variation in subtle ways after the process is done. The key is to spend some time and properly profile your process all the way through, prior to doing a production run. Often a printer will not want to spend the time and money to do this because sublimation inks are not cheap, but creating a color profile can save enormous headaches if it’s done well and be used as a standard for a process baseline to compare against.
AdvertisementIf you’re going to do a sublimated print on a garment, get a sample of the product or the fabric to test. You can then do a sublimated profile and see what happens to the colors after they’ve been applied to the fabric. Once you have this reference, you can go back and adjust your RIP if you need to make some curves for that specific item. A good RIP for a sublimated printer should allow you to save recipes for different types of fabrics and coatings so you can have a streamlined process for a later production run. You may find you have to adjust your colors or dial back on your black to keep the design from becoming too heavy looking and over-saturated.
Note: Most companies that sell sublimated equipment, inks, and printers have color profiling processes they recommend. It’s always a good idea to use these processes first and then you can adjust if needed after you become more comfortable. Reverse engineering a print to RIP is a last resort and only used for occasional images that are very troublesome and hard to match.
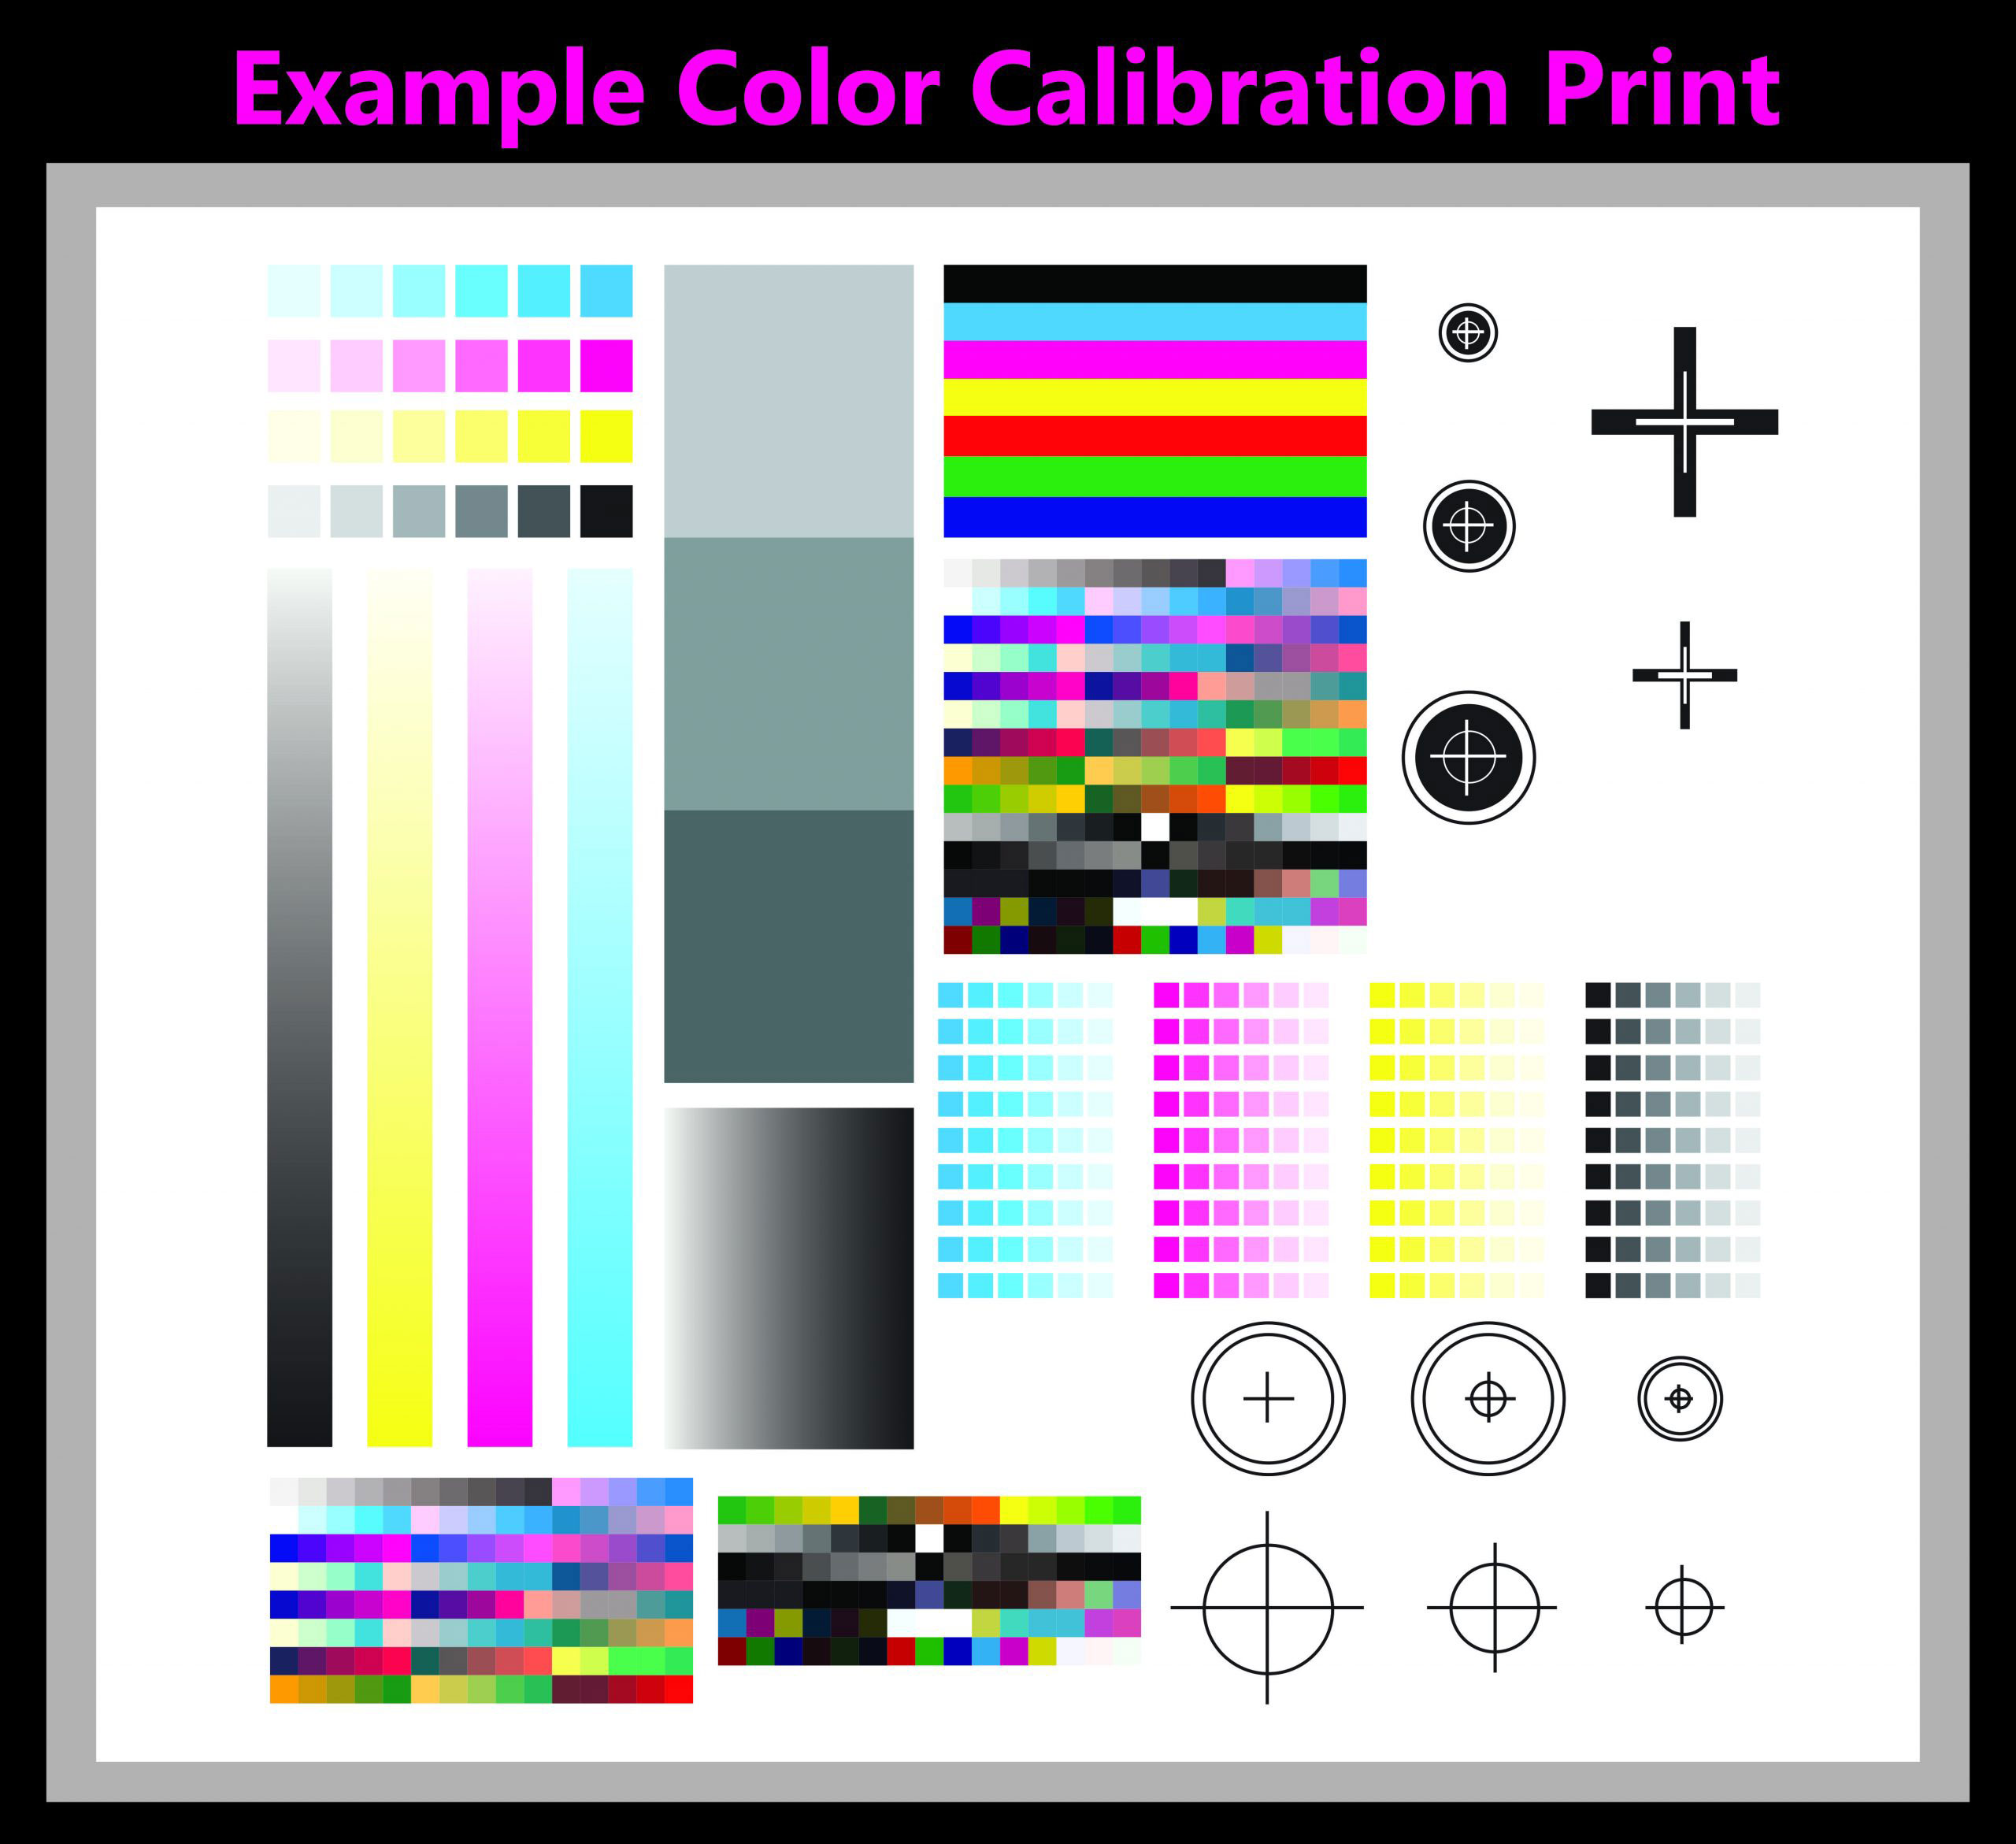
The majority of less expensive printers for sublimation are CMYK printers, so it’s important you know how to adjust images for CMYK and what the process of conversion will do to an oversaturated RGB image when it’s converted to the smaller gamut. Not only will a color conversion occasionally shift the hues on your colors, the resulting files may come out with unpleasant “color pollution” in your CMYK. In some cases, your royal blue will have significant yellow or black in it and your bright red may have cyan in it. These issues can make your final print appear dull or “bleedy,” so knowing how to correct them in RGB prior to conversion can be a useful step. Having a printed reference of a CMYK output on the specific intended fabric (see Figure 1) has helped me. When you have a printed resource of the output from your sublimated process, you can head off potential problems at the digital file stage, rather than waiting to see them on a printed piece. If you have a bright royal blue to print on a garment, you can reference the brightest royal blue on your example print, and then find the CMYK value on the digital source file (something like 100 cyan, 80 magenta). You can take these percentages and replace the color in your new art file to make sure you have the best possible outcome on the print. If nothing else, walking through this process will make you familiar with optimal color percentages for your brighter colors so you can catch a serious color shift and avoid a bad print on a finished garment.
Adjusting Your Design Comps to Fit the Garment
The exciting part of creating artwork for pre-constructed garments is there are less limitations on the type of designs and layouts you do. You can freely go off of the edges of the print areas because when the garment is constructed it will be cut down and sewn together. When I started looking at rash guards and other compression gear, concerns to designing for these types of garments became quickly apparent.
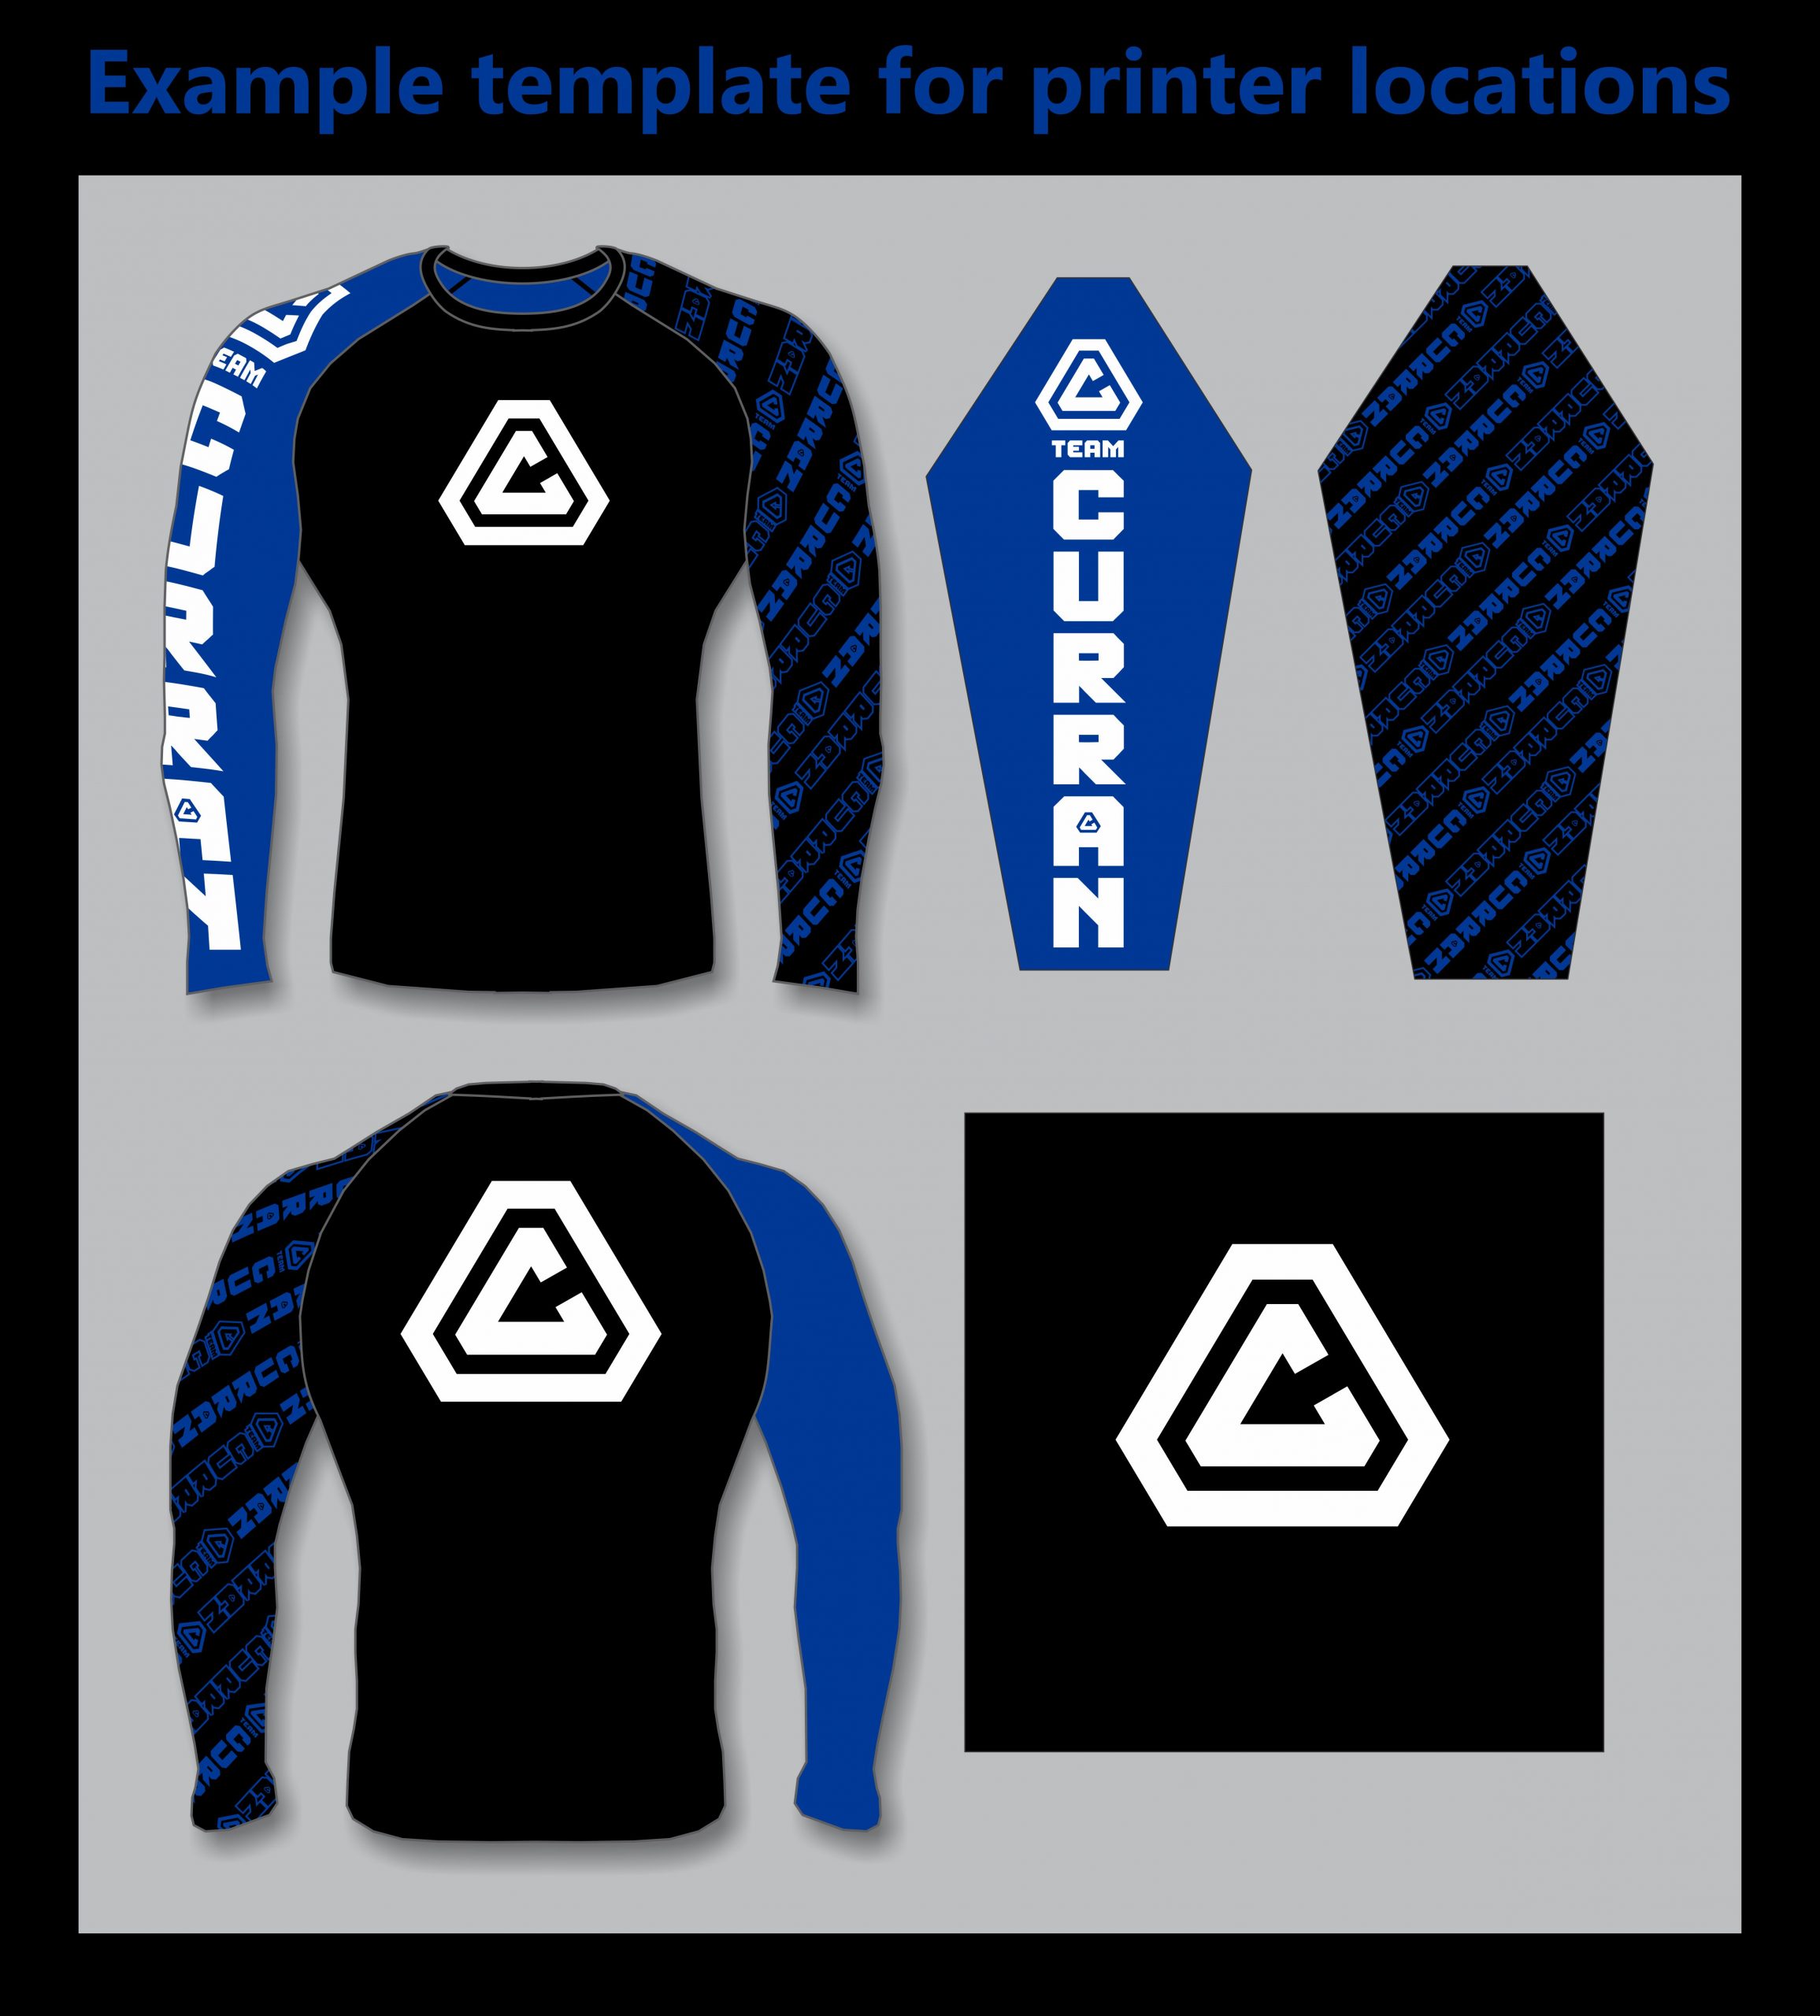
One of the biggest challenges I encountered was trying to figure out how the design was going to conform to the finished garment. Because I was creating artwork for rash guard shirts and pants, these items would be sublimated as fabric pieces prior to construction, but this also meant I couldn’t be entirely sure how the design would wrap around the torso and limbs. To avoid a bad prototype and multiple revisions, I worked with the company and requested an exact pattern to map my design to the fabric shapes for the sleeves and the main shirt areas (see Figure 2). Doing this certainly helped, but I still didn’t know how the design would look when it was curved over someone’s body.
The best way to check and adjust your designs for mapping them onto a body is to have 3D software that maps the design onto an actual body shape. If you don’t have this technology available, the next best thing is to get the most common size that will be ordered as a blank and find someone to put it on for you. When you have your model who’s wearing the garment you can map some paper or fabric prints of your design onto the shapes to check the sizing.
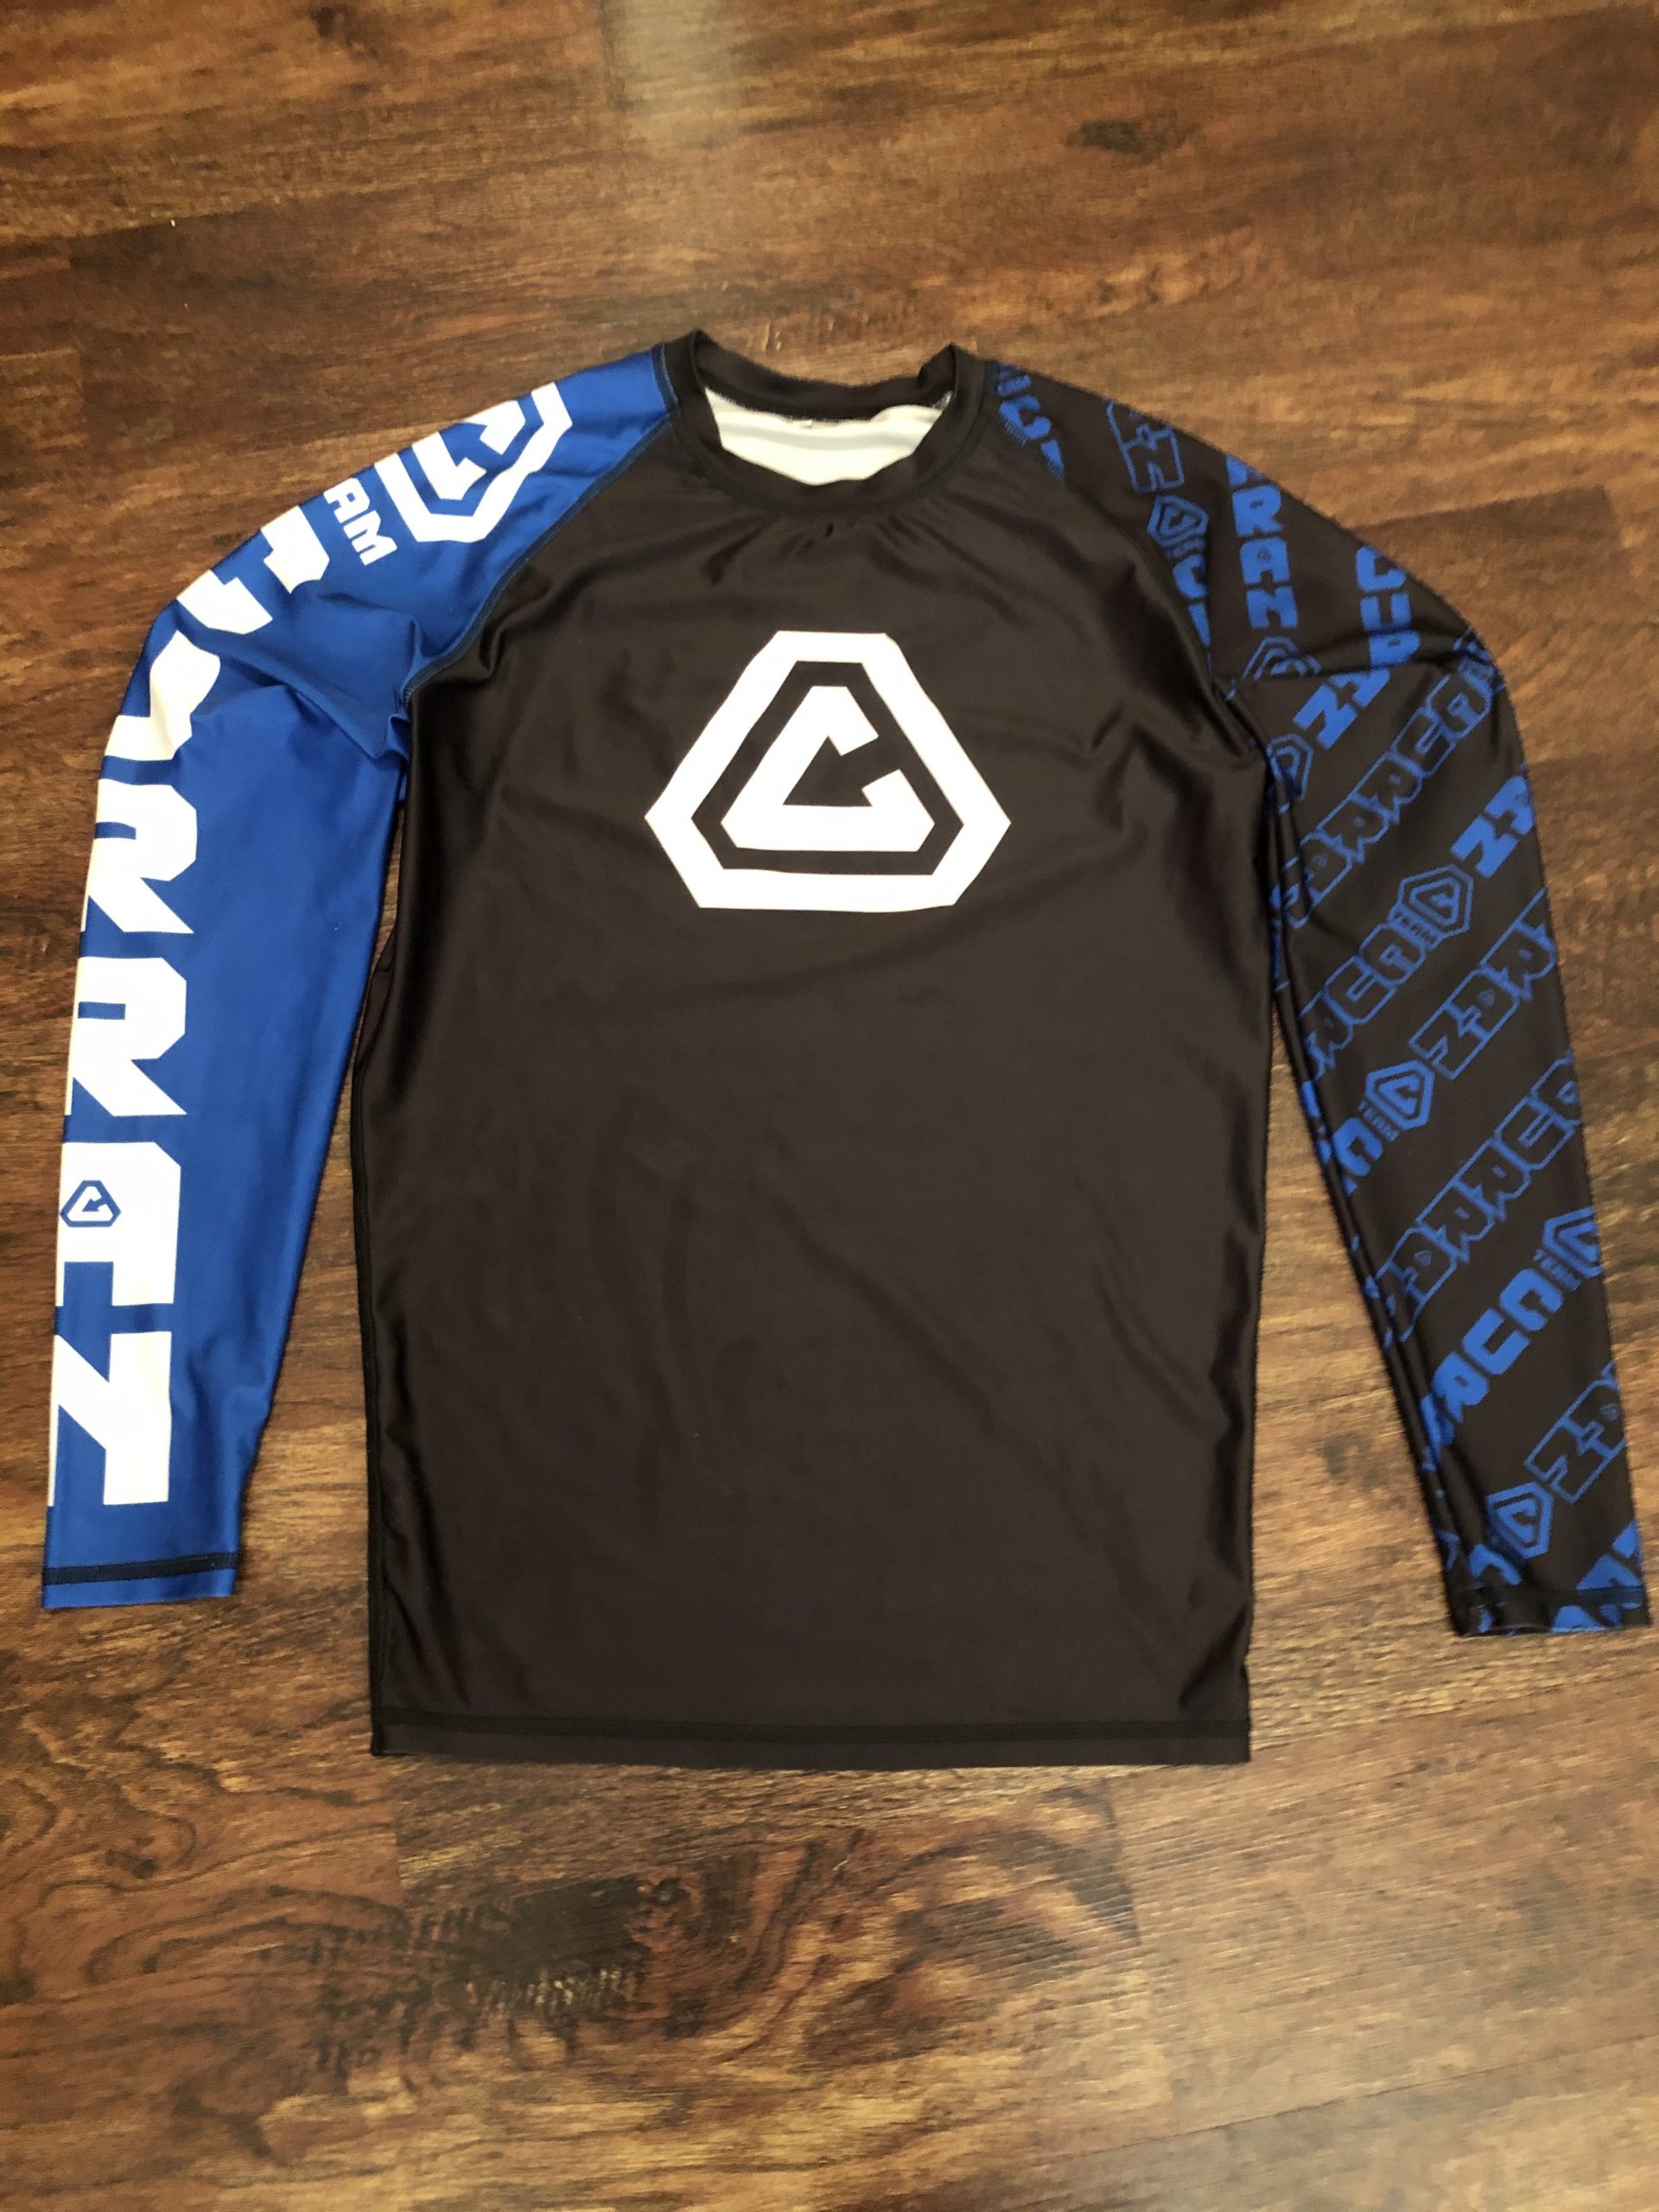
This “real person” check for sublimation designing is very important if you have logos that need to be legible on specific areas of the garment. You’ll know right away if your logo will fall too low on the chest and become distorted or wrap around the arm and become unreadable. This could cause a client to return an order for a logoed garment, so it’s critical to properly size and accommodate the distortion and sizing/positioning of design elements that need to be legible. Another really important step is to measure from a fixed point that will stay similar, independent of the shirt size, like the color or seam on the shoulder. You can then describe the necessary location of the printed elements to your sublimation printer or keep it for your records so the next order will match the first one. If possible, also keep a finished garment for a reference (see Figure 3).
If you’re printing sublimation on a finished garment it’s a good idea to understand the sizing spread of the order and make sure to accommodate the differences to the output. You wouldn’t want the logo to fall off the sides of a smaller garment or to look too small on a XXL, so you’ll have to properly account for the differences and/or make sure you output different size prints if necessary.
Using the Nature of Sublimation in Your Designs
This tip can sound a little abstract, but essentially it means as you design for the sublimation process it’s helpful to consider how the properties of the method will affect a design’s final appearance. Because it’s common for a sublimated shirt to be created prior to being constructed, it’s often a great idea to use repeating or random patterns in your design comps to avoid awkward outcomes depending on how the art will cut across the seams of the shirt (see Figure 4).
Advertisement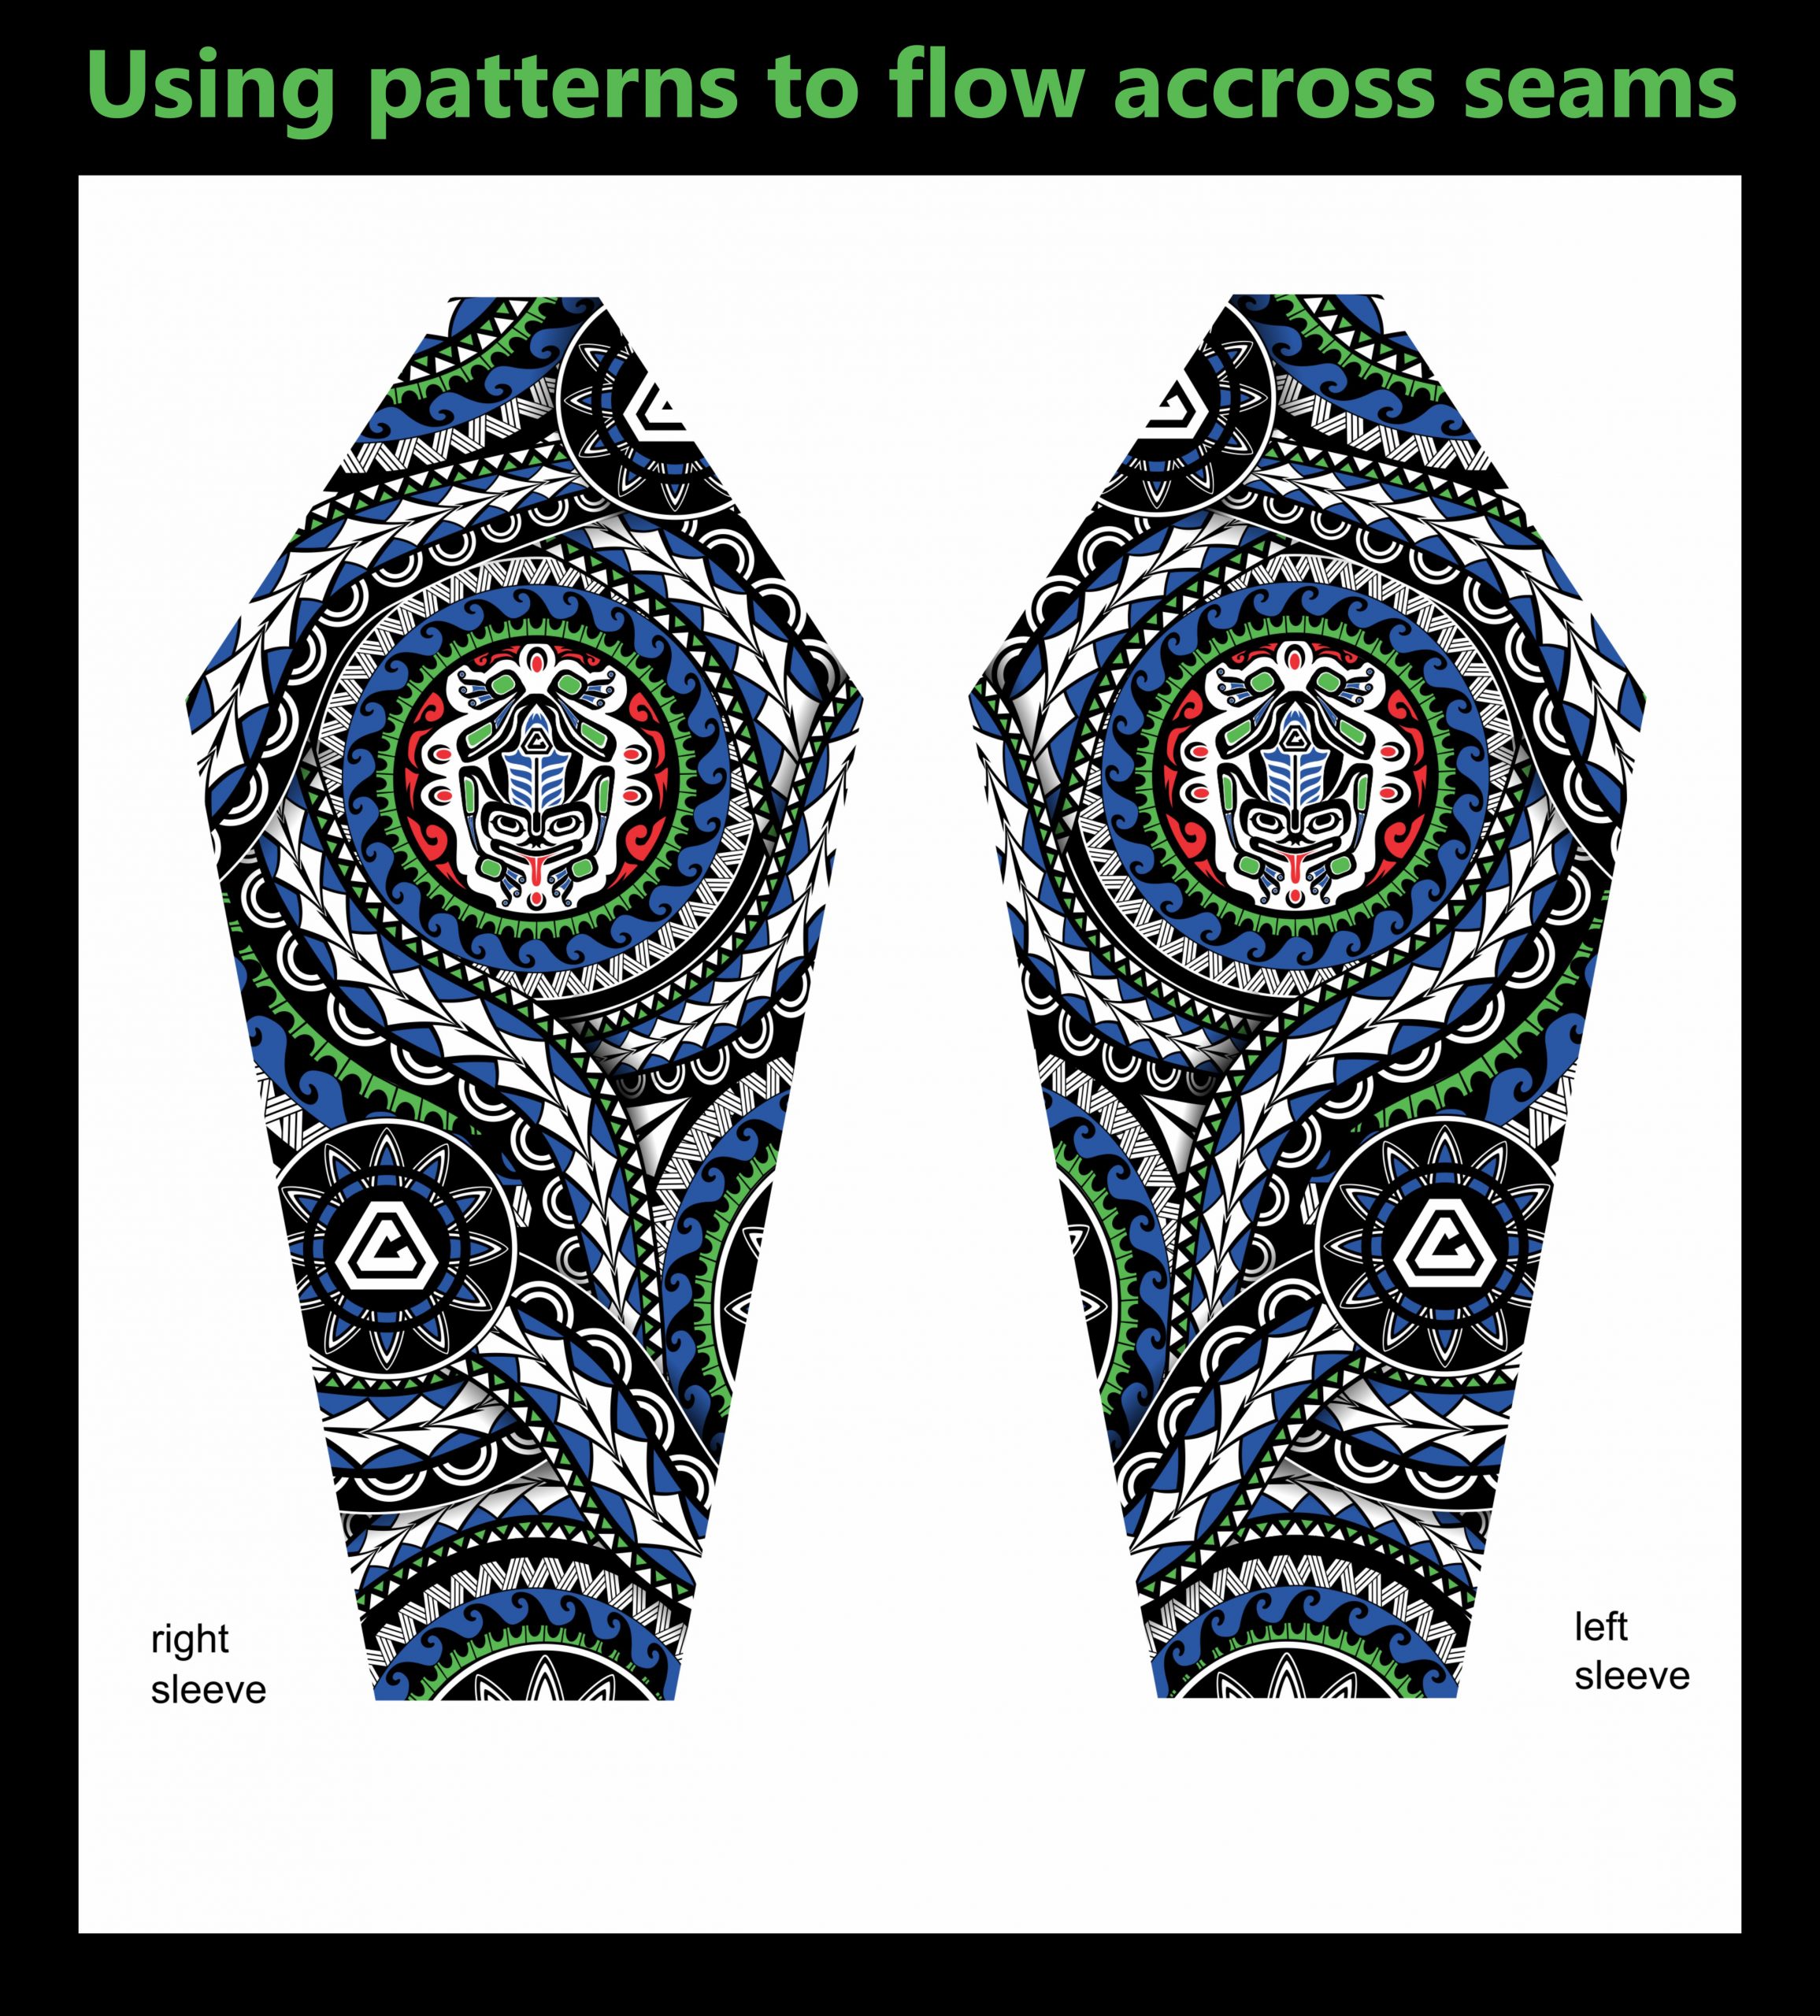
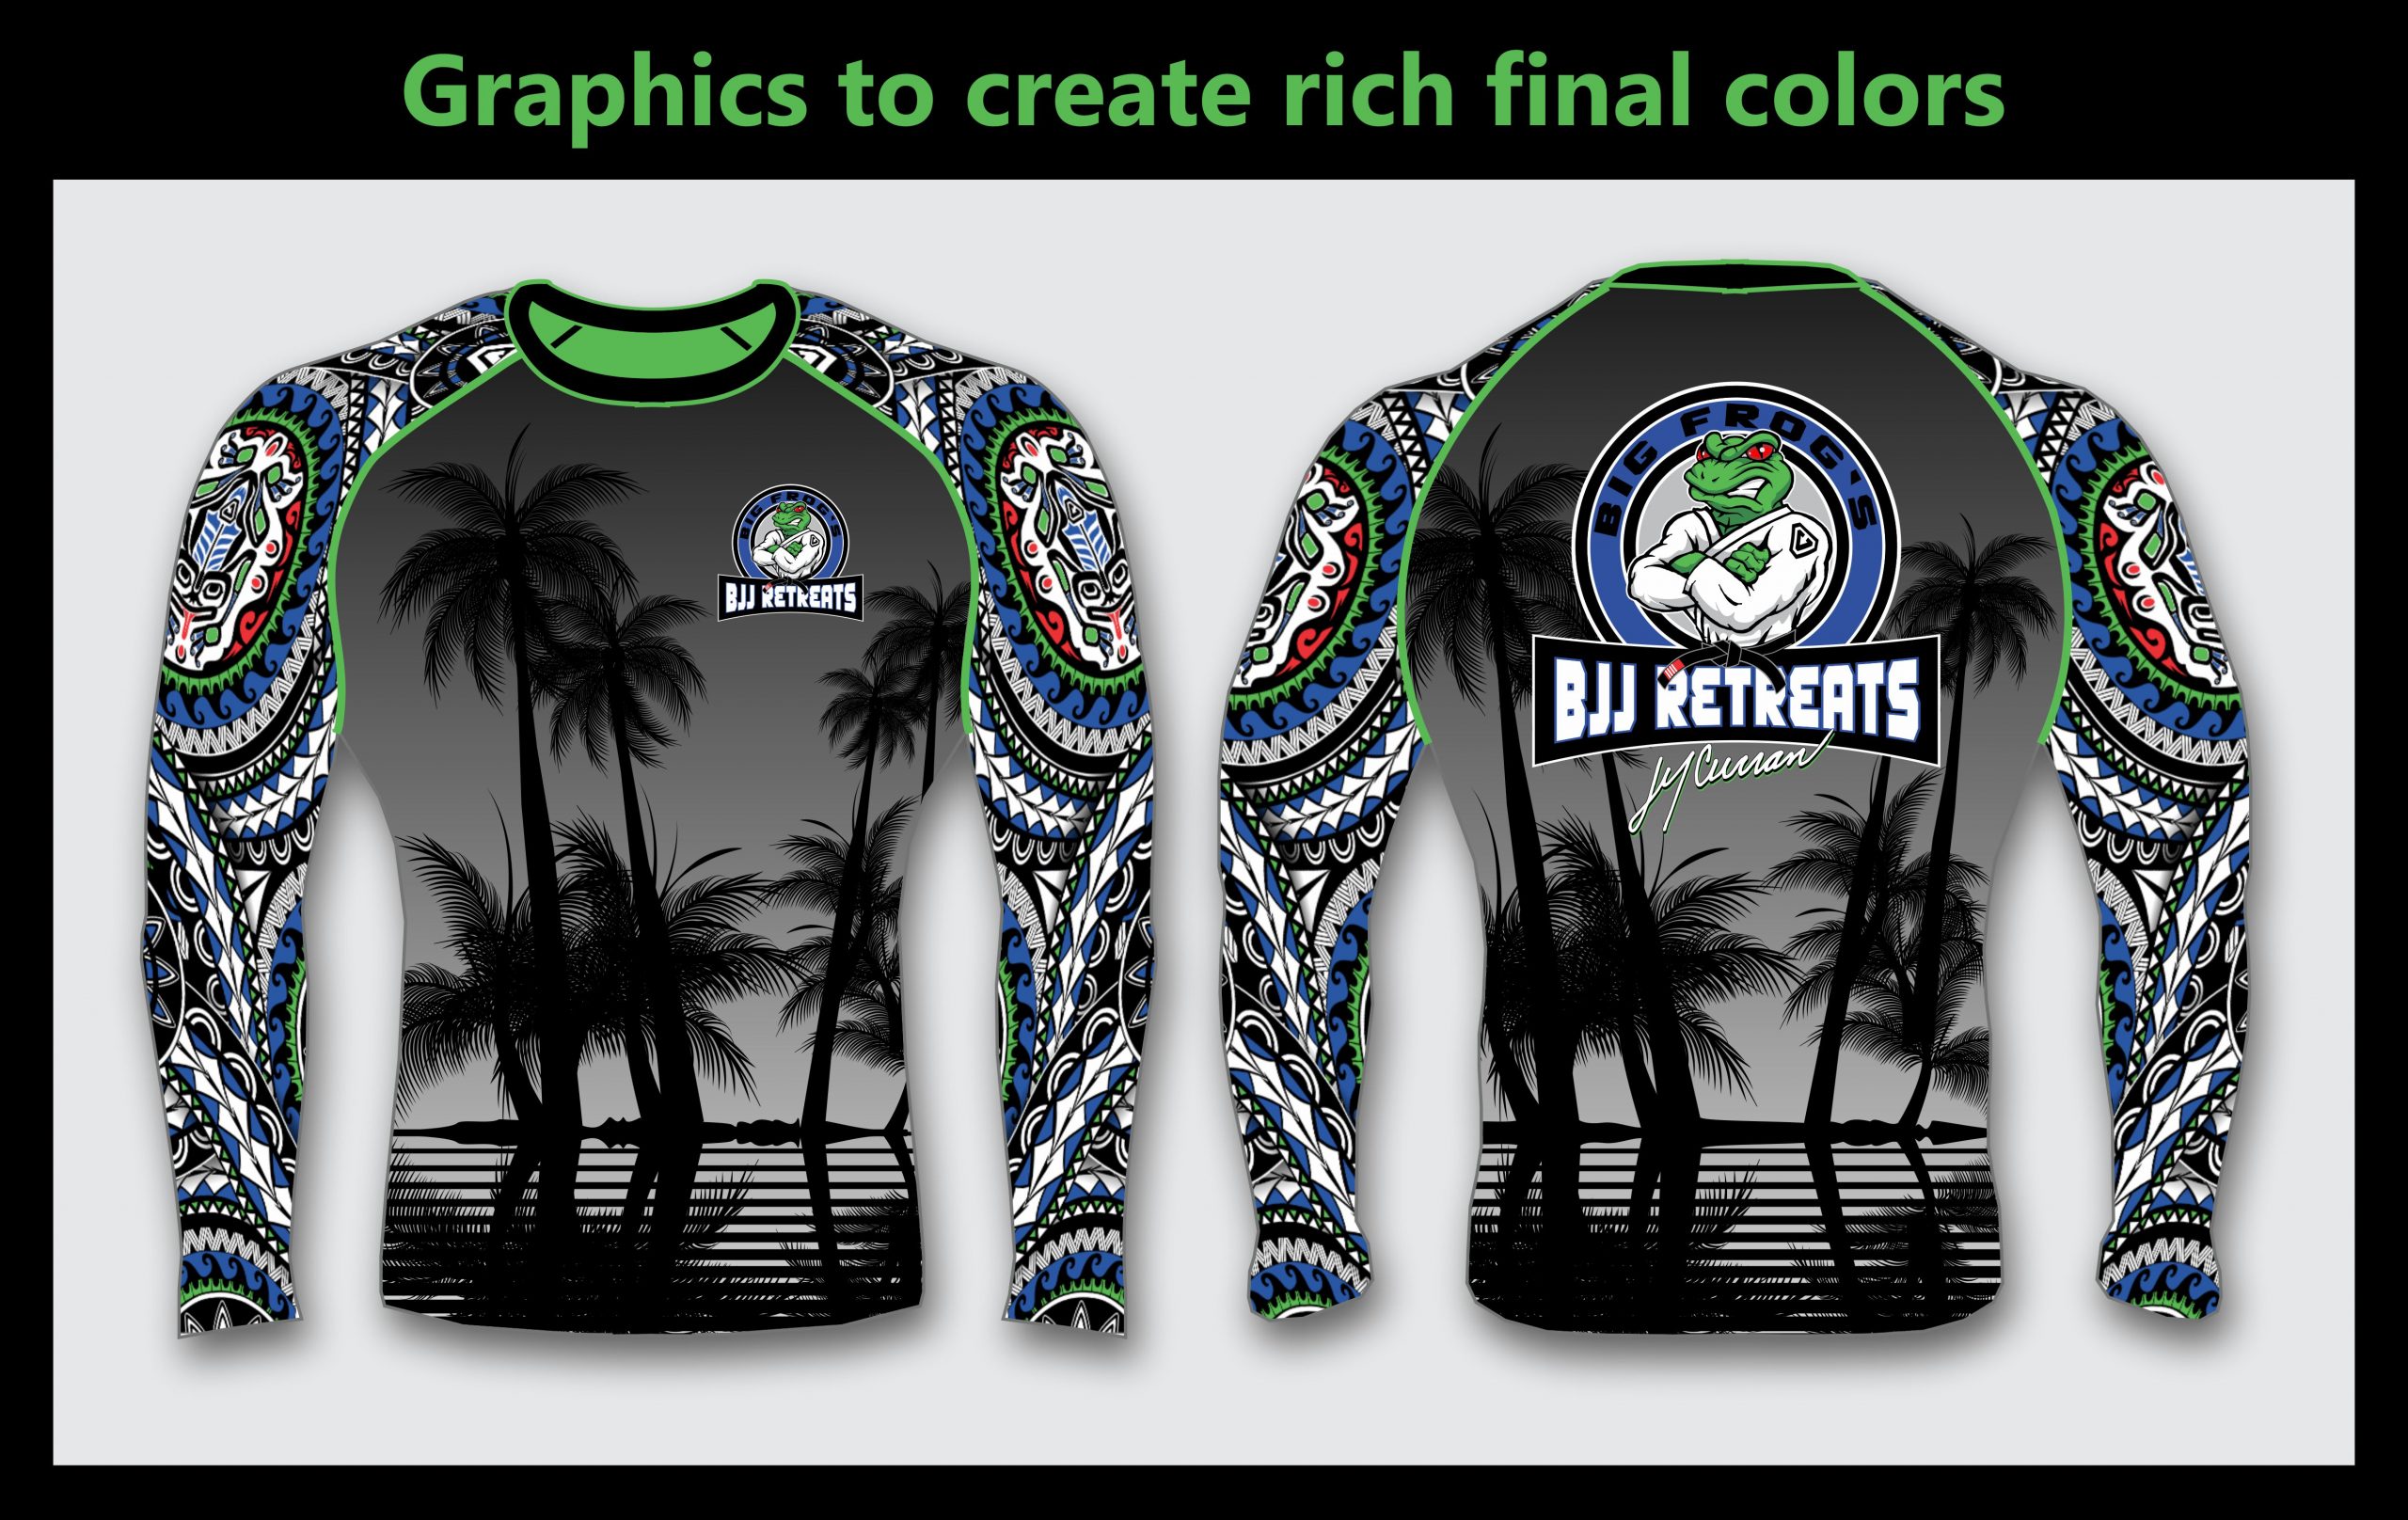
Another way to utilize the sublimation process in your designs is to remember that colors will tend to saturate and get deeper as they are pressed, so creating designs that have a darker foundation of background color or have deeper colors, will aid in making the final product look richer and more vibrant (see Figure 5).
When creating designs that have a rhythm and specific flow to emphasize the shapes they’re fitting on top of, like fitness or athletic apparel, it’s useful to have darker values at the bottom of the garment that transition to lighter shapes at the top. This effect will assist in the illusion that the body shape is smaller near the waist and larger in the chest, which can add aesthetic appeal to the design when it’s worn or put on a mannequin in a display. You can also look at the divisions of the muscle groups on the body and specifically create your design to flow with those shapes when worn. Imagine a sublimated superhero suit that perfectly fits the athlete with the shading in the right places and you’ll get the idea. Even though not everyone may want to look like a superhero, understanding how some subtle design considerations will enhance the look of the person wearing the graphic can dramatically increase the appeal of your final printed product.
Understanding Outsourcing vs. Printing In-House
There’s a big difference between doing an occasional sublimated print and deciding to offer the process as a volume production solution for your business. Printers who have committed to a volume of sublimated production will need to set up their shop with several sublimation printers, including oversize output devices and oversize heat press machines. If your shop is seeing a steady increase and demand for sublimated garments it may be time to consider your options based on what your goals are and what your customers are looking for. If you start getting complex jobs, but aren’t used to this work, it may be helpful, at first, to outsource this work.
It takes a lot of experience in printing, positioning, and heat pressing to get consistent results, and mistakes can be very costly. There are many printers who offer sublimated services domestically and internationally who have a lot of experience and all the right equipment to complete complex jobs economically and in fast turn-arounds.
If you decide to make sublimation a part of your decorated apparel services then take the time to look at the variety of printers and equipment to best match what you’ll want to offer your customers. Many of the printing supply companies will have resources for you to obtain training in each of the steps of creating quality sublimated apparel, so take advantage of education as early in the process as possible. If you’re a startup, reach out to experienced decorators who specialize in the sublimated method. You can ask to shadow their production team, or even outsource some work and follow the order as it’s being produced. As long as you’re not a competitor, you may get lucky and find a company that will share their expertise; this can save you an enormous amount of time and money.
You should properly weigh the value of outsourcing and utilize it when needed, instead of trying to do everything yourself right out of the gate. Once you and your team have the right equipment and training, then you’ll be ready to develop your own successful sublimation house. This can include finishing elements like sewing and tagging if you’re looking at pre-constructed production.
Finding the Right Sublimated Solution for You
Sublimated garments can be some of the most dramatic and creative looking apparel products available today. With the removal of limitations in size, colors, locations, and the lack of print feel,
a sublimated garment is the perfect option for customers in niche markets who are willing to pay a top rate for apparel with these features.
Many printers avoid offering sublimation, or feel it isn’t a good fit for their customers, without taking the time to seriously look at the limitations and advantages in the process. If you know how to work with the image colors, adjust the design for the shape of the product, use the qualities of the process in your designs, and make educated decisions about outsourcing, the dye sublimation printing process can be an unbeatable combination in your corner.
Let’s Talk About It
Creating a More Diverse and Inclusive Screen Printing Industry
LET’S TALK About It: Part 3 discusses how four screen printers have employed people with disabilities, why you should consider doing the same, the resources that are available, and more. Watch the live webinar, held August 16, moderated by Adrienne Palmer, editor-in-chief, Screen Printing magazine, with panelists Ali Banholzer, Amber Massey, Ryan Moor, and Jed Seifert. The multi-part series is hosted exclusively by ROQ.US and U.N.I.T.E Together. Let’s Talk About It: Part 1 focused on Black, female screen printers and can be watched here; Part 2 focused on the LGBTQ+ community and can be watched here.


The Profit Impact of a Market Dominating Position

Inkcups Announces New CEO and Leadership Restructure

Hope Harbor to Receive Donation from BlueCotton’s 2024 Mary Ruth King Award Recipient


Bulletins
Get the most important news and business ideas from Screen Printing magazine's news bulletin.

-

 Case Studies2 months ago
High-Density Inks Help Specialty Printing Take Center Stage
-

 Art, Ad, or Alchemy2 months ago
F&I Printing Is Everywhere!
-

 Andy MacDougall2 months ago
Functional and Industrial Printing is EVERYWHERE!
-

 Columns3 weeks ago
8 Marketing Mistakes Not to Make When Promoting Your Screen Printing Services Online
-

 Editor's Note2 weeks ago
Livin’ the High Life
-

 Thomas Trimingham2 months ago
“Magic” Marketing for Screen Printing Shops
-

 Marshall Atkinson2 weeks ago
How to Create a Winning Culture in Your Screen-Printing Business
-

 News & Trends1 month ago
What Are ZALPHAS and How Can You Serve Them in Your Print Business?