Articles
Published
24 years agoon
What makes some T-shirts better than others? Or to put it another way, why are you willing to pay more for some brands than others? Is one brand better simply because it costs more or because the ads say it’s better? Maybe it’s time to find out if you’re getting your money’s worth.
All else aside, you need T-shirts that provide a good printing surface. They must be well-designed, made with good quality materials and free from mill defects. They should not discolor the print and should wash well. How can you determine if a T-shirt has these qualities? It’s really not difficult.
Fabric concerns
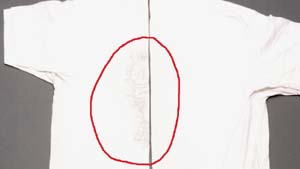
Several factors affect how well a T-shirt will print and how good the print will look after the shirt has been worn and washed a few times. The first factor you should be familiar with is called fiber mass (Figure 1).
Generally speaking, T-shirt fabric is a mixture of two substances: fiber and air. Fiber mass is simply the ratio of fibers to air. The fibers may be cotton or polyester, but fiber type isn’t the property of greatest concern. What’s more important is how many fibers the shirt has to support the graphic–you can print on fibers, but not on air.
Get a magnifying glass and take a close look at a T-shirt. Even the heaviest T-shirt has lots of spaces in the fabric. You can see large spaces between the loops of yarn with the naked eye. But there are also tiny spaces between the fibers in the yarn. T-shirts with lots of fibers and very little air (high fiber mass) are called heavyweight T-shirts. T-shirts with less fiber and more spaces are called less friendly names by screen printers who’ve had to print them.
How can you determine what the fiber mass of a garment is? It’s not practical for you to measure it in your shop. However, two numbers–one you should know and the other you can calculate–are a good indication of fiber mass: fabric weight and stitch density.
Fabric weight — The first thing to check is the weight of the T-shirt fabric. The jersey material used to make most T-shirts ranges from 5-6 oz/sq yd. Usually, the higher the fabric weight, the greater the fabric mass. Obviously, it’s not practical to weigh a square yard of T-shirt fabric. Some mills provide that information in their sales literature; with others, you have to ask for it.
Stitch density — The second number you should know is stitch density. You can measure the stitch density of any T-shirt yourself. All you need is a linen tester (a small magnifying device you can purchase from your screen-printing supplier) and a steady hand. To calculate stitch density, first count the number of courses per inch (courses are the rows of stitches across the fabric). Then count the number of wales per inch (wales are the chains of loops that run up and down the fabric). Multiply courses per inch by wales per inch and the resulting figure is the stitch density. All other things being equal, the T-shirt with the higher stitch density will have the higher fabric mass.
As a training exercise, I strongly recommend that you purchase several different brands of T-shirts, determine their fabric weight, calculate their stitch density and record the results. You will find the data very interesting. Inspection time
You can make relatively accurate determinations of fiber mass by inspecting an assortment of T-shirts. Purchase some white and black sample shirts (all the same size) from a variety of mills. Lay them all out on an inspection table with a white surface (or a table covered with a white bed sheet or a butcher paper) in a room with excellent lighting. Lift and feel each garment. The garments with high fiber mass will feel heavier and smoother. Inspect the surface of each garment with a 5x magnifying glass. The garments with a smoother surface will print better.
Pick up a black T-shirt and look through one layer of the fabric using a strong light behind it. The garments with heavier fiber mass will block out more light. Take some squares of stiff black paper (construction paper works fine) and place one under each white garment. On really flimsy shirts, the square of black paper will show through two layers of fabric. Next, place the squares of black paper inside each T-shirt, between the two layers of fabric. On some shirts, the black will show through one layer of fabric to some degree, but not on other shirts. The results of these tests will show you which brands of T-shirts have higher fiber mass. Keep records of the test results. You will need them later. Compare sizes
While the sample shirts are laid out on the inspection table, check the sizing. Sizes will vary dramatically from mill to mill. One mill’s large will be the same size as another mill’s medium. The easiest and fastest way to check sizes is to lay one shirt over another (Figure 2). You will quickly notice the size variations from mill to mill. Minor variations in size among manufacturers are to be expected and are not a problem, but when the variations are a full size, you should take notice.
Construction details
Turn the T-shirts inside out and look at how the neck and shoulder seams are sewn. The collar may have two seams, one seam, or no seams. On some brands, a piece of cloth tape will be sewn up one shoulder seam, across the back of the collar and down the other shoulder seam. With other brands, the cloth tape is sewn just across the back, inside the collar. After checking the collar and shoulder seams, inspect the hems on the sleeves and the bottom of the T-shirt. These are usually sewn in one of two ways. Most commonly, a single line of tiny, vertical stitches (called blind stitching) is used. On some garments, however, you will find seams sewn with two parallel linesof stitches.
For the screen printer and the ultimate wearer, these construction details don’t matter too much, but you should be aware of them and how they vary from brand to brand. You should also make a habit of inspecting a random assortment of T-shirts from time to time to see if the sewing is neat and consistent.
Some screen printers prefer T-shirts with what is called a quarter-turned body. I’m sure you’ve noticed that most T-shirts have a fold down the front of the shirt. (By the way, this fold is not a reliable indicator of the center of the shirt.) Some screen printers find that this fold interferes with the accurate printing of fine details and requires too much platen adhesive to hold down. So they buy quarter-turned shirts, which have the fabric tube that makes up the body of the shirt turned one quarter before it is cut during manufacturing. The folds run down the sides of the T-shirt, rather than down the front and back. If you have problems printing on the fold in the middle, ask for quarter-turned shirts. Jersey or interlock knit
Another option for textile screen printers is interlock-knit garments. Interlock-knit garments have a heavier, smoother fabric than standard jersey-knit garments. You can tell interlock knit from jersey knit by its appearance. Jersey-knit fabric looks different on the back than it does on the front, but interlock knit looks the same on both sides. T-shirts made from interlock-knit fabric cost more, but often work better for designs with extremely fine details such as process-color prints. Mill defects
Wouldn’t it be great if nobody ever made mistakes? Wouldn’t it be great if you never misprinted a shirt? Wouldn’t it be great if every shirt the mills shipped was constructed exactly according to specs? But this is the real world. Everybody makes mistakes, including the T-shirt mills.
What is a reasonable rate of T-shirts with mill defects? Based on my experience and conversations with knowledgeable screen printers and mill insiders, you should expect a mill defect rate of less than 0.5%. Regularly inspect a random sample of your incoming T-shirts for mill defects and keep records of the results. It’s not practical to expect the printers to do this while they are printing the shirts, although if they are sharp, they will occasionally spot a defective shirt. The people sorting and folding the shirts at the end of the dryer should also be trained to inspect for mill defects and keep records of their findings. The defect list
What mill defects should you and your staff look for? Check the entire shirt for neatly trimmed threads. The seam between the collar and the body should be smooth, with no puckers. The hems on the sleeves and at the bottom of the shirt should be even and lay flat (Figure 3). Overall, the stitching should be smooth, regular and even. When the shirt is laid out on a table smoothly, the bottom hem should be an even width and straight across the body of the shirt. All the seams should be closed. Turn the shirt inside out and inspect it again for uneven stitching and open seams. All shirts of the same brand and labeled the same size should have the same body width and length. But it’s not unheard of to find a size large neck label in what is obviously a size medium shirt.
Check the shirts for pinholes–that is, places where the garment has been stitched but the thread is missing. Slide a piece of cardboard of a contrasting color inside the shirt. Does the fabric appear to be of an even color, or are there areas where the fabric obviously varies in density? Look for stains and dirt on the shirt. Check for slubs, which are thick places in the yarn that look like knots. Occasionally you will find a dropped stitch, which looks like the run in a nylon stocking. The various pieces of the shirt, body, collar and sleeves should all be the same color. If you buy large quantities of T-shirts, you should also inspect for variations in color from batch to batch.
Create a T-shirt inspection form and keep careful records of your inspection results. Defects such as open hems, wrong sizes on the neck tag, dropped stitches and color variations on the shirt obviously make the garment unsuitable for printing and resale. Other defects, such as irregular hems or color variations between shirts, are usually not considered major defects that render a shirt unsaleable, but keep records of these defects anyway to determine what mills provide better shirts. Quality after printing
Judging T-shirt quality before going to press can help you avoid costly production problems and unhappy customers. But examining T-shirts newly arrived from the mill will only provide a partial assurance of quality. The fact is, quality is also measured by how the shirt performs and holds up after printing. Wash testing
The washing machine is the ultimate testing device for T-shirts and the designs printed on them. All screen printers should, but few do, regularly wash printed and unprinted shirts to determine how well the shirts and the printing will stand up to the stress they will encounter in the real world.
Three important qualities of a T-shirt that you can check by washing it are how well the T-shirt resists shrinkage, holds its shape and resists pilling.
Shrink testing All T-shirts will shrink to some extent when they are first washed. As a general rule, cotton/poly T-shirts shrink less than 100%-cotton T-shirts and heavyweight T-shirts shrink less than lightweight T-shirts. Shrinkage is measured both horizontally and vertically because T-shirts often shrink more in one direction than in the other.
Shrink testing is simple. All you need is a new T-shirt, a 10 x 10-in. square of rigid material (I use Plexiglas), an indelible marker and a washing machine. Using the marker and 10 x 10-in. plastic template, draw a square on the center of the body of the T-shirt. Wash the shirt in hot water as you normally would. After drying the shirt, measure the horizontal and vertical dimensions of the square you drew. Divide the difference between the initial horizontal or vertical dimension (10 in.) and the post-wash dimension by 10 and you can determine the percentage of shrinkage in each dimension.
If you call the mill or the distributors that supply your T-shirts, they should be able to tell you the claimed horizontal and vertical shrinkage percentages of the T-shirts they provide. Nevertheless, I recommend that you regularly test T-shirts to determine the actual percent of shrinkage for yourself.
Garment distortion The next garment-construction problem to check for when you wash test T-shirts is garment distortion. In other words, how well does the garment hold it’s shape when it’s washed and dried? You may not have noticed it, but occasionally T-shirts do not leave the washing machine in the same shape as they entered.
Testing for garment distortion should be done along with shrinkage testing. The procedure is also simple. Smooth a new, unwashed T-shirt out on a large sheet of paper, carefully trace it’s outline and draw the 10 x 10-in. square on it for shrink testing. Then wash the T-shirt and place it back on the outline. Is the T-shirt still square or have the horizontal and vertical lines changed to diagonals? Check the wales (vertical lines of knitting). Are they still straight up and down, or do they run on a slant? Garment distortion is rarely a problem with well-made T-shirts, but if you buy the economy brands, it’s something to watch for carefully.
Pilling The final problem that wash testing will help predict is pilling. Pilling only occurs on shirts knitted with a cotton/polyester yarn. It’s not as common as it once was and more often seen on fleece goods than T-shirts. Pilling is the appearance of rough little bumps of fibers on the surface of the garment as the garment is subjected to wear and abrasion.
If you suspect that the garments you buy might have a pilling problem, use your washing machine to perform a rough test. The procedure is as follows: Load a test shirt or two into the washing machine with a full load of laundry. Include some blue jeans and clothes with zippers in the load–you want to expose the T-shirts to some abrasion in the wash. After washing and drying the shirts at least five times, check the garments for pilling. Cheap, easy and fast
I’ll leave you with two final thoughts. First, all of the tests that I’ve outlined are cheap, easy and fast. It’s a pity that so few screen printers bother to use them. I guarantee that if you perform these tests regularly and record the procedures and results carefully, you will save a lot of money. I know I did.
Second, T-shirts of above average quality cost more because they are generally worth more. They are worth more to the screen printer because they have fewer defects, they are easier to print, the printing looks better on them and you can sell them for more money. I never missed an opportunity to try to convince my customers to let me print their designs on top quality T-shirts. I made more money that way and the customer was more pleased with the final product.
About the author
Mark Goodridge has worked in the screen-printing industry for 20 years. He formerly co-owned and operated a screen-printing company in Coopers Mills, ME and from 1992-95, he worked as editor of Screenplay magazine. He is currently the marketing manager for Union Ink Co., Inc. in Ridgefield, NJ.


Subscribe

Magazine
Get the most important news
and business ideas from Screenprinting Magazine.
Most Popular
-

 Case Studies2 months ago
High-Density Inks Help Specialty Printing Take Center Stage
-

 Art, Ad, or Alchemy2 months ago
F&I Printing Is Everywhere!
-

 Andy MacDougall2 months ago
Functional and Industrial Printing is EVERYWHERE!
-

 Columns3 weeks ago
8 Marketing Mistakes Not to Make When Promoting Your Screen Printing Services Online
-

 Editor's Note3 weeks ago
Livin’ the High Life
-

 Marshall Atkinson3 weeks ago
How to Create a Winning Culture in Your Screen-Printing Business
-

 Thomas Trimingham2 months ago
“Magic” Marketing for Screen Printing Shops
-

 News & Trends2 months ago
What Are ZALPHAS and How Can You Serve Them in Your Print Business?