Prepress & Screen Making
Published
24 years agoon
Editor’s note: Several years ago, Jane Willey developed this comprehensive guide to screenmaking efficiency, which was published in our March 1994 issue. Since the article appeared, Willey has shared its principles and procedures with one consulting client after another. "These techniques have withstood the test of time, and they work," she concludes. Here, we present an updated version of the article to help prevent bottlenecks in your screenroom and ensure smooth production.
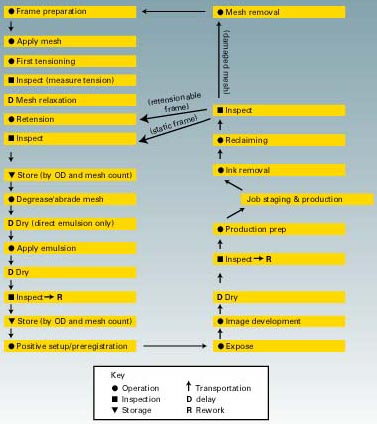
Editor’s note: Several years ago, Jane Willey developed this comprehensive guide to screenmaking efficiency, which was published in our March 1994 issue. Since the article appeared, Willey has shared its principles and procedures with one consulting client after another. "These techniques have withstood the test of time, and they work," she concludes. Here, we present an updated version of the article to help prevent bottlenecks in your screenroom and ensure smooth production. The definition I use for screen department efficiency is meeting press demands for screens in both quantity and quality at the lowest cost. The ability to keep print production running is essential, no matter what problems crop up to influence daily screen output. To meet screen demand, you must have the correct number of screens in the loop, an adequate physical space with good workflow, quick response time to emergencies, and the ability to produce screens that will perform predictably every time. In the real world, however, such perfect screenrooms rarely exist. In fact, I often find that print-production problems begin in the screen department, which is frequently ignored and underbudgeted. Consequently, it is often under fire for being unable to produce quality screens at a rate that will meet press demand. In many cases, screen quality is so inconsistent that it becomes impossible for the screen department to meet demand because the remake rate is out of control. I typically see conditions in the screen department that vary anywhere from deplorable to okay, at best. Usually, the area is physically scattered and inadequately lighted, with little or no temperature or humidity controls, water on the floor, clutter and dirt everywhere, and no clear pattern of workflow. How can you expect to have efficient and quality production under these circumstances? Remember, the screen is the printing plate. A stable, accurate, and durable frame, mesh, and stencil are required to print quality work repeatably. In addition, these quality screens must be available in the right quantities, mesh counts, and sizes when production needs them. Until the screen department has adequate space, equipment, and, most importantly, a controlled process, high-volume screen-printing plants will never be able to meet the demands of increasingly complicated art and escalating production rates in an efficient manner, let alone a cost-effective one. This is particularly true in high-volume garment-printing plants, where screen volume is often higher and mistakes lengthen setups and press downtime. So how can you achieve this optimum level of screenmaking and, in turn, print-production efficiency? First, you need to determine your shop’s capabilities. While many variables determine the size and production capacity of individual screen departments, several constants must be considered as minimum parameters to meet quality and efficiency for all screen departments. To understand what these constants are, it’s important to first understand the components of the screen loop. The screen loop The screen loop is a standardized set of steps and procedures that are repeated daily to produce press-ready screens (Figure 1). The more streamlined and uninterrupted the screen loop, the more efficient your screen department will be. The goal of the perfect loop is to adequately supply production with the needed volume and mix of high-quality screens and be able to react to the occasional ripped screen without interrupting the daily screen output. But note that no loop can be successful unless you have proper scheduling and planning in place. As you can see from Figure 1, the amount of handling and steps needed in screenmaking are numerous. Each step has a direct bearing on the finished product. The steps shown here can be applied to both a static-frame (stretch-and-glue) or a retensionable-frame screen loop. All are based on a non-library reclaiming system, where most screens are reclaimed after use, not stored with the stencil intact for repeat jobs. Although a library would typically reduce the number of screens produced per day, it would require many more screens and would not reduce the number of steps in the loop. Each step in the loop is important, and the penalty for neglecting one is severe. I will assume that you know basic procedures and techniques for each step. The areas I’ll discuss are ones that are most often overlooked or cause devastating results if not given close attention, including: * fabric retensioning * degreasing * proper screen inventory in stretched and coated storage * sufficient drying for coated screens * quality inspections and controls When parts of the loop are eliminated or frequently ignored, it’s usually because the screen department is operating in a crisis environment. The rule of "we don’t have time to…" takes the place of following proper procedures. This results in screens that are not durable for press runs or do not image correctly and have to be remade a second or even a third time. If the problem isn’t discovered until the screen goes to press, print production is likely to experience unscheduled downtime. Soon, a state of crisis becomes the norm instead of the exception, and no screen leaving the department has been through all of the required steps. At this point, not only is efficiency gone, but you are now playing "screen roulette," where there is no guarantee that any given screen will have the quality or durability standards you desire. Here’s a short synopsis of the repercussions you face for neglecting each of the most commonly skipped steps. Retensioning This is the first crucial step in screenmaking. Unfortunately, it’s often circumvented, especially when using static frames. As Figure 1 shows, at least one relaxation/retensioning step is required. This is particularly important for static frames because this is the only time that you can enhance mesh stability before the frame is cut loose from the stretcher. Stable tension means a stable image, more accurate registration on press, and longer mesh life. All of this yields better screenroom efficiency. While recent testing indicates that you can skip the relaxation and retensioning steps in screen stretching, practical application in a production environment proves these steps necessary, particularly with higher mesh counts (305 threads/in. or higher). You just can’t achieve maximum tension levels in a single tensioning, and attempts to do so actually weaken the mesh and increase breakage rates. Degreasing When you skip this step, you invite the possibility of "fisheyes" (uncoated areas on the screen), pinholes, and even stencil breakdown during a press run. You must degrease your screens to ensure that you have a clean surface to which the emulsion can bond. If you’re using capillary film, abrading the mesh before degreasing is also a must. Minimum numbers of stretched and coated screens This is absolutely critical to the maintenance of your loop. Approximately 40% of your total screen loop should be maintained in these two stages of your screen cycle to serve as a shock absorber. If a substrate doesn’t arrive in time for production or if a rush job is moved up in the schedule, these extra screens cushion the blow. If breakage or makeover rates constantly drain your screen reserves below these minimum numbers, then you need to determine the root of the problem and take steps to correct it. Without adequate reserves, you cannot react in a timely manner to a screen that is damaged during a press run or to a rush job that must go out. Nor can you meet daily screen output minimums. Drying After retensioning and degreasing, the next most neglected step is thoroughly drying coated screens. Complete drying of the stencil is a function of time, temperature, humidity, and airflow. If you compromise one of these, you compromise screen integrity. Dry your coated screens horizontally, print side down, in a temperature- and humidity-controlled, safelighted environment. The amount of time will be dictated by the emulsion, capillary film or other stencil system you are using and your plant’s specific environmental conditions. However, if water is on the floor and/or in the air of the drying area, the drying time becomes days or never instead of minutes or hours. Incorrectly or partially dried screens may result in a myriad of problems including pinholes, poor image resolution, and stencil breakdown on the press. Inspection and quality control Pushing screens through the loop faster than intended usually means that something is going to be bypassed. Setting up a press and then discovering that a screen is ripped, incorrectly imaged, out of register, or unprintable for some other reason is both costly and frustrating. Setting up inspection and quality-control points throughout the screen loop can prevent this from happening. Not only will the QC points keep less-than-perfect screens from reaching the press, but they will also provide a constant check on the screenmaking process. Keeping good records will illuminate recurring problems and the conditions that lead to them. By noting a condition that historically has created problems, you can correct it during the screenmaking process and keep it from interrupting the loop now. Some key conditions that you need to monitor are listed in Figure 2.
| Figure 2: Key Screenmaking Processes and Checkpoints |
| • Screen tension–during retensioning, before coating, after press run (retensionable only) • Film positives–complete set, right reading, registration, design number • Screen–frame number, mesh count, design number, date/time • Dry stencil–emulsion coverage, emulsion uniformity • Imaged stencil–resolution, match to film positive, placement in frame, right reading • Exposure–monthly exposure test, new lamp schedule • After reclaiming–mesh damage, cleanliness • Temperature/humidity hourly readings–coating, coated drying, coated storage areas |
You should also post and follow these standard parameters at all times: * minimum and maximum tensions for each mesh count * time that coated screens stay in hot drying * exposure times for each mesh count * setup measurements * coating procedures for each mesh count This list reflects only those items that are required for minimum control, so you may wish to include several others. The screen loop and the process checklist are the first set of constants necessary for screenroom efficiency. The second set of constants is the environmental conditions that you need to adequately support your screen loop. The environment The physical environment of your screenmaking department should be an enclosed area where new or reclaimed screens enter, cycle through the loop, and then exit into the job staging and production area. The entire enclosure should be temperature and humidity controlled; have sealed floors, walls, and furniture; have separation of wet and dry functions; be safelighted from coating through image development; have adequate ventilation; and be absolutely spotless! Maintain a temperature of 68-95°F in the general area, and 85-95°F in the hot (drying) rooms. The hot rooms must have circulating, filtered airflow. Maintain humidity in all dry-function areas at 50% RH or less. All surfaces should be smooth and washable, with no tendency to shed. For example, the area should have no raw concrete or unfinished wood surfaces (floors, walls, ceilings, racks, cabinets, etc). In my opinion, the only acceptable safelights are permanent sleeves that are manufactured for the requirements of the screen-printing industry. Yellow fluorescents ("bug lights") quickly lose their initial protection levels, and it is difficult to judge their effectiveness with the naked eye. Adequate ventilation is necessary for the entire area, but especially in those areas where VOC contamination is likely (screen reclaiming, coating, static-frame gluing, etc.). Fighting dust and dirt is a constant battle, but in this case, cleanliness equals quality, and quality equals efficiency. The screen loop and the screen department environment are process constants–their steps and conditions should never change. What does change is the amount of space and equipment you need to produce the correct number of screens to efficiently balance your production requirements. The larger your print-production floor and the more shifts you run, the larger your screen loop and screen department will need to be. The scale of operation The variables that determine the size of your screen department and screen loop are as follows: * number of machines * number of colors per machine (primarily garment printers) * number of frames per size (by outer dimension or "OD") * number of shifts * number of setups per machine per shift * number of mesh counts used Ideally, keeping six months’ worth of records will give you a perfect profile of your plant’s screen requirements. This information should give you a clear picture of a typical day (or shift). It will describe the number of jobs run, number of colors in each job, sizes (ODs) of the frames used, and mesh count mix. In lieu of these records, use the following formula to estimate your requirements: screen-loop size (SL) =
number of colors (C)
x number of setups per shift (SU)
x loop factor (LF)
x number of machines (M)
x number of shifts (S) The loop factor is actually a combination of three factors: * the number of production shifts supported by the number of screenmaking shifts * the variety of screen outside diameters (ODs) * the variety of mesh counts It is critical that your screen loop be large enough to keep the presses running. Yet, you want to be efficient enough to have the fewest number of screens possible to accomplish 100% print-production efficiency. Depending on your individual needs, the loop factor can vary from 1.75 to greater than 10. The ratio of these variables based on historical records will provide an accurate loop factor for any particular situation. If you do not have historical records, you have to estimate. I suggest using the following formula: loop factor (LF) =
shift ratio factor (SRF) x screen outside dimension factor (ODF)
x mesh count factor (MCF) You can find values for shift ratio, number of ODs, and number of mesh counts in Table 1. To see how the formula works, assume a shop runs one production shift and one screenmaking shift. This plant uses two frame sizes, but each press in the shop is dedicated to a specific OD frame. You know exactly how many of each frame size needed per shift, so it’s as if you were only running one OD. This works any time the frame sizes employed during a shift remain the same. If each press wasn’t dedicated to a single frame size and the frame sizes changed each day, then you would use the factor for two frame sizes from Table 1 instead. The plant uses three mesh counts.
| Table 1: Estimated Loop Factors | |||||
| Shift ratios | Screen ODs | Mesh counts | |||
| Ratio
1 2 3 |
Factor
1.75 2.75 3.75 |
Ratio
1 2 3 4 |
Factor
1.00 1.25 1.50 1.75 |
Ratio
1 2 3 4 5 6 7 |
Factor
1.00 1.50 1.75 1.85 1.90 1.95 2.00 |
Plugging in the numbers from the table for this shop, you have LF = SRF x ODF x MCF
LF =1.75 x 1 x 1.75 = 3.06 (or 3) If you change the variables to account for an additional production shift, a total of three screen ODs, and four different mesh counts, the calculation would change as follows: LF = 2.75 x 1.5 x 1.85 = 7.63 As you can see, supporting two production shifts with one screenmaking shift, plus adding more screen ODs and mesh counts can easily double the size of the frame loop. Once you have determined your loop size (total number of screens required), the next step is to determine the scale of your screen department. Remember, the steps in the screen loop are constant, but the space and equipment required are dictated by the loop size and frame ODs. Obviously, a screen loop of 1000 frames rather than 500 frames, or a frame OD of 50 x 70 in. rather than 23 x 31 in., will require a larger facility and more equipment. For an example of how to determine the screen-loop size (SL), let’s assume the operation is one shift, uses three mesh counts, has a loop factor of 3, and includes the information in Table 2. Using the estimation formula, the calculations for the screen loop will be as follows: * for machines A & B, SL = C x SU x LF x M x S SL = 6 x 3 x 3 x 2 x 1 = 108 * for machines C-F, SL = 8 x 3 x 3 x 4 x 1 = 288 The total loop size is 396 (rounded to 400) frames for all six machines. This uses the loop factor of 3 to compensate for two frame sizes and three different mesh counts. Again, the two different ODs are dedicated to specific machines and are always in the same ratio.
| Table 2: Sample Shop Information for Calculating the Screen Loop | |||
| Press(M) | Number of colors printing (C) | Frame size (in inches) | Setups/shift (SU) |
| machine A 8/c auto | 6 | 23 X 31 | 3 |
| machine B 8/c auto | 6 | 23 X 31 | 3 |
| machine C 10/c auto | 8 | 30 X 43 | 3 |
| machine D 10/c auto | 8 | 30 X 43 | 3 |
| machine E 10/c auto | 8 | 30 X 43 | 3 |
| machine F 10/c auto | 8 | 30 X 43 | 3 |
The floor plan shown in Figure 3 is approximately 4000 sq ft and will accommodate a screen-loop range of 300-600, producing 100-200 screens per shift. Figure 4 shows a typical distribution of frames in the loop. The numbers in Figure 4 are a centerline, and during a production day, all areas will be in constant flux. The screen department in this example would employ six to 12 people. The floor plan follows the process for the loop and is based on using carts for transporting and storing screens with virtually no built-in racking or drying. The size and number of equipment pieces such as carts, sinks, exposure units, work stations, and light tables are totally dependent on the number and dimensions of screens in the loop. This plan also assumes the use of pin registration for the art and preregistration of film positives to the screen.
| Figure 4: typical distribution of frames in the screen loop | ||
| Area | Percentage | Number |
| Reclaiming | 15% | 60 |
| Retensioning through stretching | 5% | 20 |
| Drying and stretched storage | 20% | 80 |
| Coating through coated storage | 20% | 80 |
| Preregistration through production prep | 7% | 28 |
| Production | 33% | 132 |
| Total | 100% | 400 |
Improving productivity In any screen department, you will have a range of efficiency based on labor, process technique, and automation that will allow you to maximize efficiency for a given space. For example, if your print production initially dictates a screen loop of 300 frames with four employees producing 100 completed screens per shift, but you purchase a new press that expands your loop to 420 frames with an increase in daily screen output of 160, you can meet the increased production by adding personnel in key areas, improving your process techniques, or both. Certainly, any of the hands-on steps in the process (e.g., reclaiming, degreasing, coating, preregistration, and stretching) are all areas where more people will generate more screens–provided there is adequate space for additional work stations. Multiple sinks, exposure units, stretching tables, etc., will all boost screen production, but usually require physical expansion of the screen department. Other ways to increase screen output without a physical expansion or additional personnel involve improving your current process or automating steps in the loop. Using carts to transport screens and hot rooms for drying rather than built-in storage and drying cabinets will dramatically reduce the number of times individual frames must be handled. It will also provide quicker drying times without sacrificing the integrity of the finished screen. Both carts and hot rooms reduce the incidence of screen breakage. Pin registration of film positives speeds up preregistration placement of film to screen. Automated reclaiming lines and automatic coaters will standardize results and speed up the process as well. However, just as a move from manual printing to automatic printing requires minimum volume and careful economic analysis to justify equipment investment, so does a decision to automate your screenmaking process. Efficiency = profitability As the sophistication of images and presses requires tighter screen tolerances, I am sure we will continue to see a trend to update and streamline the screenmaking process. It will not matter how well your art department performs or how many printing presses you have. If the screen department is not balanced in capability and quantity, you will not achieve the efficiency you strive for. After all, the screen is the translating link between the original art image and the final printed product–which, in the end, is the key to your profitability. About the author Jane Willey is a technical consultant specializing in prepress and printing techniques, as well as procedural and quality-control systems. During her 20-plus years in the screen-printing industry, she has worked as a designer, production supervisor, and prepress specialist. She has also contributed a variety of articles on production and management topics and frequently speaks on these subjects at industry trade events.


Subscribe

Magazine
Get the most important news
and business ideas from Screenprinting Magazine.
Most Popular
-

 Art, Ad, or Alchemy2 months ago
F&I Printing Is Everywhere!
-

 Case Studies1 month ago
High-Density Inks Help Specialty Printing Take Center Stage
-

 Andy MacDougall2 months ago
Functional and Industrial Printing is EVERYWHERE!
-

 Columns2 weeks ago
8 Marketing Mistakes Not to Make When Promoting Your Screen Printing Services Online
-

 Editor's Note2 weeks ago
Livin’ the High Life
-

 Marshall Atkinson2 weeks ago
How to Create a Winning Culture in Your Screen-Printing Business
-

 Thomas Trimingham2 months ago
“Magic” Marketing for Screen Printing Shops
-

 News & Trends1 month ago
What Are ZALPHAS and How Can You Serve Them in Your Print Business?