Prepress & Screen Making
Published
22 years agoon
File compression for digital images follows one of two schemes. The method is either lossy or lossless. With a lossless format, there is no damage to the file on compression, and all digital information remains intact. Lossy format, on the other hand, will allow for greater levels of compression, which results in smaller files on your hard drive. But you pay a higher price for the extra compression.
File compression for digital images follows one of two schemes. The method is either lossy or lossless. With a lossless format, there is no damage to the file on compression, and all digital information remains intact. Lossy format, on the other hand, will allow for greater levels of compression, which results in smaller files on your hard drive. But you pay a higher price for the extra compression.
Lossy formats introduce artifacts that irreversibly damage the image. The greater the level of compression, the more artifacts that are introduced. Worse yet is the fact that this can be a progressive degradation, meaning that the more often you open and resave an image file in a format that employs lossy compression, the more damage you do to the image. When this process is repeated enough, the damage becomes so great that you can no longer use the file as the basis for printing.
The most commonly used lossy file format is JPEG. It is the default file-compression format for almost all digital cameras today. You might ask why companies like Nikon, Epson, or Olympus would use a file format that damages the image irreversibly. It has to do with economy and the average level of image-quality acceptance on the part of the consumer. It may also have to do with the fact that most images captured on digital cameras are not used for commercial print reproduction. If they are used for anything commercial, it is usually for posting on the Web, where image quality is not a big issue and economical file size generally takes precedence.
For the prepress technician, color separating and printing JPEG image files is becoming a daily issue. Sales people and clients will typically e-mail you the designs they want printed in the form of JPEG files. That would be fine if these files were just samples for evaluation. But more often than not, these images become the artwork you’re expected to separate and print.
The real problem comes when you need to enlarge the damaged files to the scale at which they’ll be printed. Now the artifacts are magnified, and the very, very painful task of cloning and repainting begins. I have seen prepress technicians working for hours trying to repair a single JPEG file.
JPEG compression breaks an image into rectangular blocks, each representing 8 x 8 pixels of detail, and then independently compresses each block. The result of JPEG compression on a file that was of poor original quality is an ugly, repetitive pattern of blocks. Such over-compression can take place when an image is saved as a JPEG file in computer software like Photoshop, or when an image is captured at a low resolution with hardware like a scanner or digital camera.
A solution in sight
With JPEG files so commonplace, how can we ever see our way past these obstacles? Well, hope is on the horizon. Alien Skin Software LLC has released Image Doctor, a beta-version plug-in filter for bitmap-editing software. According to the developer, this set of powerful image-retouching tools for Photoshop, Fireworks, Paint Shop Pro, Corel Photopaint, and other image editors, magically removes blemishes and defects, quickly repairs over-compressed JPEGs, and seamlessly replaces unwanted details and objects.
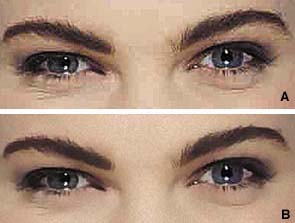
When one of my customers tipped me off about this product, I immediately went to the company’s Website (which is listed at the end of this column) and downloaded the filters. One of the key components I discovered in the software is JPEG Repair. JPEG Repair reduces the damage caused by over-compressing JPEG image files, making the images more aesthetically pleasing <B>(Figures 1A and 1B)</B>.
Working with Image Doctor is very easy, and the results you get are impressive. Not only will it work on overcompressed JPEGs, but it also provides excellent overall image repair on files that have been polluted with dust and dirt during scanning or scanned from scratched photos and slides.
The amount of retouching you apply to an image is completely up to you. Upon opening an image in Image Doctor, the program presents you with a retouching screen that contains slider bars for applying selective blurring and grain additions. The following procedures are all it takes to use the program’s JPEG Repair feature:
1. Select the image area to be repaired.
2. Starting from the lowest setting, incrementally move the Remove Artifacts slider until the blocky defects of JPEG compression are no longer visible. But be careful not to exceed the slider position at which they seem to diminish.
3. If even the strongest Remove Artifacts setting doesn’t remove all of the blocky artifacts, use just enough Blur Edges to remove the artifacts that remain.
4. Use the Add Grain slider to add back any surface detail lost during steps 2 and 3. Add the minimal amount of grain that creates the desired appearance.
Slider and button descriptions
The following descriptions clarify the purpose of the primary controls found in JPEG Repair.
Remove Artifacts This slider controls the strength of deblocking in the program (deblocking is the reduction of rectangle-shaped artifacts in highly compressed JPEGs). Moving the slider to the right strengthens the deblocking effect. You might assume that selecting the highest value would give you the best results. This, however, is not the case. Excessive Remove Artifacts values result in an unnaturally soft appearance in your image.
Blur Edges This slider controls the amount of blur apparent on the dis-crete edges within the selected area of your image. Moving the slider to the right increases the amount of blur. Note that some blurring can help wipe out defects, such as extra-stubborn artifact edges. But too much can wipe out all detail from your image, so use the Blur Edges feature cautiously.
Add Grain JPEG Repair introduces subtle, organic noise-randomly placed blobs in the area of the image you select for enhancement. These blobs help recreate the natural surface textures of higher-resolution, uncompressed images. Moving the slider to the right yields a stronger pattern of dark blobs, so again, only use as much as needed to get the best results.
Randomize Grain To instantly change the arrangement of grain added to your selection, click this button. If you have not added any grain to your selection, this button will have no effect at all.
Correcting a corrupted image is a simple two-step process. The first step is to use the blur slider to soften the edges of the generated artifacts. This has a tendency to flatten the image and lower the overall contrast. But you can remedy this problem with the second step, which is to apply grain to the image until you achieve the desired look. Each of the correction functions are independent of each other, so if you find that applying the grain gives you the surface correction needed, but that some artifacts are still visible, simply increase or de-crease the blur slider and watch the correction in the preview.
Alien Skin offers some very helpful tips and techniques for using JPEG Repair. One is that you should not crop or resize your image before using the filter. Image Doctor relies on the regularity of the JPEG compression grid, which is altered when you crop or resize. Use JPEG Repair first; crop or resize second.
You can use JPEG Repair with or without a selection, but it is suggested that you use selections to separately treat the areas in your image with perceptibly different levels of damage. The JPEG compression effect is more noticeable in areas that are lighter in tone, like skin-tone values, than in darker areas, such as those representing dark hair. With an image that contains both types of graphic elements, applying the same strength of repair across the entire image may wash out some details that you wish to preserve in the hair. Ideally, you should select and treat the areas containing hair first, then repeat the procedure on the skin-tone areas.
JPEG Repair is extremely easy to use. With only three sliders to adjust, it’s hard to screw up. It’s also an easy filter to overuse, so apply each function only as much as necessary to prevent creating an "airbrushed" appearance in the repaired image.
The 30-day full-function demo of Image Doctor can be downloaded from Alien Skin’s Website at www.alienskin.com. Demo’s are available for both Mac and PC platforms.


Subscribe

Magazine
Get the most important news
and business ideas from Screenprinting Magazine.
Most Popular
-

 Art, Ad, or Alchemy1 month ago
F&I Printing Is Everywhere!
-

 Case Studies1 month ago
High-Density Inks Help Specialty Printing Take Center Stage
-

 Andy MacDougall1 month ago
Functional and Industrial Printing is EVERYWHERE!
-

 Columns2 weeks ago
8 Marketing Mistakes Not to Make When Promoting Your Screen Printing Services Online
-

 Editor's Note2 weeks ago
Livin’ the High Life
-

 Thomas Trimingham2 months ago
“Magic” Marketing for Screen Printing Shops
-

 Marshall Atkinson2 weeks ago
How to Create a Winning Culture in Your Screen-Printing Business
-

 News & Trends1 month ago
What Are ZALPHAS and How Can You Serve Them in Your Print Business?