Articles
Mastering High-Density Inks
Screen Printing presents a refreshed take on Charlie Taublieb’s popular 2014 article on high-definition special-effect printing.
Screen Printing presents a refreshed take on Charlie Taublieb’s popular 2014 article on high-definition special-effect printing.
In garment printing, the term “special effects” covers a lot of inks and processes, some of which I’ve never considered to be part of this category. Puff, for example, isn’t a special-effect ink to me, even though some consider it to be one. Other inks are clearly designed for special-effect printing and can create remarkable results when used correctly. I want to focus on some of my favorites in this article: high-density (HD) inks, gels, and bases.
If you aren’t familiar with HD inks, they can produce dramatic three-dimensional images. They are designed to print through very thick stencils and have a high viscosity with reduced tack and increased flow characteristics compared to standard plastisol inks. As you’ll see, they can achieve thick ink deposits with extremely sharp edges. Used correctly and creatively, HD inks allow you to produce truly unique effects.
HD inks lost some popularity for a number of years because of concerns and regulations over the use of ortho-phthalates. Once many of the ink companies reformulated the products, HD inks came back again. Still, few printers use them because many don’t know how. The ultimate goal with HD inks is to produce a print that has dimension to it after printing and that stays that way once it’s through the curing unit. I’ll discuss the production steps that are unique to HD printing below and show how the technology was used to create several award-winning shirts.
AdvertisementScreenmaking Considerations
One of the most common problems I see in shops that aren’t accustomed to HD printing is screenmaking, especially selecting the right mesh and creating stencils of sufficient thickness to achieve the desired effect. You need a thin mesh that has a good percentage of open area to allow the ink to pass through the stencil easily without too much squeegee pressure. The most popular mesh counts for HD printing are around 80 to 83 threads per inch with a 70 to 71-micron “S” thread. These meshes have an open area of about 60 percent.
You can make stencils for HD printing with certain types of direct emulsions or with thick capillary films. I’ve worked with both, and my opinion is that capillary films definitely make more sense for this application. The issues I have with direct emulsions are the time it takes to apply them, the number of coats it takes to get the needed thickness, and the difficulty of duplicating the results across multiple screens, which takes a high-quality coating machine to do predictably. Capillary films are easier to apply and you can get them in thicknesses ranging from 100 to 1000 microns. The most popular films for HD printing fall between 200 and 400 microns. Thicker films might require you to use wire meshes with 80-micron threads and will require very long exposure times. It’s also very difficult to get good, clean prints from such thick ink deposits.
Applying the capillary film to the mesh is where many printers run into problems. Because the films are fairly expensive, I cut them down to size when I can, leaving a 1-inch border on all sides of the image area. I find it’s easiest to use a “build up” board that is slightly bigger than the film but smaller than the inside dimension of the frame, and then laying some newsprint on the board before placing the capillary film on it (emulsion side up). Then when I have the screen in the exact position I want it, I lower it (print side down) onto the emulsion.
Many printers use water to apply the mesh as they do when making screens for their regular work, but it’s not the right choice for HD printing. For one, the water will reduce the thickness of the stencil and therefore the ink deposit. Also, because the capillary films used for HD printing are so thick, water doesn’t always adhere them to the mesh very well and they can delaminate from it during the printing process. For this application, use direct emulsion instead of water to apply the capillary film. I prefer using SBQ-sensitized pure-photopolymer films and emulsions for HD screens because they are the fastest to expose.
To get the best results, I apply the emulsion twice. I use a squeegee for the first coat to attach the film, and then I apply a double coat of the same emulsion to the inside of the screen using a round-edge scoop coater to ensure a good bond between the film and emulsion. You can dry the screen between the two steps if you like, but it isn’t necessary. But be sure the screen is dry before exposing it, remembering that you are creating a very thick stencil. With a heated drying cabinet, depending on the settings and the humidity in the screenroom, it should take about an hour. It will take several hours without a heated cabinet, and you might consider letting the screen dry overnight.
Avoid using weak light sources such as fluorescent tube units to expose thick-film screens. You might be able to get such an exposure unit to work, but the exposure times will be very long and the edge definition will probably not be as good. I prefer using metal-halide lamps in the range of 3000 to 6000 watts, allowing 90 seconds for each 100 microns of film thickness; this means a 400-micron film would take 6 minutes to expose. I’ve had mixed experiences using LED exposure units for this application, with results that have varied widely depending on the manufacturer. My advice is to talk to your stencil system supplier and test.
AdvertisementAfter exposing the screen, I like to let it soak in a dip tank filled with water for about 5 minutes. This isn’t necessary, but will make it easier to wash out the screen. Then I use a 1000-psi pressure washer with a V-shaped nozzle from about a foot away. Wash only the side that has the film attached to it. After washing is complete, dry the screen thoroughly. I prefer vacuuming my screens dry.
Ink Selection and Job Setup
There are several different types of HD formulations – inks, gels, and bases. HD printing is most commonly done with plastisol, but over the past few years, several water-based ink lines have been introduced that are also designed to achieve raised effects.
HD inks can be used straight out of the can and produce extremely sharp, well-defined edges. The most common colors are black and white; they can be mixed with other colors to create secondary colors. After curing, inks should retain their sharpness and have a matte finish.

FIGURE 1. A silver HD gel as it appears in the can.
HD gels are similar to inks and are available as a clear; they are also available with metallic or other particles in them. (See the silver gel shown in Figure 1.) When printed, they may or may not have dimension and sharp edges, depending on the gel you use. When fully cured, they should be glossy with rounded edges (see Figure 2).

FIGURE 2. A close-up of an HD gel print with black added to it. Notice the glossy finish and rounded corners.
 HD bases usually require toner or ink to be added for color. So many HD bases are available that it’s difficult to give a blanket description of what they do. Some rise like puff inks while others have a very hard finish that won’t flatten when foil is applied to them through a transfer machine, a popular use for HD bases (see Figure 3).
Since these are all three-dimensional inks, you should set your off-contact distance higher than you would for a standard print. If you are printing multiple HD colors in a job, set each screen a little higher than the previous one to avoid the ink not clearing the screen. For jobs that involve standard plastisols with HD effects, print the HD colors last.
 In all types of HD printing, use soft squeegees with minimal pressure. I like to use a 55/90/55 triple durometer squeegee whether printing on an automatic or manual press. Use a deep squeegee angle and just enough pressure to clear the screen. One stroke is best, as a second one can cause the ink to spread under the screen and smear, ruining the effect. You can get a wonderful textured look in your print by using a wallpaper brush instead of a squeegee and cutting the bristles down (see Figure 4). This is easiest when printing by hand, of course, but you can also trim the handle in addition to the bristles and then clamp the brush into the squeegee holder to print on an automatic. Figure 5 shows a close-up shot of a print with a silver gel onto an HD black ink that was done using this technique.

FIGURE 5. In this print, silver gel was printed on top of an HD ink using a wallpaper brush to create the textured effect.
Some HD inks are very thick when printed, but surprisingly, they flash fairly quickly, not unlike standard plastisol inks. I prefer using an IR flash unit when printing manually and a quartz unit on an automatic. The temperature needed to fully cure HD inks ranges from 325-380 degrees F through the entire ink layer. Because of the thickness of the ink deposit, in addition to raising the temperature, you’ll need to slow down the conveyor of your curing unit as well to get enough heat through the print to fuse the ink.
Remember what I mentioned earlier about the different finishes of HD inks and gels after curing. Inks should have a matte finish with sharp edges. If they are glossy after curing, chances are the temperature was too high. Gels, on the other hand, should have a glossy finish with rounded edges when they are fully cured. If they are undercured, they will look just like an HD ink, with a matte finish and sharp edges.
HD special effects require a lot of heat, so white shirts may not be the best choice for this work as they could easily scorch. Dark-colored shirts are definitely more forgiving. Performance fabrics and other heat-sensitive materials are also not the best fit for HD effects. When printing a lot of complex layers, use a hand-held heat gun to carefully gel the inks as a flash may get too hot in one area and cause a problem.

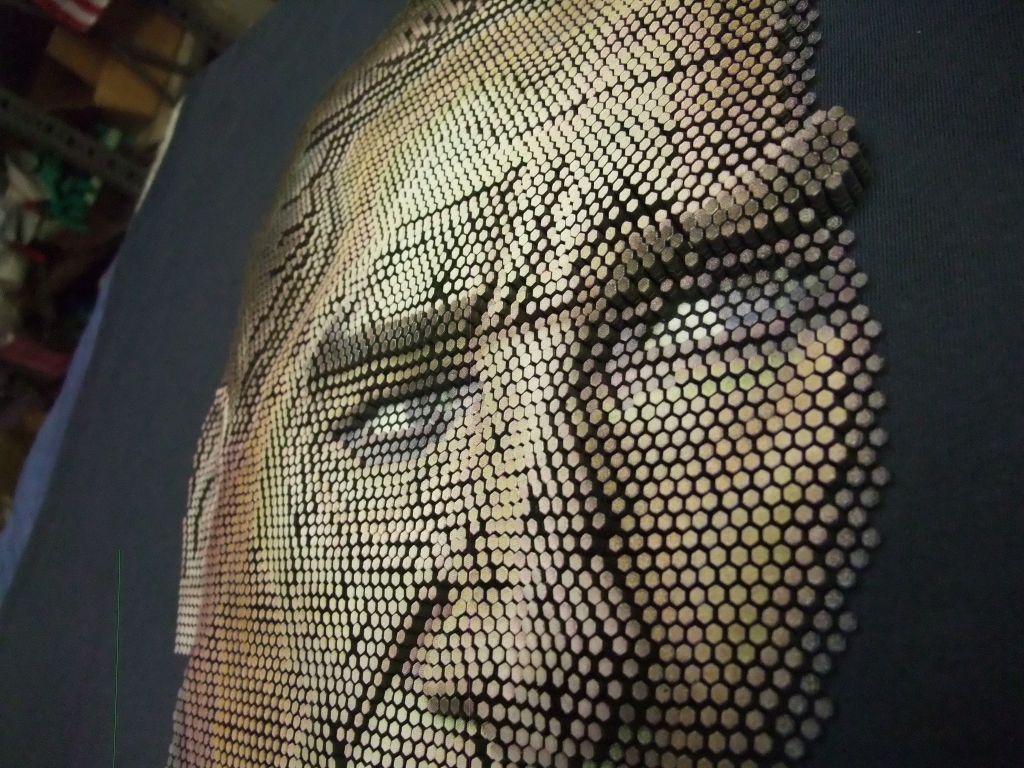
 This shirt features a four-color print using three HD inks and a color blend. The print was built up gradually, with about 15 layers of each color. Note how sharp the edges of the print remained despite the ink thickness and multiple passes.

Get Creative!
Most of the shirts for this article were done by European T-Shirt Factory, Istanbul, Turkey, a very capable, high-volume producer of printed apparel. (The shirts illustrating effects with gel inks and foil were done during a workshop.) These shirts were created for technical printing competitions and were designed to test the limits of HD technology, not to produce wearable garments. But the company does a lot of production work with HD effects as well, and these award-winning shirts suggest what this technology is capable of with a little creativity. With experience, I’m sure you’ll grow to love HD inks for special-effects work as much as I do.
Read more from Screen Printing‘s August/September 2017 edition.
Let’s Talk About It
Creating a More Diverse and Inclusive Screen Printing Industry
LET’S TALK About It: Part 3 discusses how four screen printers have employed people with disabilities, why you should consider doing the same, the resources that are available, and more. Watch the live webinar, held August 16, moderated by Adrienne Palmer, editor-in-chief, Screen Printing magazine, with panelists Ali Banholzer, Amber Massey, Ryan Moor, and Jed Seifert. The multi-part series is hosted exclusively by ROQ.US and U.N.I.T.E Together. Let’s Talk About It: Part 1 focused on Black, female screen printers and can be watched here; Part 2 focused on the LGBTQ+ community and can be watched here.


Inkcups Announces New CEO and Leadership Restructure

Hope Harbor to Receive Donation from BlueCotton’s 2024 Mary Ruth King Award Recipient

Livin’ the High Life


Bulletins
Get the most important news and business ideas from Screen Printing magazine's news bulletin.
-

 Art, Ad, or Alchemy1 month ago
F&I Printing Is Everywhere!
-

 Case Studies1 month ago
High-Density Inks Help Specialty Printing Take Center Stage
-

 Andy MacDougall1 month ago
Functional and Industrial Printing is EVERYWHERE!
-

 Columns2 weeks ago
8 Marketing Mistakes Not to Make When Promoting Your Screen Printing Services Online
-
 Editor's Note2 weeks ago
Livin’ the High Life
-

 Marshall Atkinson2 weeks ago
How to Create a Winning Culture in Your Screen-Printing Business
-

 Thomas Trimingham2 months ago
“Magic” Marketing for Screen Printing Shops
-

 News & Trends1 month ago
What Are ZALPHAS and How Can You Serve Them in Your Print Business?