Articles
How to Optimize Your Flash Curing
Learn ways to increase your production while reducing cost, heat, and wasted energy.
FLASH CURING HAS been an essential part of textile and T-shirt production for over 40 years. Yet, for all its benefits, flash curing has become a Band-Aid many printers use to correct poor printing practices. It can be a great problem solver for novice printers: Flashing between colors seems to fix registration problems, ink build-up on the screens, and other technique-related defects.
The problem is, flash curing means heat, and heat is wasted energy. Besides being expensive, heat also affects mesh tension, registration, production speed, and the performance of subsequent colors in the print sequence. Overuse of flash curing leads to heat retention on the platen and the surface of the garment. The heat can’t dissipate into the environment, so it gets transferred to subsequent screens, where it can heat or gel the ink and lead to image defects. The substrate also absorbs the excess heat, which can be a disaster with sensitive fabrics. We always want to use the minimum amount of heat to get the job done.
Unfortunately, new ink systems and the mandate by some of the major brands to remove PVC from the formulations have dramatically increased the need for individual flashing between colors. High solids acrylic (HSA) water-based inks, for example, require flashing and a cooldown station after every color. This triples the number of heads required on a press. A conventional 16-color press now requires 48 heads plus load and unload stations. The energy usage and high capital cost of such very large oval presses with multiple flashes is considerable, even with high-volume production orders.
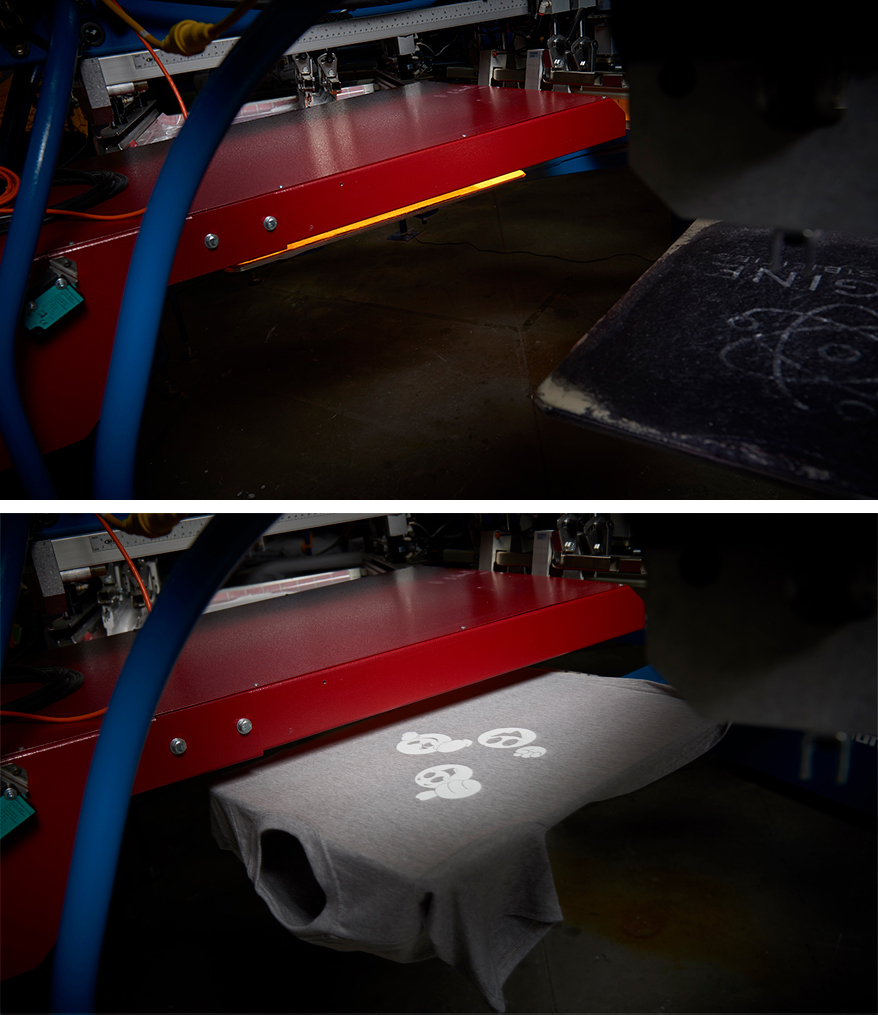
AdvertisementAnd it’s not just the inks: The technical nature of the fabrics we’re printing more often today also makes flash curing a critical control point in production. Materials like moisture-wicking polyester, performance apparel, stretch fabrics with Lycra, low-energy sublimated jerseys, and lightweight tri-blend yarns demand precise control of heat to achieve the right results. These substrates often have very narrow processing windows that result in high shrinkage, sublimation dye migration, or scorching if too much heat is applied or allowed to build progressively over time. (See Figure 1.)
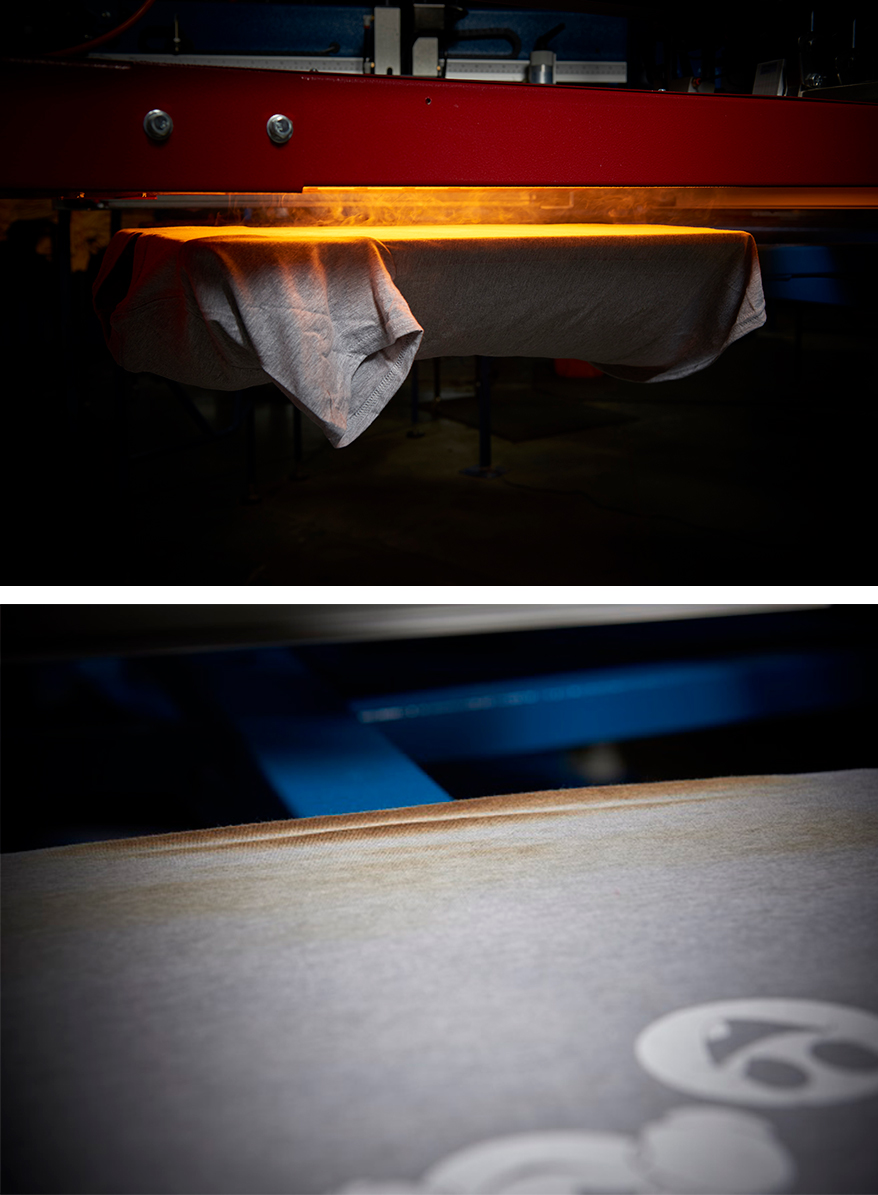
FIGURE 1 Look familiar? Flashing too long, at too high a temperature, can spell disaster with the heat-sensitive fabrics in high demand today. Telltale smoke during the flashing process (left) produces scorch marks (right) that mean a rejected shirt, in addition to lost production time and wasted energy. (Photographs by Jerome Vieh, with thanks to JW Contract Screen, Covington, Kentucky, for allowing us to shoot in their facility.)
And remember: Heat is the enemy. The hotter the printroom, the more difficult controlling the surface temperature of the garment will be. Cold rooms present different challenges, with wide temperature swings and rapid cooldown of the print surface. Often, you’ll see wide variations in image quality and color consistency when printing resumes after a press delay. If the job involves critical color matching, this can be a disaster.
With a better understanding of how flash curing works, you can apply it more efficiently and effectively in your plant. It may surprise you to hear that it’s possible to achieve flash times of half a second or less without risking the problems associated with heat buildup. With a correct flash setup, you can control surface temperature, dwell time, and the curing needs of different garment and ink colors, balancing heat throughout the process while minimizing the time needed to gel the ink. You can flash at the fastest speed of the press with little, if any, residual heat passed onto subsequent screens.
You can also save a lot of cash. In many shops, energy usage can be 10 times more than what is actually needed.
The Integrated Heat System
Flash curing systems first appeared around 1978. The two most common heating elements in the early units were cal-rods and blackbody panels, both of which produce radiant heat. These first-generation elements are inexpensive to manufacture and use, but not particularly responsive or accurate.
Panel flashes are still in common use today, mostly with manual printers and entry-level automatic presses. They are operated either in a continuous cycle, with the power always on, or they have proportional timers that surge the unit with power on a 15- to 30-second cycle. Either way, they are either power on or power off. (While it’s possible to reduce the amount of current through the proportional timers, it’s not commonly done with this heat source.)
Blackbody panels produce uniform IR heat when energized. The amount of energy (or radiance) they emit is expressed in watts of energy per unit of area (W/sq in. or J/sq cm), sometimes called the watt density of the emitter. The higher the watt density, the shorter the time needed to cure. Think of high watt density as the difference between a match and a blowtorch.
The theory of the energy distribution of a blackbody surface was developed by German theoretical physicist Max Planck in 1900. Planck’s law describes the spectral energy density of electromagnetic radiation (wavelength of light) a blackbody emits at a given temperature. In order for the temperature of a surface to be raised, it must absorb this radiant energy.
Planck defined a blackbody as a surface that completely absorbs all incident radiation. It also emits radiation at the maximum possible monochromatic intensity in all directions and at all wavelengths. This means that all colors have the same intensity of radiance. In other words, the emitted energy is color-blind – all colors absorb equally.
Planck further established that the radiance at each IR wavelength is the maximum amount possible for a given temperature. If we used an IR spectrometer to measure this emitted energy and plotted the result, it would follow the Planck distribution. Planck hypothesized that energy can be absorbed or emitted only in fixed units of photons of energy. This absorption does not change and is known as Planck’s constant.
What does this mean for us? The key takeaway is that IR energy emitted by a blackbody will have no visible color, and so all colors will absorb the energy equally. White will cure at the same rate as black. This is particularly attractive when you have heat-sensitive materials like tri-blends and you want all ink colors to gel at the same rate without overheating the yarn.
AdvertisementUnfortunately, blackbody panels are not particularly responsive and their cycle times are pretty broad. Temperature is usually controlled by retracting the unit away from the printing platen. The panel cycles in for the flash and pulls back after some designated time interval. This is fine for plastisols printed on cotton, but definitely not satisfactory for more sophisticated inks and fabrics.
The solution came with the introduction of quartz tube flash units, which use incandescent tungsten filaments. Think of them as incandescent light bulbs on steroids. They are highly accurate, instantly responsive, precise, and controllable – but they are also much more expensive than panel flash units. They can be controlled with percentage timers, thermostats that measure bulb temperature, or surface thermo probes that shut the lamps off when the desired surface temperature has been reached.
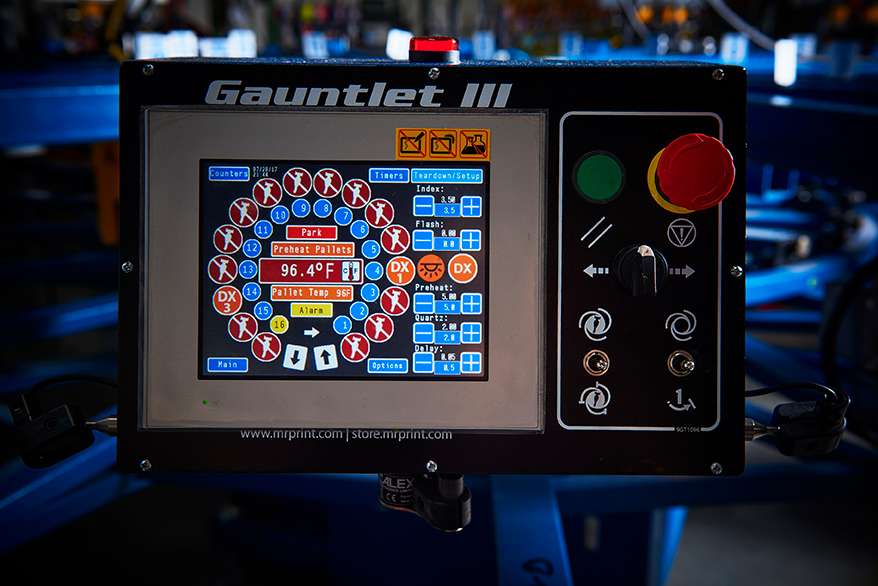
FIGURE 2 Presses with quartz flash units and thermo probes that interface with the control panel allow the surface temperature of the platens to be continuously maintained during a run.
Quartz flash units are very popular because they can be cycled down to a standby temperature and almost instantly energized to the target IR frequency. Because they are highly controllable, we can use Planck’s law to precisely calculate how much energy we need to get the job done. Better yet, they allow the use of thermo probes to monitor surface temperature continuously and adjust lamp intensity based on the target temperature. As platen temperatures rise during the run, the thermo probes reduce the flash cycle time to only raise the surface temperature to the target level. (See Figure 2.) This is a major advantage when dealing with temperature-sensitive materials like rayon (tri-blends), acrylics, and sublimation-prone polyesters.
Quartz units operate in what’s known as the near- to medium-IR region. In flash curing, IR frequencies do the work and are invisible to us. The light you see emitted from the bulbs is waste energy and is a function of the operating temperature of the bulbs. As the temperature of the filament increases, it begins to emit color – first a deep red, then red, orange, yellow, and finally white as it reaches very high temperatures. The shorter the wavelengths emitted (tending toward white), the more reflective the energy becomes.
Medium-wave IR lamps are much more expensive than the short-wave tubes used in the least expensive quartz flash units. Short-range bulbs are much more prone to selective color reflectance, meaning (no surprise) that white reflects and black absorbs. The difference is that white can reflect up to 95 percent of the energy while black can absorb up to 80 percent of it. In other words, it would take 16 times more energy to cure the white. Obviously, the black ink or the garment would be toast long before the white ink gels.
This is a very important concept. The whiter or yellower the light looks, the more reflective the IR will be to different colors. This means that if you see white or yellow light from your lamps, most of the energy is being reflected at the substrate surface by the ink.
Ideally, we would like to combine the radiance of a blackbody panel with the responsiveness of a quartz lamp. We can’t have both, so we compromise. Medium-wave and fast medium-wave IR provide good absorption across colors. There is some color sensitivity, but it is tolerable. The frequency of medium-wave IR is between 3.4 (1100 degrees F) and 3.9 (900 degrees F) microns. The higher the frequency, the lower the temperature and the less it reflects color. (See Figure 3.)
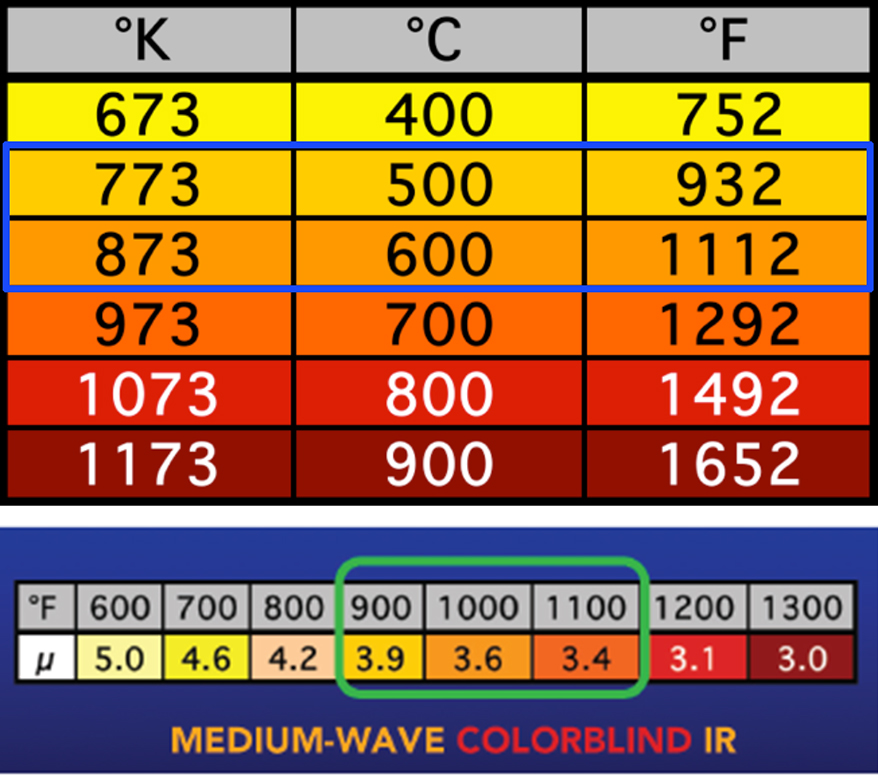
FIGURE 3 The ideal flash temperature to generate the medium-wave IR that works across the range of colors is between 900 and 1100 degrees F. Narrower wavelengths below 3.4 microns generate more heat that will be more reflective.
An item of note here: The most efficient transfer of radiant heat, in a color-blind mode, is around 900 degrees F. This is one of the reasons that the temperature on blackbody panels is set so much higher than what plastisol cures at, and it’s a source of confusion for many printers.
Higher temperature settings will not help you. In fact, the higher the temperature, the more reflective the surface becomes, and you actually lose efficiency. Setting the unit below 900 degrees F reduces the emitted energy, so the only way to speed up the transfer is to lower the distance between the panel and the surface, as we shall see.
Equipment manufacturers can theoretically pack lots of elements together to get a very high watt density, but with bulbs costing more than $80 each, it makes sense to use as few as possible to get the job done. (Not to mention that energy costs would be doubled with such a design and the life of the bulbs could potentially be shortened due to the close proximity of the lamps to one other.) As with most things in screen printing, the challenge comes down to balancing cost and effectiveness.

Manufacturers of quartz flash units use parabolic reflectors (FIGURE 4) to focus the energy evenly across the platen.
To improve the efficiency of the bulbs, manufacturers commonly back them with parabolic reflectors that help focus the energy evenly across the printing platen. In order to get maximum uniformity and heat distribution, each manufacturer has designed their reflectors based on the target watt density of their flash unit. (See Figure 4.) Each design has a specific focal distance. If you set your lamps higher, you will still get even heat, but the intensity will drop off quickly and your flash times will skyrocket. If you set them too close, the surface temperature will be very uneven and you will have heat banding in areas where the energy is being concentrated.
How far should you set the panel or lamp head from the print surface and what happens when you change this distance? This is a very important question, because small changes can make enormous differences in surface temperature.
Energy drop-off follows the inverse square law, the same formula used in screenrooms to calculate changes in exposure as the light source is moved closer to or farther away from the emulsion. Shops with fixed-distance LED exposure units no longer need this calculation to burn their screens, but for calculating surface energy, it is still very important.
The inverse square law states that energy at the surface varies inversely to the change in the distance. (See Figure 5.) The temperature rise is measured by multiplying surface energy by time. It sounds complicated, but it simply means that if you double the distance to the emitter, the amount of energy decreases by a factor of 4. Conversely, if you cut the distance by half, you quadruple the amount of energy at the surface. Put another way: If your flash time is 2 seconds at the current distance, then by halving the distance, your flash time will drop to half a second.
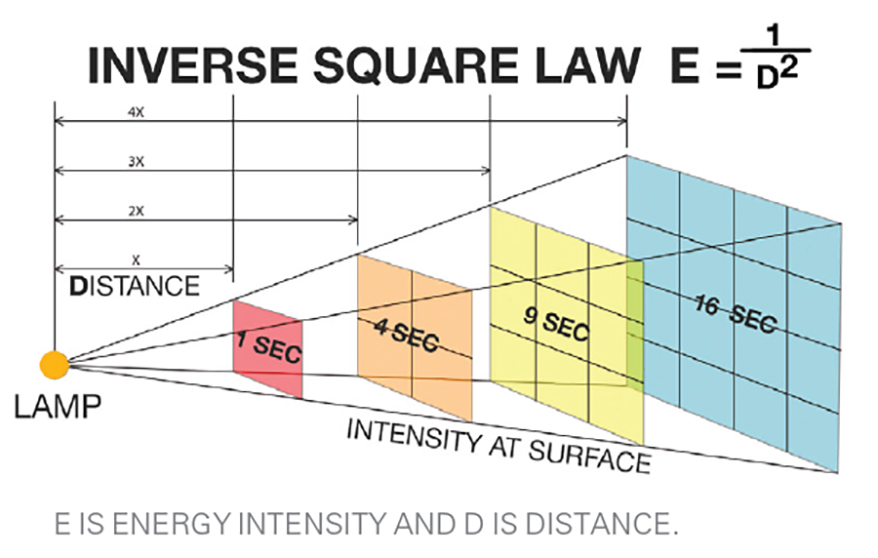
Following the inverse square law (FIGURE 5), users of blackbody panels can achieve faster flash times by decreasing the distance from the flash to the platen.
This is a great thing to know if you are using blackbody panels and you want to shorten your flash times. Set the surface temperature to 900 degrees F and then reduce your time according to how much you lower the panel toward the surface.
For quartz tubes with reflectors, however, lowering the distance will create severe temperature variation. You’ll likely burn the material while having uncured ink right next to the scorched areas. Increasing the distance with a quartz flash will also have a compound effect on energy loss due to the now-diffused reflector.
Pulling It All Together
So with a better understanding of how IR heat behaves, how do you put the pieces together? The key to high-production, efficient flashing is knowing how to direct and sequence the transfer of heat.
Whether you are using plastisol, water-based, or silicone ink, the goal of flashing is to temporarily set the ink so it does not transfer to the subsequent screens. Here, physics again come into play. Ink transfer happens because the printed ink film splits between the substrate surface and the backside of the following screens. The adhesive force of the ink binding to these surfaces is greater than the cohesive force holding the ink film together, so it splits in the middle, with some ink transferring from the substrate to the back of the next screen.
Our goal is to gel the ink layer to the point where the cohesive force is greater than the adhesive force, hence no transfer. We can do several things to help accomplish this.
First, use highly tensioned mesh with an off-contact distance of 1.5 millimeters (0.06 inches). Mesh tension of 25 newtons per centimeter is sufficient to minimize surface contact between the screen and the wet printed ink film. If you can limit the point of surface contact to the squeegee blade, there will not be enough force to lift the ink off the garment. While some transfer is inevitable, the vast majority of ink will remain on the garment.
Second, the critical ink film to flash is the underbase, which has different requirements than the surface or overprint layers. The primary objective with the underbase is to cause enough ink to penetrate into the garment to provide an anchor with the knit of the T-shirt. This ensures excellent washability for many cycles. But at the same time, we want the thinnest ink deposit possible.
Proper mesh selection is essential in meeting those requirements. My favorite is a 225/40 “S” thread mesh, which delivers excellent ink release with minimum squeegee pressure. It gives you a very thin, opaque layer of ink with minimum penetration into the garment, which will be very important once we apply heat to it. Our goal with the flash is to gel the ink just to the point where it won’t transfer. We definitely do not want to cure it completely because this creates a whole new set of problems. You know you have the right amount of gel when you can lightly touch the ink surface after flashing with no ink transferring to your hand.
To achieve this with the lowest amount of heat and shortest time, you need to preload heat into the system – a fancy way of saying to preheat your platens and warm up the ink. The key to maximum efficiency is to consider how much heat is actually needed to gel the ink. In shops that don’t understand this, flashes are too long, garments get saturated with heat, energy is wasted, and presses must be slowed down to deal with the consequences.
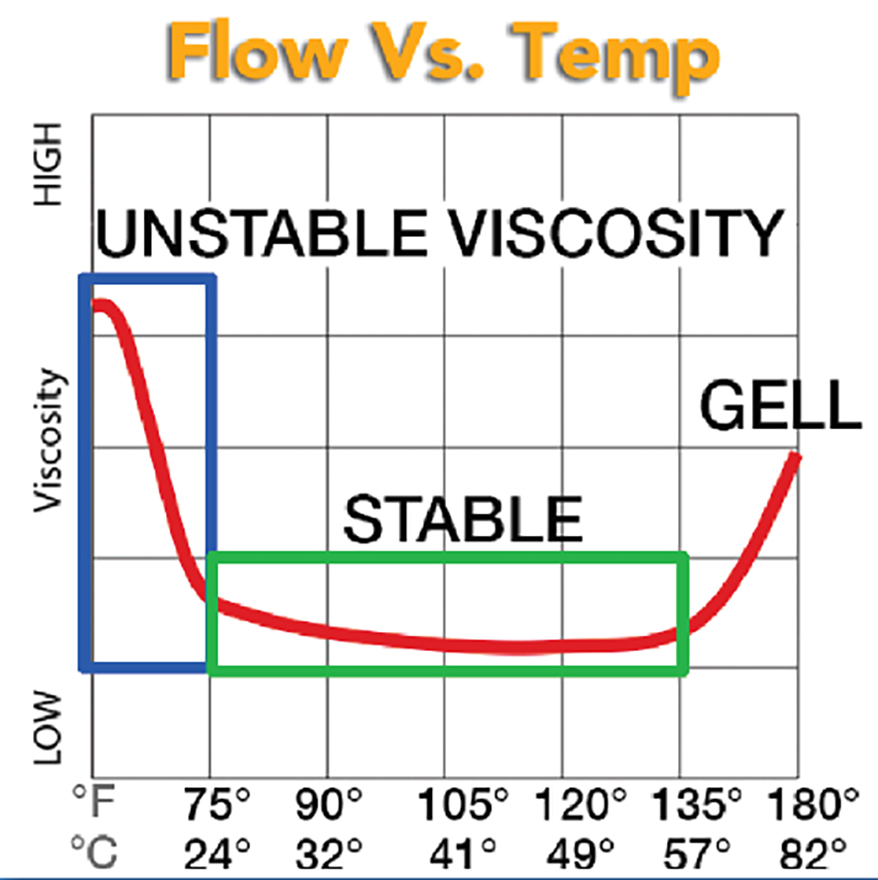
FIGURE 6 Plastisol ink is thermally sensitive. The colder it is, the higher its viscosity and the more unstable it will be on press.
Plastisol is still the most common ink used for T-shirt printing. It cures by fusion of a resin with a liquid plasticizer. Previously, polyvinyl chloride (PVC) was the primary resin; modern inks have moved away from PVC, but the principle is still the same. Think of the resin as grains of sugar dropped into a cup of tea. The solid sugar sinks to the bottom, and as you stir the tea, the crystals dissolve. The same thing happens with plastisol. The resin begins to absorb the liquid plasticizer when the temperature reaches roughly 180 to 210 degrees F. This means all we need to do is reach that temperature in the ink film.
Plastisol is thermally sensitive: The colder it is, the stiffer the ink and the higher its viscosity. (See Figure 6.) As we heat the ink, it softens and the viscosity drops. At 90 degrees F, the viscosity stabilizes and remains constant until it reaches 135 degrees F, where it begins to slowly thicken until it gels. This information will guide you in preheating the platens.
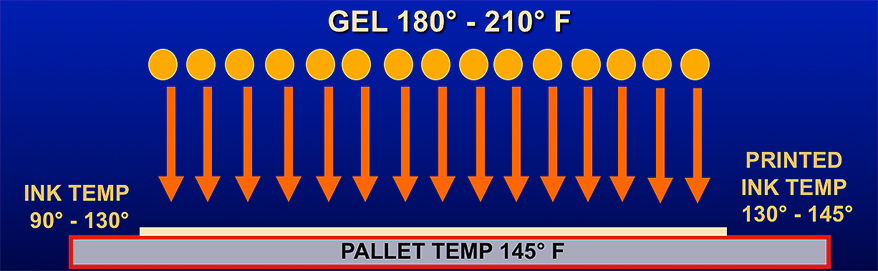
Put the press in no-print cycle with the flash units set for a 1- to 2-second exposure, then run the press until the platen temperature reaches ±145 degrees F. (See Figure 7.) Do this with ink in the screens so the hot platens will warm it. Do not start printing or color matching until the ink temperature exceeds 90 degrees F. The goal is to minimize the difference between the temperature of the ink and the screen and the temperature at which it gels.
Preheating the platens (FIGURE 7, left) will allow for quicker flash times. Cycle the press with inks in the screens to preheat the ink as well, lessening the work the flash unit must do. With quartz units and thermo probes tied to the control panel, the flashes cycle on and off as necessary (FIGURE 8, right) to maintain the ideal temperature, making it impossible to overflash.
When you print with the ink prewarmed and the platens hot, the radiating heat from the platen will almost instantly increase the ink film temperature to the platen temperature. This means that to gel the ink, you only need to raise the ink film by another 40 degrees F. It’s an insignificant amount and you can do it with a very minor temperature bump versus the heat blast common in so many shops.
The final component is to synchronize the flash cycle to the press index. Quartz flashes run at a reduced temperature between cycles. This way, a minimum surge of power will get the lamp up to peak emitting temperature in less than half a second. Set your flash cycle to start as soon as the press begins to index. Reduce the flash time progressively until the peak of the flash occurs just before the platen lands in the next station. (See Figure 8.)
This means the flash will be hottest before the platen is under it. The flash will power down as the platen is locking down under the elements, and the 40-degree F boost you need occurs during the cooldown cycle of the flash. The beauty of this method is that you cannot over flash.
AdvertisementAs the now-gelled ink rests under the cooling elements, the surface temperature will remain above 145 degrees F. (See Figure 9.) The printed ink film will stiffen as the press indexes into the next color, getting it closer to being properly gelled and reducing its tendency to split.
When the platens and inks are preheated (FIGURE 9), only a minimal temperature bump from the flash units is needed to gel the ink.
No cooling station is required, but you will benefit from rolling the gelled underbase ink film in order to create the smoothest possible surface platform for the overprint colors. A number of post-flash rollers are available. Some are heated (which is desirable) and others aren’t; all work well.
Mesh selection for the overprint colors is very important to the success of this approach. You want to print colors that will be applied to the underbase through the finest mesh possible. Normally, I use a 305/34 mesh as a compromise between wash durability and the thinnest ink film possible. It takes much more effort to split a thin ink film than a thick one, and it takes even more effort when the film is partially gelled. Ink deposited through a mesh with a 40-, 48-, or 55-micron thread diameter is very easy to split. Ideally, we could use a mesh with a 27- or 31-micron thread, but with today’s ink technology, such a very thin ink film would have poor wash durability and the print would fade sooner than it normally would.
The print sequence of the overprint colors helps as well. Starting with the color with the least area and printing the one with the largest overprint area last will minimize ink transfer. The tackiness or stickiness of the ink also comes into play. Some pigments are stickier than others. Printing small areas of high-tack ink will make it more difficult to transfer the ink film.
Summary
We have covered quite a lot of ground in this article. Having a clear understanding of the flash temperature and the differences between flash units is the starting point. Investing in fast, medium-wave IR quartz flash units is well worth it. They are extremely controllable and will allow you to progressively reduce the flash duration and temperature during the run. If your press has surface sensing thermo probes, as in Figure 2, this will happen automatically.
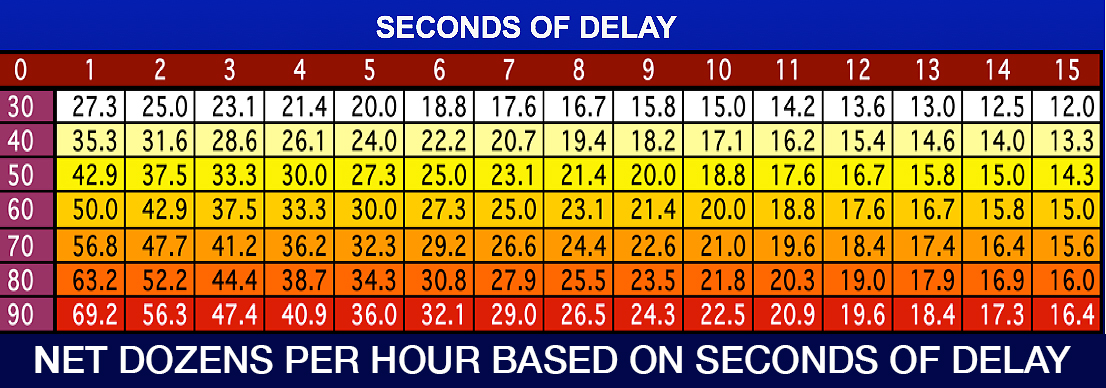
FIGURE 10 shows what such a decrease in flash times can mean to your production.
Preheating your inks and platens and balancing your system to control heat buildup will ensure the highest possible production with the least energy usage. The chart in Figure 10 can help you assess what eliminating those unnecessary seconds of flash delays from your print sequence can mean to your production. If your system is balanced, you can completely gel the ink without having to delay the print cycle at all.
Let’s Talk About It
Creating a More Diverse and Inclusive Screen Printing Industry
LET’S TALK About It: Part 3 discusses how four screen printers have employed people with disabilities, why you should consider doing the same, the resources that are available, and more. Watch the live webinar, held August 16, moderated by Adrienne Palmer, editor-in-chief, Screen Printing magazine, with panelists Ali Banholzer, Amber Massey, Ryan Moor, and Jed Seifert. The multi-part series is hosted exclusively by ROQ.US and U.N.I.T.E Together. Let’s Talk About It: Part 1 focused on Black, female screen printers and can be watched here; Part 2 focused on the LGBTQ+ community and can be watched here.


Inkcups Announces New CEO and Leadership Restructure

Hope Harbor to Receive Donation from BlueCotton’s 2024 Mary Ruth King Award Recipient

Livin’ the High Life


Bulletins
Get the most important news and business ideas from Screen Printing magazine's news bulletin.
-

 Art, Ad, or Alchemy2 months ago
F&I Printing Is Everywhere!
-

 Case Studies1 month ago
High-Density Inks Help Specialty Printing Take Center Stage
-

 Andy MacDougall2 months ago
Functional and Industrial Printing is EVERYWHERE!
-

 Columns2 weeks ago
8 Marketing Mistakes Not to Make When Promoting Your Screen Printing Services Online
-
 Editor's Note2 weeks ago
Livin’ the High Life
-

 Marshall Atkinson2 weeks ago
How to Create a Winning Culture in Your Screen-Printing Business
-

 Thomas Trimingham2 months ago
“Magic” Marketing for Screen Printing Shops
-

 News & Trends1 month ago
What Are ZALPHAS and How Can You Serve Them in Your Print Business?