Pad Printing
Published
17 years agoon
Pad printing is an effective method of decorating parts of all kinds, from ad-specialty items such as pens and golf balls to industrial products like faceplates and propane tanks. Numerous add-ons and custom options are available to make this already productive process even more efficient. Some are designed to enhance parts handling, while others address potential bottlenecks in the printing workflow. Let’s take a look some of these beneficial technologies.
Multiple colors
Most manufacturers offer standard vertical machines in one through four or six-color configurations. Multicolor open systems can have multiple cliches, or one cliche in a split inkwell. Independently adjustable cliches are more desirable than having all of the colors on a single cliche. The benefit of independent cliches is simply the ability to more easily absorb potential image-to-image and/or image-to-part-location problems.
Multicolor closed systems can also have single or multiple cliches. A few manufacturers offer small (60-mm) multicolor ink cups, commonly referred to as split ink cups, that allow you to print two or three colors. The limitation is that the colors must be side by side, unless your machine can pick up once and then stroke the print two or three times. In that instance, you can shuttle the part to print colors on top of one another. The other limitation is that split ink cups are difficult to manufacture, and thus are expensive.
Shuttles
The four types of shuttles are pneumatic, electronic, stepper-motor driven, and manual. Pneumatic shuttles are less expensive and more popular than the other automated shuttle systems. Pneumatic shuttles can have multiple positions by means of either multiple cylinders or a single, more expensive cylinder equipped with magnetic brakes. Be very careful to avoid any fluctuation to air pressure when working with parts of a critical nature on pneumatic shuttles.
Electronic shuttles have programmable, servo-driven motors. These shuttles are more expensive than their pneumatic counterparts and are somewhat hard to find. Stepper-motor-driven shuttles can be programmed to travel a desired number of steps between prints. Stepper-motor and electronic shuttles will typically last longer than pneumatic shuttles. Manual shuttles are used for low-volume jobs where the registration of colors is not critical.
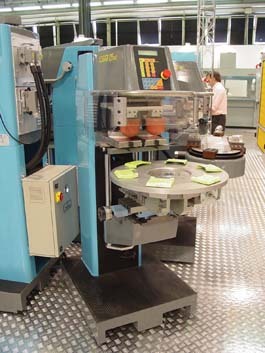
Rotary tables
Rotary tables for parts placement can also be electronic, stepper-motor driven, or pneumatic. Accuracy and price are determining factors. Electronic and stepper-motor-driven rotary tables are more expensive than pneumatic ones, but they can move weight more accurately. Rotary tables can be of just about any reasonable diameter, allowing anywhere from two to 12 or more fixtures to be attached (Figure 1).
Some manufacturers have modular rotary systems with up to four independently adjustable machine-mounting stations. Depending on the application, one, two, three, or all four machines can be used simultaneously, turned off individually, and even rotated 180º on their mounts to operate alone. This allows more than one job to run at the same time.
Racetrack conveyors
Racetrack conveyors are standard equipment on many multicolor machines. Racetracks are pneumatically driven in most cases and can have several nests or fixtures. If necessary, cams can be attached to allow the nests to rotate in between stations for printing multiple sides on a given part. These systems are rarely used outside of the pad-printing industry.
Over-under conveyors
Over-under conveyors are usually chain driven or precision-link mechanically driven. In most cases, parts simply fall off the nests into a container at the end of the line, or are transferred to separate conveyors for subsequent operations.
A few manufacturers use the bottom of under-over conveyors (Figure 2) for secondary operations. One in particular has under-over conveyors that present the part at a 30º angle after printing, rather than upside-down. This allows for easier access for post-print operations such as assembly.
Walking beams
Walking beams are a mechanical means of moving parts from one print station to another. Walking beams are limited in that they usually require that the part be picked up, moved over, and located against a stop of some sort for each printing operation. In most multicolor operations, it is not recommended that the part be moved in this fashion.
Hot-air dryers
Hot-air dryers are common on racetrack conveyors and rotary tables. Even though most pad-printing inks dry to the touch within a few minutes, most people prefer to have the additional drying equipment, especially if they are using two-component ink or printing multiple colors with a lot of coverage, or at high speeds.
Air blasts
In many single- and multicolor applications, it is necessary to increase the amount of air flow over the surface of the part and/or the pad in between prints to speed drying and increase adhesion of subsequent colors. Usually, a separate, compressed-air line and regulator are necessary, as are separate inline regulators for each individual branch.
Flame-treating equipment
Certain substrates require pre-treatment to increase their wettability—or ability to accept the ink and allow it to flow. Material such as LDPE, HDPE, PET, PP, PVC, EPDM, and EVA are examples. Flame-treating equipment requires propane or natural gas, so one of those two needs to be available near the machine.
Corona/plasma treating equipment
Instead of using flame, corona and plasma treating equipment use electrical current to produce an ion-rich discharge that increases the wettability of the surface exposed. This equipment is more expensive than flame-treating equipment, but it is faster, cleaner, and doesn’t require any fuel—only electricity.
Static-control equipment
Sometimes static is a problem. Packaging materials, plastics, the friction of the machine, or even low humidity can generate static. When necessary, static-control equipment like de-ionizing air nozzles and air knives can be added to the pad printer or feed systems.
Automatic pad-cleaning systems
Also known as tape-off, automatic ink-residue systems can remove debris from the pad very quickly. These systems can be add-ons to existing machines or built-in on some newer machines. In most cases, the frequency of tape-off (cleaning) is programmable. Usually the tape-off occurs after image transfer. After the pad prints and returns to the up position, a slide mechanism positions a tray of tape adhesive side-up under the pad. The pad compresses on the tray quickly, the slide moves the tray back out of the way, and the next printing cycle starts.
Ink pumps
Ink pumps are sometimes used on automated open systems. Particularly useful on vertical rotary pad printers, ink pumps automatically control ink viscosity. Usually, the ink drains from the lowest point in the ink well into a container where thinner is automatically added and mixed into the ink. The ink is then pumped back up into the inkwell.
Thinner-metering systems
Automated closed-cup machines can have thinner-metering systems added to continuously add thinner to the ink cup. These systems simply drip a predetermined amount of solvent into the top of the ink cup at regular intervals. Unless the ink cup has some feature that allows the thinner to be mixed into the ink, the thinner just sits on top of the ink, having very little effect on viscosity.
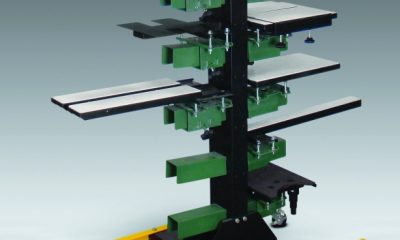
Pad shuttles
Pad shuttles can be a less-expensive alternative to the purchase of a larger machine in some applications. Using a split pad, a pad shuttle can, in some cases, print an image that would otherwise exceed the cliche or ink cup’s maximum image area. For example, let’s say you have two images of the same color that must print with their respective centerlines being 45 mm apart. When etched separated by this dimension, the two images don’t fit within your machine’s maximum image area. If these two images fit when separated by, for example, 30 mm, then you could etch them that way, pick them up with two pads butted together, and then shuttle the two pads apart to achieve the desired 45-mm separation prior to image transfer.
Pad shuttles can also be used to print two images on two different sides of the same part when both images, etched side by side, are picked up at the same time by two separate pads. After image pick up, the pads move along the X-axis to position the first print. After the first print, the nest rotates while the pad shuttles into position for the second print. In order for this to work, your machine needs to be able to pick up once and print twice, and you must have both a pad shuttle and a rotating nesting fixture (Figure 3). You can also print two colors this way if you have a two-color ink well on a one-color machine.
Nesting fixtures
All too often nesting fixtures are an afterthought in tooling up for a job. In pad printing, it is necessary for the part to be properly supported, especially at critical stress points and areas where the forces of pad compression are greatest. The nests also need to be ergonomically correct and where several nests are necessary, within a few thousandths of an inch of being exactly the same. In some applications, the type of pad to be used must be taken into consideration when designing the nests.
In the interest of saving time and money, it is sometimes tempting to go to the tool maker down the street to have your nests built. That is fine, provided that your tool maker has experience dealing with pad printing. On several occasions, I have seen quality problems result from a lack of pad-printing-process knowledge in the design of nests, especially on automated systems.
Pad-printing-equipment manufacturers should know how to design and build nesting fixtures correctly. Let them build your nesting fixtures, at least until you become proficient enough to be able to educate the tool maker you use.
Of course, not all parts are critical enough in nature to warrant having someone build your nests. Some parts require little more than double-sided tape or a lump of modeling clay as a nest. A lot of people make their own nests for one-up printing jobs by using automotive body filler. You can find or build a container, mix the filler, pour it into the container, then place your part in at the angle you want. (Spray the part first with a light lubricant so you can get it out of the filler after it cures.) After 30 minutes or so, the filler is cured hard enough for uneven surfaces, tight corners, and rough edges to be sanded away for a reasonable, consistent fit.
Safety guards
Operator safety is everyone’s concern. Some pad printers don’t require any safety equipment, while others require complex enclosures or light curtains. Most automatic machines come with standard safety guards or shields that are effective and don’t interfere with the efficient operation of the printer.
The potential for productivity
If you can develop a way to hold a part steady and transport it, chances are good that the product is a suitable candidate for pad printing. Consider the types of jobs you currently accept, think about the types of projects you’d like to handle, and involve the equipment manufacturer in these processes. In the end, you’ll come to appreciate that pad printing really is both a precise and flexible method of decorating.
About the author
John Kaverman is national sales manager for Innovative Marking Systems, Lowell, MA. He holds a degree in printing technology from Ferris State University and has more than 20 years of combined experience in the pad-printing and screen-printing industries. Kaverman welcomes comments and questions and can be reached by e-mail at john@padprinters.com.
Editor’s note: This article is an excerpt from John Kaverman’s Pad Printing Technical Guidebook. You can purchase the book by visiting the ST Online Bookstore at http://www.stmediagroup.com/st-bin/quikstore.cgi or by calling 513-421-2050.


Subscribe

Magazine
Get the most important news
and business ideas from Screenprinting Magazine.
Most Popular
-

 Case Studies2 months ago
High-Density Inks Help Specialty Printing Take Center Stage
-

 Art, Ad, or Alchemy2 months ago
F&I Printing Is Everywhere!
-

 Andy MacDougall2 months ago
Functional and Industrial Printing is EVERYWHERE!
-

 Columns3 weeks ago
8 Marketing Mistakes Not to Make When Promoting Your Screen Printing Services Online
-

 Editor's Note2 weeks ago
Livin’ the High Life
-

 Marshall Atkinson2 weeks ago
How to Create a Winning Culture in Your Screen-Printing Business
-

 Thomas Trimingham2 months ago
“Magic” Marketing for Screen Printing Shops
-

 News & Trends2 months ago
What Are ZALPHAS and How Can You Serve Them in Your Print Business?