Garment Printing
Published
24 years agoon
Let’s begin this article with a quiz. Which of the following statements are true, and which are false? Dye migration happens only on 100% polyester fabric. You can help prevent dye migration by putting blank garments through a hot dryer prior to printing them. Low-bleed plastisol will always stop dye migration. The answer to all of these statements is false, yet many garment printers believe them to be true. To understand and correct these misconceptions, we need to explore the realities of dye migration. What is dye migration?
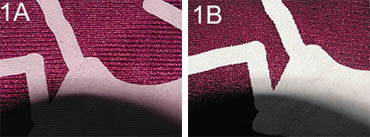
Let’s begin this article with a quiz. Which of the following statements are true, and which are false? Dye migration happens only on 100% polyester fabric. You can help prevent dye migration by putting blank garments through a hot dryer prior to printing them. Low-bleed plastisol will always stop dye migration. The answer to all of these statements is false, yet many garment printers believe them to be true. To understand and correct these misconceptions, we need to explore the realities of dye migration. What is dye migration? The terms dye sublimation, dye migration, and bleeding are often used interchangeably to describe a complex problem in garment printing: an unwanted reaction between plastisol ink and the dye used in the garment fabric–particularly in polyester fabrics and blends. In fact, these three expressions are not interchangeable. They actually refer to the various steps in a single process that results in a printed ink film taking on the color of the garment. The dye in the fabric sublimates under high temperatures, migrates into the ink layer, and the result is bleed, a discoloration of the cured print. Bleeding begins with sublimation All matter has three physical phases: solid, liquid, and gas. A good example is H20. Its solid state is ice, its liquid state is water, and its gaseous state is steam. Even a material such as lead has three phases–if you get it hot enough, lead becomes a gas (but not one you’d wish to breathe). Normally, a solid changes to a liquid and then to a gaseous state as it’s heated. But in the sublimation process, materials skip the liquid phase or pass through this phase so quickly that the change is essentially a direct conversion from solid to gas. The best example of sublimation is dry ice, which is solid carbon dioxide. As it warms, it converts from a solid to a gas and diffuses into the surrounding air as a temporary fog. Unfortunately, textile screen printers must deal with sublimation on a regular basis. Heat-set dyes are used in fabrics that contain polyester, and when these dyes are heated to their sublimation temperature, they convert to a gas. If this sublimation process takes place in the presence of plastisol ink, the sublimated dye can migrate into the plastisol. And that, of course, leads to bleeding in your print. The worst part of this scenario is that the results of dye migration may take several days to show up after printing–perhaps after the garments have been packed and shipped to the customer. Any fabric containing polyester is vulnerable to dye migration and bleeding. This includes 100% polyester fabrics, such as the examples shown in Figures 1A and 1B. (Figure reference: Polyester garments, such as these examples of printed dazzle cloth, are notorious for dye sublimation and migration problems. Note that in Figure 1A, portions of the red garment printed with white plastisol take on a pinkish cast, indicating that the fabric was exposed to excessive heat at some point of the printing process. When temperatures are kept below the sublimation threshold of the dye, however, printed areas show clear white without evidence of bleeding (1B)). It also includes polyester-cotton blends, such as the samples depicted in Figures 2A and 2B. (Figure reference: A common misconception is that only 100% polyester fabrics are prone to dye sublimation/migration. As these 50/50 cotton/poly blend examples demonstrate, any time dyed polyester is present in a fabric, the potential for bleeding exists (2A). Again, careful control of temperature during printing will result in a successful print (2B)). Some colors are more prone to dye sublimation than others, and red shades are notorious for being the worst. But all colors are capable of sublimating to some degree. The best rule of thumb is that every dark shade of fabric containing polyester should be treated with respect and tested as discussed later in this article. The mechanics of dye migration On polyester fabrics, the gaseous, sublimated dye becomes trapped underneath the plastisol ink layer, and it solidifies as it cools. But now, the bond between the dye and the polyester fabric has been broken and that dye molecule is free to attach itself to something else. Since plastisol is a wonderful solvent for the dye, it allows the color to migrate throughout the printed ink film. So what you are really seeing in that discolored print is a diffusion of the dye particles throughout the ink layer. The dye particles don’t just move to the surface; they are evenly distributed throughout the ink layer. If all the sublimated dye migrated to the surface of the print, you’d see much more intense discoloration than you typically see. Polyester dyes will sublimate at temperatures ranging from 360-420°F (182-215°C). So why this is a problem if you normally cure the garments at 320°F (160°C)? The answer is more complicated than you might think. When you set the dryer to 320°, you are actually trying to maintain a tunnel air temperature of 320° in order for the ink film to reach that temperature and cure properly. However, drying chambers are open at both ends, and you are adding relatively cold shirts at one end. To compensate for heat loss and maintain the correct temperature at the belt surface, the dryer must actually exceed a 320° temperature in certain locations. This tendency is prevalent in electric infrared (IR) dryers. The IR panels used in these systems may reach a surface temperature exceeding 700°F (370°C)! Furthermore, IR panels radiate their heat downward toward the belt and can cause a fabric’s surface temperature to increase rapidly beyond the 320°F. If the fabric gets hot enough, the dye will sublimate and migrate into the print. The best solution for IR dryers is to balance dryer belt speed and temperature settings to provide the lowest amount of heat exposure that results in successfully cured prints. For best results, I suggest using a thermocouple or temperature-sensitive tape to measure the temperature on the belt as garments pass through the chamber. A gas dryer is less likely to create the kind of super heat that leads to sublimation, but that doesn’t mean gas-dryer users are off the hook. Like everyone else, they likely also use flash-curing units–the single biggest culprits in creating dye-migration problems. Garment printers use flash-curing units to gel underbases, to compensate for art problems by partially curing parts of designs, and to partially cure thick ink deposits to prevent smearing when overprinting. However, the influence of the flash-curing unit on dye-migration problems is frequently overlooked. These problems stem from failing to adjust flashing parameters for particular jobs, shop conditions, or ink types and deposit thicknesses, as well as failing to control the amount of heat that press platens absorb from flashing. In my testing and experience, the flash-curing unit has proven to be the biggest cause of dye migration, with electric IR dryers coming in second and gas dryers being the least problematic. As you’ll learn shortly, the best way to begin reducing dye-migration problems is to improve your flashing technique. "Low bleed" doesn’t mean "no-bleed" Low-bleed inks are designed to prevent dye migration. They are not designed to prevent dye sublimation. No ink can stop dye from sublimating at excessive temperatures. Low-bleed inks contain chemical-blocking agents that work on the dye only to stop migration. But if there is more sublimated dye than can be handled by the chemical-blocking agent in the ink, you may still get some dye migration. The dye simply overpowers the ink’s ability to stop it. Remember, plastisol manufacturers call them "low-bleed" inks with good reason: They are not perfect insurance against dye migration. Preventing sublimation/migration The top consideration in preventing dye sublimation and migration is heat. Wherever necessary, avoid exposing polyester-containing fabrics to excessive heat. First, control your flash temperatures and flash time. Remember that when a press is cold, you need more heat to flash an ink layer. Once the platens heat up, however, the ink film will gel much quicker. Warm platens pre-warm the fabric and ink before the platen even swings under the flash, reducing the flash time required. Conversely, when the platen is still cool, it absorbs a large portion of the flash energy and longer dwell times are required. Just remember that as the platen heats up, more heat goes directly to the fabric and ink, and the potential for dye sublimation and migration increases. You can control the heat delivered by your flash unit in two ways. First, if the unit supports temperature adjustment, you can turn it down as the press platens heat up. Secondly, you can speed up production once the platen is warm, exposing each platen to a shorter period beneath the flash unit. (A third, less practical option is to increase the distance between the flash unit and platens. This will reduce the heat to which your platens and prints are exposed, but it also tends to slow production significantly). Most shops set flash temperatures to the same level for each job and then speed up production after the flash unit and press platens warm up. Unfortunately, this approach doesn’t take several important factors into account. Not all jobs have the same flash requirements. Some underbases are heavy, solid layers of ink, while others are much thinner or contain halftones. Different types of underbases can have drastically different requirements for flash time and temperatures. So a flash-curing unit cannot be considered a "set and forget" device. The flash unit must be diligently controlled for each job, just as you would adjust a squeegee or floodbar to achieve a specific result. Anyone who operates or assists in running a press must be competent in operating a flash-curing unit. Flashing is a critical part of the printing process, but unfortunately, many operators don’t know their way around a flash unit. The general procedure I have witnessed in various garment shops involves having a supervisor or lead person set the flash unit, then allowing no one else to touch it. Monitoring platen temperature is the easiest way to prevent excessive heat caused by flashing. On an automatic press, when the platens become too hot to touch, you can usually dial down the temperature on the flash unit. My experience has been that you can balance press speed and flashing temperature so that platens never exceed 120°F (49°C). At this temperature, platens feel warm to the touch, but not hot. If you can maintain platens at this temperature or lower, it is very unlikely that dye sublimation will occur. And without sublimation, there can be no dye migration. Platen temperature is less of an issue in a manual printing setup, yet more dye-migration problems seem to occur in manual operations. Why is this? Most often, the cause is inconsistent use of the flash unit. Most manual flash units sit in one spot, and the platens are sequentially pivoted under the flash. Once in place, dwell time and exposure to heat is determined solely by the operator, who is supposed to rotate the platens at precisely the right time. But if the printer is distracted or has trouble with the next garment, for example, the shirt under the flash may see a lot more heat than it needs. That extra heat will set off the sublimation-migration-bleeding process. To control flashing in this scenario, use a flash unit that operates on a timer. Such flash-curing systems can be accurately adjusted to flash only as much as is necessary, and they don’t care if the printer is distracted by having to stop and put more ink on the screen. When a change in flash units is not practical or affordable, then the solution is printer education and training. A good manual printer is keenly aware of time without consciously thinking about it. He or she can settle into a production rhythm, subconsciously counting off flash time and sliding the platen out of the way at the right moment. If you do not have a printer with this kind of acquired "instinct" or coordination, you will definitely need some form of timer. Rarely will you experience dye-migration problems if you have your flash unit and dryer settings under control and are using a low-bleed ink. Notice that I say "rarely." This is because you may still see occasional occurrences in which the garment itself is to blame. Lower-quality goods, for example, may lead to bleeding because they contain excess dye, not because of dye released through sublimation. This is why fabric testing is so important. Testing the fabric When you are uncertain about the quality of a fabric you’re about to print, you need to run rudimentary wet- and dry-crock tests to confirm whether the fabric contains excess dye that is not bound to the polyester. When I say "rudimentary," I mean that you don’t necessarily need a formal crock-testing setup. You only need a clean piece of white fabric wrapped around your finger. Begin by rubbing the piece of white fabric two or three times across the same area, using a firm stroke. Then, with a wet piece of the same white fabric, repeat the test on a different area of the garment. If you get a significant amount of color transfer with either test, I would suggest rejecting the garment. If you get some very faint coloration from either test, the fabric is probably alright, but it is still advisable to do some further testing. Print a test garment and place it in a warm place for at least 24 hours. I like to place it on a dashboard in the sun, which is not very scientific, but it works. If you see no dye migration after the test period, you can safely print the garments. Otherwise, they should be rejected. Remember that even low-bleed inks cannot handle an overload of sublimated dye. It’s better to not print the job than to print it, have it rejected, and have to print it again. The role of your screens Since excess heat is the cause of dye sublimation and migration, it follows that reducing the need for heat will help prevent these problems. You can do this with some changes in screen preparation. Namely, you must ensure adequate screen tension, which is critical in preventing dye sublimation. If you have well-tensioned screens and use a proper off-contact setting, you will be better equipped to print a thin, opaque underbase. Higher screen tensions allow you to print ink only where it is needed: on top of the fabric. If you drive the ink into the fabric, which frequently happens when your screens are under-tensioned, the heat will have to reach into the garment to get at the print, which leads to dye sublimation. With properly tensioned screens, your dryers won’t have to work so hard to cure the thinner ink layer sitting on the surface of the garment. Finally, higher tensions allow you to raise your mesh count on underbases, thereby decreasing the ink-layer thickness even further and requiring you to expend even less heat energy. Stop bleeding away your profits A controlled printing process and regular garment testing both play a critical role in reducing dye sublimation, migration, and bleeding. Once you’ve mastered these skills, you’ll be rewarded by higher quality on your decorated garments, as well as greater productivity (which, of course, is always linked to profitability). If you can flash faster, you can print faster. If you use less ink and less energy, you make more money. And if you can reduce dye migration and bleeding in the process, you’ll retain more customers.


Subscribe

Magazine
Get the most important news
and business ideas from Screenprinting Magazine.
Most Popular
-

 Case Studies2 months ago
High-Density Inks Help Specialty Printing Take Center Stage
-

 Art, Ad, or Alchemy2 months ago
F&I Printing Is Everywhere!
-

 Andy MacDougall2 months ago
Functional and Industrial Printing is EVERYWHERE!
-

 Columns3 weeks ago
8 Marketing Mistakes Not to Make When Promoting Your Screen Printing Services Online
-

 Editor's Note2 weeks ago
Livin’ the High Life
-

 Thomas Trimingham2 months ago
“Magic” Marketing for Screen Printing Shops
-

 Marshall Atkinson2 weeks ago
How to Create a Winning Culture in Your Screen-Printing Business
-

 News & Trends1 month ago
What Are ZALPHAS and How Can You Serve Them in Your Print Business?