Articles
Published
17 years agoon
A question that I’m commonly asked in e-mails is, "How do I take my current knowledge and experience in screen printing and elevate it to start producing simulated-process prints on dark and colored garments?" Needless to say, this is a hard question to answer in a single e-mail reply. You must manage many variables in art, separations, and printing before you can make the leap, but I am a believer in setting high goals and always reaching for that next level.
A question that I’m commonly asked in e-mails is, “How do I take my current knowledge and experience in screen printing and elevate it to start producing simulated-process prints on dark and colored garments?” Needless to say, this is a hard question to answer in a single e-mail reply. You must manage many variables in art, separations, and printing before you can make the leap, but I am a believer in setting high goals and always reaching for that next level. This column will outline how to bridge the gap between basic multicolor printing and the realm of simulated process printing in an efficient manner with the least amount of stress possible.
Any significant change in a company, especially a manufacturing company that is already comfortable with its process, benefits from an orderly implementation that starts with a change in mentality, then in practice, and finally in overall process. The best results that I have seen in elevating the quality or standards of production come when everyone involved feels some responsibility and ownership in the production process.
The mentality of simulated process
If the first order of change in quality and level of difficulty is a shift in mentality, then it needs to be carefully planned out and implemented in a set of steps that will get everyone involved with the knowledge that they need to accomplish the goal. I have seen big problems when the gauntlet is thrown down and the printing staff is suddenly expected to produce higher quality work of significantly greater difficulty with no additional compensation or appreciation.
Managers and owners can be very tempted to think in black and white and just demand that new levels be reached, but this will commonly be answered with resistance and minimal achievements. That is why it is important to start with the mentality change. Ask yourself, “Who needs to think, train, and act differently for this process to be accomplished, and how can they be motivated?” This is sometimes called the “people factor,” and I cannot emphasize enough how a properly motivated group will rocket through a change like this. Some simple ideas on how to motivate people for the move to simulated process:
1. Provide training for your printers and artists, and include rewards/incentives for achievements. Of course, few rewards compare to a monetary one, but sometimes a change in title is even enough. Silly as it may sound, a new title of master printer or senior artist can do wonders in motivation when the money isn’t available.
2. Set a realistic timetable for necessary training and tasks to be completed. Factor in some practice and training downtime for each area: artwork prep, separations, screenmaking, press setup, and printing production.
3. Find a role model or mentor—a person who has handled this level of printing before—and use that individual as a resource and motivator. Everyone should believe that they, too, can accomplish the task.
Wait until everyone is on board for the challenge before you venture out onto the practice stage. As you move through the more difficult steps in a higher level of printing, it is important to review the mentality and morale of the people involved and make sure they are willing to hang in through the learning curve. People commonly agree to things in a meeting, but then when the going gets tough, they revert back to old habits or get turned off quickly. So stay tuned to your group’s morale, and let them know the achievement is one that everyone will be proud of in the end.
The practice of simulated process
I understand that the typical motivation for a company to move up into simulated-process printing is customer demand for specific artwork, but the ideal situation is not to attempt a whole new process from scratch on a deadline-driven customer order. Doing so is setting up a situation for serious and expensive problems.
A better approach is to carefully move through each area of the screen-printing process with a practice piece of artwork that will allow for a fair amount of time along the way for the learning curve. The downside to this is that practicing doesn’t generate money. Nevertheless, I have found that practicing simulated-process printing is essential to developing consistency and catching problems before the scrapped shirts start piling up at the end of the dryer. The proper walk-through of simulated-process practice starts in the art department, then moves to the screen department, and finishes at the press.
The art department’s role
Proper training in the art department will stave off most of the potential headaches with simulated process work. The artwork you print will only be as good as the set of separations used to create the screens, so the approach your artists take to produce designs needs to be systematic and controlled. Most of the problems tend to be out of the artist’s hands when a customer provides the artwork, so it’s best to make your first foray into simulated process printing with artwork that’s been created to work well with this method.
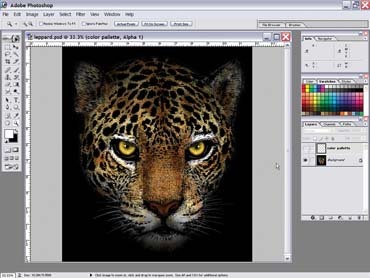
A design I created for the wildlife market was constructed specifically for use in simulated-process printing (Figure 1). The simplest way to create artwork like this is to begin with a controlled palette of colors that you select as you illustrate. In this case, I used a palette of eight colors that I blended to produce the final artwork (Figure 2). Some artists hate to force the design process within a palette such as this, but it really pays off when it comes time to separate and print the artwork. An art department making the switch to simulated process for the first time should start by defining a palette of inks. These inks are then simulated in Photoshop as color palettes for the art department to use when designing garment graphics. These colors can be saved as swatches that every artist can refer to when creating new designs. In the beginning, your shop will have its hands full with art development and separation, so relying on swatches to help control color use will save your staff time and hassle.
Another issue when it comes to training your artists is to have them create artwork that has definitive edge quality and blending. The edge quality of an image is determined by how well the contrast of the outlines in an image work to border the areas of color. Whenever possible, it is ideal to have a sharper, more defined edge quality to an image that will be separated for simulated process. Fuzzy edges are problematic, and the trouble is compounded by the reproduction through a halftone screen. A good way to control this is to use black outlines to define all of the shape edges in the design. They don’t have to be thick lines, and in the case of my design, I used a black hairline as rough border to confine the shapes and colored areas within (Figure 3).
The blends in a design created in house should be controlled to shift cleanly from one swatch color to another and/or drop in value as they fade into a dark garment. Gradual color blends that overlap each other without a solid opacity may produce hues that are difficult to separate and can cause color-matching problems when on press. Always remember that overlapping colors on the monitor have different hues than what your inks will reproduce.
The final steps of art preparation and separation are accomplished simultaneously. The preparation stage of the art should be minimal, assuming the art was created correctly in house using a predetermined color palette. On the other hand, if the customer supplied the art, you will truly never know what you are going to get. It’s common for customer-supplied artwork to have way too many colors, blends that are not definitive to two separate colors, and poor edge quality. In these cases, be sure you work with the customer to have the art recreated so that it will reproduce well—or make it crystal clear that what they see on paper can’t possibly represent what the final shirt will look like. If everything is wrong with the art (poor quality edges, too many colors, etc.), then try to insist on a recreation before moving the art to the separation stage. Doing so ensures that the final work will be of higher quality. No one ends up happy with poorly printed shirts.
Separating for simulated process can be a very artistic process in itself. I have found the best, most consis-tent results by splitting the artwork into channels in Photoshop and then resetting the colors in the channels to match the art for a clear picture of the final product. You can use any number of paths to split the artwork into channels. One of these methods is to use plug-in separation software for Photoshop that does it for you. The plug-in’s success depends largely on how well the artwork is prepped and designed.
Another method that is more meticulous and time consuming (but very accurate) is to carefully extract each color as a curve and then define it as a spot-color channel. These spot channels are then recombined in order into one file to simulate what the final print will look like (Figure 4). In this manner, the artwork is essentially separated and rebuilt at the same time. This approach also gives the clearest picture of the final print’s appearance. The task of pulling each spot channel takes significant training and a careful, detail-oriented eye to accomplish well, but the results can be simply awesome. An effective way to train an artist (or non-artist) to handle spot channels is to bring in a consultant who has significant experience. A third party can walk artists through the practice of prepping and separating with the least amount of press downtime.
In a tough spot, it’s really a smart move to send a difficult file out to have it professionally separated so that the films will be the best possible reproductions. The money that this costs will pay off with less press downtime and fewer scrapped shirts (or prevent the loss of the whole order). The goal is to move into simulated-process screen printing with confidence that the art and separations are the best that they can be.
Simulated process in the screen room
The big difference in changing up from regular spot-color printing into simulated process is that you’ll be printing finer lines and halftone dots. A good way to practice is to simply print a variety of halftone dots in solid blocks from 0-100% and in graduated blends to make sure you’re selecting screens that can hold the dots. I always advise companies that are just starting out to avoid really fine dots. Newcomers will find it was easier to hold and print a 42-line/in. halftone than a 55-line/in. one. Remember that you’ll want to have at least four threads of mesh per dot, so a, 42-line halftone would require an 180-thread/in. mesh. Check the tension of each screen with a tension meter. It’s more important for the screens to be similar in tension than all high tension, but having a tension above 18 N/cm really helps control variables such as screen stretch and color peel-up onto the back of the next screen.
Other things to consider and watch are the exposure system and the washout to make sure you’re getting a really good, clean border on the dots in your stencil. Look at the dots through a loupe and check for nice clean edges. If your emulsion looks ripped at the edges or distorted, you will have to adjust the exposure time and possibly the pressure of the washout system. The shirt will never be any better than the films—and subsequently the screens—so it’s essential that all of your hard-earned work in the art department is properly reproduced on screen.
The final print
Carefully managing all of the other areas in the workflow really takes the pressure off of the printers. The main difference between simulated printing and conventional spot-color printing is what I call skim-rather-than-smash printing. Using tight screens with fine details requires some practice with the press. Start by going through this checklist and make adjustments where necessary:
1. Make sure everything is level (platens, screens in down position, and squeegees if you’re using an automatic press).
2. Check your squeegee blades and sharpen them if necessary. I recommend a 70-durometer squeegee or a triple-durometer 60/90/60 for most simulated-process printing.
3. If you’re running a manual press, make sure you practice printing some halftone gradations so that you can be sure you’re not crushing out your tonal range. Make your body move like a machine, and try to keep even pressure and speed from side to side and through the length of the stroke.
4. Test your inks. Inks commonly need viscosity reduction for halftone printing. Just be careful you don’t adjust the opacity by breaking them down too much. A couple of percentage points in viscosity change go a long way.
5. Find the brightest, low-tack (won’t stick in the screen) white available to create a good underbase.
6. Test your flash, and flash just enough to gel the ink and avoid pick up on the next screens.
7. Watch for registration shifts that may indicate the press isn’t aligned properly or that a poorly stretched screen is causing excessive screen stretch.
8. Control the pressure! This is often the biggest problem. Remember that detailed printing is more about the careful release of the ink from the screen than smashing it through the mesh. Pressure control will help control dot gain. I’ve seen manual press operators who can print as good a shirt as an automatic press when they carefully control their squeegee pressure.
The final result
Take time to evaluate your simulated-process results and document the problems, as well as the things that are working. Recording the process is a good final step for ensuring that you’ll be able to repeat it for the orders that follow. Don’t be discouraged if the first print on the press doesn’t look right. Try to determine right away whether a color change or art change is the problem. Often a small color change will give good results when the artwork is prepped and separated on target. Switching from spot-color printing to simulated-process printing can seem like a really big hurdle, but with right mindset, careful preparation, and diligent execution, it can lead to garment prints that will make your company proud and your customers ecstatic.


Subscribe

Magazine
Get the most important news
and business ideas from Screenprinting Magazine.
Most Popular
-

 Case Studies2 months ago
High-Density Inks Help Specialty Printing Take Center Stage
-

 Art, Ad, or Alchemy2 months ago
F&I Printing Is Everywhere!
-

 Andy MacDougall2 months ago
Functional and Industrial Printing is EVERYWHERE!
-

 Columns3 weeks ago
8 Marketing Mistakes Not to Make When Promoting Your Screen Printing Services Online
-

 Editor's Note3 weeks ago
Livin’ the High Life
-

 Marshall Atkinson3 weeks ago
How to Create a Winning Culture in Your Screen-Printing Business
-

 Thomas Trimingham2 months ago
“Magic” Marketing for Screen Printing Shops
-

 News & Trends2 months ago
What Are ZALPHAS and How Can You Serve Them in Your Print Business?