Prepress & Screen Making
Published
19 years agoon

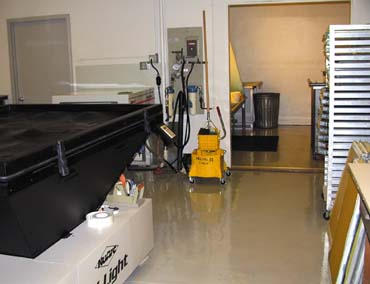
My travels give me the opportunity to visit a lot of different shops, in many different states and countries. Of everything I’ve seen, the screenroom remains one of the most interesting areas. It also is usually one of the scariest areas in the business. It’s almost always dark, dirty, wet, and generally grungy. I’m amazed that such a critical part of the process is so grossly ignored and abused. In keeping with the renewal theme of the new year, I would like to offer some real-world, inexpensive fixes that can transform a sometimes miserable space into an area you can be proud of (Figure 1), one that dramatically improves the overall quality of the screens you produce.
Out of the dark
Let’s start with lighting. For some reason, most screen areas are very dark. I can understand the logic. Keeping it dark keeps the screens from exposing prematurely. That is only part of the story. Screens are sensitive to UV light, usually in the form of stray daylight leaking into the room. The first step is to turn all of the lights off and look for leaks into the room. Mask, caulk, or otherwise plug any leaks you find. There should be no white light entering the room.
The next step is to actually add some light to the room. Diazo and photopolymer emulsions are insensitive to yellow, gold, orange, and red light. These are called “safelights” because it is safe to handle photosensitive materials in the presence of these colors. The brightest of them is yellow light. There are a number of different options available to you. I prefer to use yellow or gold fluorescent tubes. I use a 2 x 4-ft laying panel with a diffuser cover. These are available for about $40 from any good home-improvement or building-supply retailer. The tubes are 4 ft long and are rated at 40 watts. I use two of them. This will illuminate an area at least 10 x 10 ft under excellent light level. You will be amazed at how much dirt you’ll find in the room when the lights finally come on.
To further maximize the light level, give the screen-coating and shooting areas a new coat of paint. Use a good grade of semigloss in white, ivory, or a very light pastel gray. This has the effect of intensifying the light level, as the available light is reflected throughout the room. The semigloss is easy to keep clean and can be wiped down with soapy water with no ill effect.
A fresh start for the floor
With the light levels up and the walls nice and bright, the next step is to tackle the floor. This is usually a big mess. Years of dripped and spilled emulsion are usually evident. Because the room has been so dark for so long, a lot of dust and dirt has accumulated in the corners and around the baseboards. The floor is almost always bare or sealed concrete. Now is the time to throw in some elbow grease and get it cleaned up.
Your first job is to scrape and chip all of the dried emulsion off the floor. When you’ve loosened it all, suck up as much dirt as you can with a good shop vacuum. Make sure to put a damp rag over the exhaust so you don’t spew all that dirt back up into the room. With all the dirt gone, it’s time to give the floor a new look as well.
Here I recommend a two-part aliphalic epoxy. This is going to cost about $1.00/sq ft. Get the epoxy from a professional paint-supply company. You do not want the kind that goes on garage floors. It is too weak for our needs. The kind I use is definitely industrial; it’s used to paint oil rigs and other equipment exposed to saltwater and caustic chemicals. It comes in a number of different colors. I prefer a light, platinum gray with a high-gloss finish. The epoxy is thick. You need to apply it with a squeegee. It will fill in any cracks, dips, nicks, chips, or other surface imperfections. When you are done, the floor will look like a mirror–and it is darn near indestructible.
Once you mix the epoxy’s two components, you have about 45 minutes to get it all down before it hardens. Once it starts to go, there is no stopping it. When you apply the coating, make sure you have lots of ventilation–and you must wear an approved vapor respirator. The epoxy is nasty stuff and must be treated with full care and attention. An overnight cure makes the floor ready for normal shop traffic.
You need three more things to complete the screenroom makeover: a set of good racks for drying your screens, a dehumidifier big enough to handle your shop’s air volume, and a set of fans to keep the air moving. Let’s start with the fans. These are cheap, cheap, cheap. Your best bet is to go down to a home-goods store and purchase two 20-in. box fans. This will set you back between $20-30. While you are there, purchase two 20-in. furnace filters that are rated for handling allergens. These filters are about $5-7 each and filter to a 5-micron particle size. This is smaller than the dust that usually settles on our screens, but large enough not to choke the air flow of the fans.
When you get back to the shop, tape a filter to the intake side of each fan with some 2-in. duct tape. You now have a filtered source of moving air that actually cleans the air that circulates over your screens. You will be amazed at the difference in the quality of your screen coating with this simple addition.
The dehumidifier is a must. The reason for this is that as coated screens dry, the water they contain evaporates into the air, increasing the humidity level. The higher humidity makes it more difficult to dry the screens completely and evenly, which can cause problems during screen exposure. If you are in a high-humidity area already, the problem only becomes worse. You want to use a dehumidifier to keep the relative humidity in the room between 40-60% and fans to move the air around so that screens dry more evenly.
If you coat and expose up to about 25 screens per day, a 16-pint dehumidifier should be sufficient. You can purchase one from any number of sources for less than $150. Make sure you have some way to drain what is captured. To monitor the temperature and humidity, go to Radio Shack and purchase an in-door/outdoor combination thermometer/hygrometer. This is a battery-operated unit that you can buy for less than $35. It will measure the high and the low for both temperature and humidity over the course of the day. This is helpful in determining just how stable the climate is in your screenroom.
The drying rack you use can be made from 0.5-in. PVC sprinkler pipe, 1- x 1-in. lumber, or purchased as a rolling rack. I like the rolling rack because I can move it away for cleaning. The rolling unit is more expensive, and I would consider it to be an optional, yet handy, purchase. Your main concern is to have good air circulation around the screens when they are drying horizontally in the rack. Avoid any kind of configuration that traps air as the screens dry.
With the makeover now complete, there is only one other purchase you will need to make. This is a dedicated mop and bucket, along with a Wet Floor sign. These items are in the screenroom at all times. We keep some soapy water in the bucket and mop the floor in our screenroom several times during the day. We are in the habit of doing this while the screens are being exposed. The beauty of frequent, quick mop-ups is that the room never gets dirty as long as you keep it up. Once you establish the routine, it becomes second nature and you do not even give it a second thought.
Keep it clean
The payoff from this relatively small investment in terms of time and materials (itemized in Table 1) is a screenmaking area that delivers capillary-quality screens on demand. Pinholes and dust defects are all but eliminated. Furthermore, the high light levels improve morale and pride in workmanship. It’s amazing how great the returns are on the less than $500 you’ll spend keeping your shop clean.
| Table 1 Screenroom Makeover Supply List | |
| (1) 2- x 4-ft laying fluorescent panel | $40.00 |
| (2) yellow or gold fluorescent bulbs | $12.00 |
| (1) 1 gallon semigloss wall paint | $21.00 |
| (1) 1.5 gallons two-part aliphalic epoxy | $90.00 |
| (1) 1 gallon epoxy thinner | $20.00 |
| (2) 20-in. box fans | $20.00 |
| (2) 20-in. 5-micron air filters | $14.00 |
| (1) roll 2-in. duct tape | $4.00 |
| (1) 16-pint dehumidifier | $150.00 |
| (1) temperature/humidity monitor | $35.00 |
| (1) mop, bucket, safety sign | $60.00 |
| Total: | $466.00 |
About the author
Mark A. Coudray is president of Coudray Graphic Technologies, San Luis Obispo, CA. He has served as a director of the Specialty Graphic Imaging Association Int’l (SGIA) and as chairman of the Academy of Screenprinting Technology. Coudray has authored more than 250 papers and articles over the last 20 years, and he received the SGIA’s Swormstedt Award in 1992 and 1994. He covers electronic prepress issues monthly in Screen Printing magazine. He can be reached via e-mail at drdot@aol.com.
©2005 Mark Coudray. Republication of this material in whole or in part, electronically or in print, without the permission of the author is forbidden.

Subscribe

Magazine
Get the most important news
and business ideas from Screenprinting Magazine.
Most Popular
-

 Case Studies2 months ago
High-Density Inks Help Specialty Printing Take Center Stage
-

 Art, Ad, or Alchemy2 months ago
F&I Printing Is Everywhere!
-

 Andy MacDougall2 months ago
Functional and Industrial Printing is EVERYWHERE!
-

 Columns3 weeks ago
8 Marketing Mistakes Not to Make When Promoting Your Screen Printing Services Online
-

 Editor's Note3 weeks ago
Livin’ the High Life
-

 Marshall Atkinson3 weeks ago
How to Create a Winning Culture in Your Screen-Printing Business
-

 Thomas Trimingham2 months ago
“Magic” Marketing for Screen Printing Shops
-

 News & Trends2 months ago
What Are ZALPHAS and How Can You Serve Them in Your Print Business?


