Prepress & Screen Making
Published
11 years agoon
It’s time to swear off the carwash, the backyard hose, and the bathtub. Now is the time to transform your screen-printing shop into one that incorporates a streamlined screen-cleaning, reclaiming, and reuse operation. In doing so, you will convert that once most time-consuming and undesirable task in the shop into one that is a much more satisfying job. And, you will be able to institute a system that will let you effectively reuse frames.
It’s time to swear off the carwash, the backyard hose, and the bathtub. Now is the time to transform your screen-printing shop into one that incorporates a streamlined screen-cleaning, reclaiming, and reuse operation. In doing so, you will convert that once most time-consuming and undesirable task in the shop into one that is a much more satisfying job. And, you will be able to institute a system that will let you effectively reuse frames. By embracing the latest screen-cleaning systems and techniques—ones that offer a simplified way to quickly and efficiently remove ink, emulsion/stencil, and haze/ghost images—you will be able to produce screen frames that look like new and are ready for reuse.
The tangible benefits of this approach show up on the positive side of the balance sheet. They are revealed in the impact on our environment, including the elimination of harmful chemicals released into septic and drainage systems. Benefits become evident in concerted efforts to conserve water resources when you institute a filtration system in conjunction with a no-splash-back washout booth. With that said, the following offers a step-by-step approach to the most effective and economical solutions for screen-frame cleaning, reclaiming, and reuse.
How to choose necessary equipment
It makes sense to purchase a group of systems. This way, the guesswork is taken out of piecing together what you think you need and which systems/chemicals will be compatible for the entire screen-cleaning, reclaiming, reuse operation.
Washout booths constructed of polypropylene or stainless steel are the norm with a polypro booth generally being the standard. This is because of their durability and ability to withstand chemicals, drains that are easy to clean, aluminum bases for stability, and, most importantly, space for a recirculation and/or filtration system. Some smaller booths are UPS-shippable.
A filtration system is not a luxury, but rather a necessity. Choosing one that fits underneath a washout booth enables every screen printer the opportunity to easily and responsibly meet city/county/state regulations for proper disposal of waste particles. Choose a system that is properly designed to offer this function. The end result will be that all residue will be left behind and the remaining water will test as drain safe.
A recirculation system is another environmentally sensitive piece of equipment that helps to eliminate harm to our environment and cuts down on product cost. This is due to the system’s ability to filter out the ink pigments coming off of the screen during cleaning and then filtering the pigment out of the screen wash. As a result, the printer reaps the benefit of using the screen wash many times over. Choose a recirculation system that is constructed of polypro or stainless steel and will hold 15-20 gal of eco-friendly screen wash. Ideally, it will include an air pump system that will circulate the chemical through a rolled filter media, circulate it through a baffled cleaning chamber, circulate through a canister filter with final recirculation back through an applicator brush with a trigger action.
A drum-pumping station can be a great add-on, depending upon the quantity of screens you are cleaning/reclaiming and the hours you spend per day in this function.
Generally, a single-unit system sits on top of a 55-gal drum of product such as degreaser, screen wash, stencil remover, or press wash. It utilizes an airflow pump with a trigger-action dispensing nozzle that is hooked up to a compressor. Placed next to a washout booth, the system simplifies the screen-cleaning process by enabling the operator to provide a consistent flow of product with easy spraying action. Over the short and long term, the DPS system enables savings in time used in screen cleaning and in product used due to less waste. And, with the elimination of plastic spray bottles, the environmental impact is also minimized.
When it comes to a pressure washer, why use a heavy-duty, industrial unit instead of a consumer system? If you are not a home-based or small studio cleaning and reclaiming one or two frames a week, you should invest in a heavy-duty, commercial system. Investment in inexpensive systems will cost about $200. If you’re a shop that spends an hour or two per day reclaiming screens, then you will most likely burn though this type of pressure washer in six months to a year. By the time you add up replacement costs and time lost printing to searching out a system, it makes sense to invest in a pressure washer with 1500 psi that has an adjustable spray nozzle (anywhere from $795 to $925 on a proven, industrial system that will last close to a decade). An added benefit to a commercial system is lower noise output.
Reclaiming a screen
First, evaluate environmental considerations by seeking out an economical, proven product group that is environmentally friendly. Small shops or home-based studios, where space is minimum, will be grateful for low-to-no-odor, citrus-scented chemicals that are drain-safe. But for all companies, no matter the size, it is important to start to make this swing on behalf of our families, communities, and the planet.
Screen degreaser is used prior to coating a screen with emulsion as the need to remove dust and other particles is primary. Choose a biodegradable, ready-to-use chemical, if possible. The product will allow for non-abrasive mesh treatment, acting like a wetting agent for use on all synthetic and wire screen mesh. Ideally, it will offer an even sheeting of water for complete, uniform stencil adhesion to improve film lamination and bonding of direct photo emulsions.
The steps to application are: Place the screen in washout booth and thoroughly wet with water; apply the degreaser onto a brush or directly onto the screen; scrub the mesh on both sides, letting it lather up. Rinse the screen with a pressure washer to remove all product from both sides, especially around frame edges. Next, flood the screen. Now you have a screen that will enable the emulsion or capillary film to freely adhere to the mesh. Finally, let the screen dry in a clean, dust-free area. If you are able to, go the extra mile and include a drying cabinet. This piece of equipment can also be used to store screens that have been coated with emulsion. The cabinet will keep them light-safe.
A color change on-press due to a smeared image or the need to change colors during the press run can be best accomplished by choosing a non-flammable on-press ink remover that will quickly flash off. Again, choose an eco-friendly chemical that can also be safely disposed of as a solid waste when it has dried on the rag. Again, opt to check out/choose a biodegradable, eco-sensitive product that will work rapidly and efficiently on plastisol inks, leaving no solvent residue on the screen (you will probably need to test a few products).
Screen wash (Figure 1) is used after you have finished the printing project. A water-soluble screen wash with a high flash point to remove plastisol ink from the screen emulsifies ink rapidly and rinses off easily with water. During your product-testing phase, make sure that the product you choose does not leave a residue.
Here are the steps for ink removal: Using a squeegee or card, scrape off the excess ink from your screen. Place the screen in washout booth. Spray the product directly onto both sides of screen. The ink will start to liquefy. Using a brush, scrub back and forth, up and down, on both sides of the screen, adding a little product as needed, agitating the mesh to free the ink. Rinse off both sides of screen with your commercial pressure washer and watch the ink run off. If you miss a spot, just agitate a little more and rinse off with the pressure washer. Remember, choosing a product that is biodegradable and eco-sensitive and meets VOC Regulations, Rule 1171 will be an ideal choice.
Emulsion/stencil removal
This is the first and last job anyone wants to perform. But, as a necessity, it is important to seek out and test products that will remove emulsion and capillary film from screens as efficiently and happily as possible and without harming the screen mesh. Again, look for a product that is eco-sensitive, biodegradable, and ready to use—or one that can be diluted with water. Also look for a product that performs well in all climates.
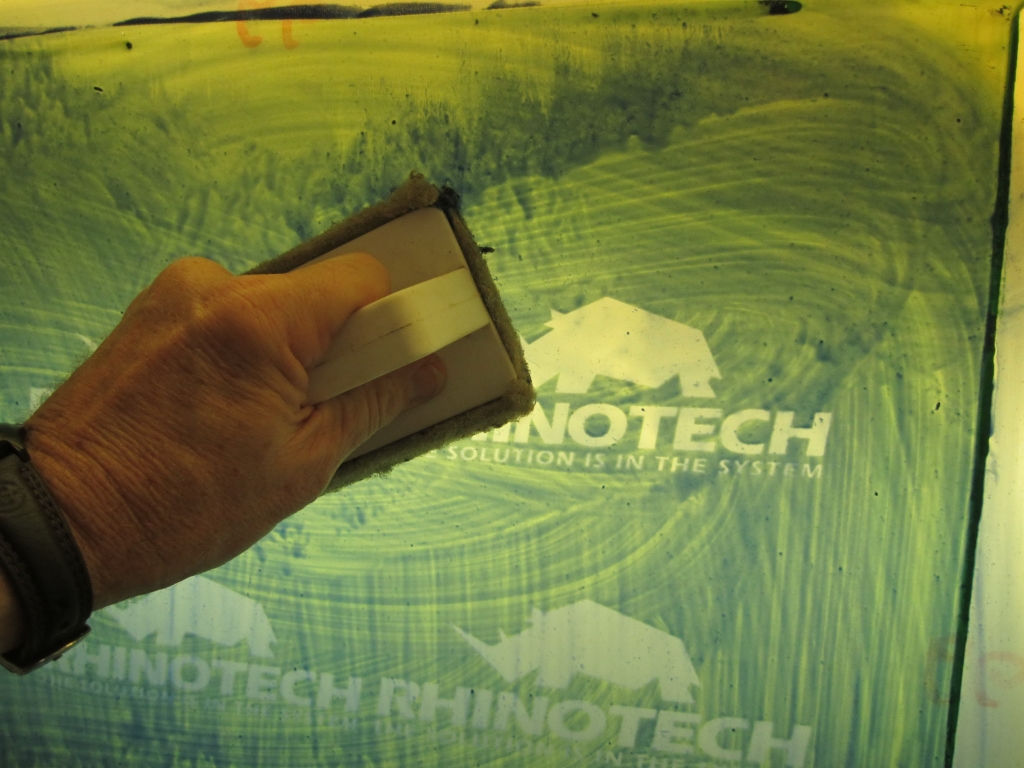
Start the reclaiming process by propping the screen in your professionally built, polypro washout booth. Wet the screen on both sides. Apply emulsion remover onto the screen. Using a wet scrubber pad, scrub the stencil on both sides (Figure 2). You will notice that it will begin to break down the stencil. Let it sit for a minute or two, enabling the remover to work. When removing the stencil from a number of screens, apply the remover to all of the screens. Once completed, return to the first screen, blast it with a pressure washer (Figure 3), and continue down the line until all screens are finished. Important note: Do not let the stencil remover dry on the screen! This will cause many emulsions to harden, making it almost impossible to remove after that.
Because the emulsion is a thicker product, similar to the consistency of glue, this is the time to consider installing a filtration system. This will prevent all particles 5 μm and larger from going down the drain.
Removing haze/ghost images is achieved though using an eco-sensitive product that is formulated to remove embedded UV-, conventional-, and plastisol-ink residue from the screen after emulsion removal. It effectively lifts the haze and embedded ink from the mesh, then emulsifies and dissolves the ink resins, binders, pigments, plasticizers, etc. The solution suspends resins, so reattachment to the mesh surface is prohibited, allowing for water-rinse removal.
Try to choose a haze remover that is biodegradable so that you will be fully compliant with all rules and policies in your own community regarding what you can dispose of down the drain and through a septic system. The routine use of haze remover helps to ensure that no stains will build up on each other, making it more difficult to clean later. The haze remover (also an excellent degreaser) will not harm mesh.
The process of de-hazing is this: Apply a small amount of the haze remover onto a brush and scrub both sides of screen frame. Let it sit for one to three minutes. You will see the haze lift up and break apart. Rinse it off with water and, finally, rinse with a pressure washer. Of vital importance: Remember to rise the water off first so that when you use your pressure washer, the remover will not splash back at you.
This process also enables the printer to actually de-haze multiple screens at a time. By the time the last screen is brushed, the printer is able to return to the first screen, rinsing it with an even, back-and-forth action motion with a pressure washer. Finally, let the screen dry.
Aluminum screen frames and quality polyester mesh are not inexpensive, so it’s important that a printer get the most use out of them (Figure 4). By following the steps outlined above, especially the de-hazing and degreasing sections, the printer can help extend the life of the mesh and spread the initial investment in a screen out over many, many print runs. Proper storage of screens when not in use is also of utmost importance. Using an industrial-grade rolling rack that accommodates screen sizes of 20 x 24 in. and 23 x 31 in. can help you cut down on the potential of broken mesh
Keep an eye on your hands
Screen cleaning and reclaiming can aid in ravaging hands! When the last screen is reclaimed, it’s an advantage for printers to use a product that will help to heal and soothe hands. Plenty of products are available to clean hands, prevent moisture loss, and rehydrate skin.
Gregory Markus is president of RhinoTech, www.rhinotechinc.com.
Economics of Screen Cleaning, Reclaiming, and Reuse
As with any business, the main focus is the bottom-line. By incorporating the following steps into your workflow, you will save time, money, and effort involved in the cleaning, reclaiming, and reuse of screens. Remember, we are screen printers! If we are not printing, we are not making money. This is as critical for the one-, two- and three-person shops as it is for the large screen-printing companies. In summary:
1. Use a good, eco-friendly product that does not cost more than traditional cleaning products. Generally, you will use less of the eco-product per use as compared to a conventional product.
2. Investigate, compare, and invest in a recirculation system. A recirculation system generally holds 15-20 gal of screen wash and works to filter out ink pigments, cleaning the screen wash for reuse many times over. Another advantage is that it is a system to move you toward environmental compliance.
3. Take the leap to purchase a dip/soak tank that will hold stencil remover. Why, you ask? Because a dip tank allows the printer to reuse the stencil remover many times over instead of just letting it run down a drain each time it is sprayed onto a screen in the washout booth.
4. Invest in a filtration system. You will be infinitely grateful that you chose to purchase this system, and it’s much less expensive than a plumber! Emulsion is a thick substance, and you do not want to take the chance of clogging drain pipes and septic fields. Finally, a filtration system will help you comply with local, state, and federal rules governing what goes down the drain.
5. Invest in a heavy-duty pressure washer. With this system, you save by not having to replace homeowner-grade units every six months or a year. You will speed up screen-cleaning/reclaiming efforts and, again, save lots of money to spend on other screen-printing equipment, supplies, and accessories.
6. A printer’s goal is to distribute costs over many projects. For example, a 20 x 24-in. aluminum screen frame with 110-thread/in. mesh range runs $22-26. Reusing that screen for 25 different jobs makes the per-screen cost per job approximately $1. This is the ultimate reason why taking care of screen frames is a vital business practice.


Subscribe

Magazine
Get the most important news
and business ideas from Screenprinting Magazine.
Most Popular
-

 Art, Ad, or Alchemy2 months ago
F&I Printing Is Everywhere!
-

 Case Studies1 month ago
High-Density Inks Help Specialty Printing Take Center Stage
-

 Andy MacDougall2 months ago
Functional and Industrial Printing is EVERYWHERE!
-

 Columns2 weeks ago
8 Marketing Mistakes Not to Make When Promoting Your Screen Printing Services Online
-

 Editor's Note2 weeks ago
Livin’ the High Life
-

 Marshall Atkinson2 weeks ago
How to Create a Winning Culture in Your Screen-Printing Business
-

 Thomas Trimingham2 months ago
“Magic” Marketing for Screen Printing Shops
-

 News & Trends1 month ago
What Are ZALPHAS and How Can You Serve Them in Your Print Business?