Articles
Published
20 years agoon
In pad printing, controlling and maintaining the condition of the ink is key to a successful job. Often, other uncontrolled process variables may create what is perceived solely as an ink-related problem. All too often I have seen technicians struggle for hours to solve what they believed to be an ink problem while ignoring other potential problem-causing variables such as machine settings and environmental conditions. This frequently is due to a lack of understanding of the pad-printing process and the role of the ink in the process.
The first thing to understand is that the inks specifically designed for use in pad printing are different from conventional solvent-based, water-based, and UV-curable screen-printing inks. Although pad-printing and screen-printing inks have some similar characteristics, there are also important differences.
Unlike screen-printing inks, pad inks are designed to evaporate quickly, which is a crucial part of the pad-printing process. Also, pad-printing inks are applied in thin films, which causes them to be easily affected by variables such as temperature, humidity, and static.
All pad-printing inks consist of resins, pigments, a vehicle, and sometimes special additives. Resin (or binder) is the portion that forms the ink film. Typical resin systems include epoxy, enamel, vinyl, acrylic, and polyurethane. Pigments are colorants in the form of powders or dyes that are dispersed in the resin system, giving the ink its color and opacity. The vehicle is the solvent (or thinner) used to adjust the viscosity of the resin/pigment mixture and to give the ink its printing characteristics. Special additives will be covered in following sections.
In order for the pad-printing process to work successfully, the ink must be capable of rapidly changing its viscosity to become tacky. The components listed above all work together to produce that “tacky” quality.
Types of pad-printing inks
Several different types of ink are specifically formulated for pad printing, including one-component or “solvent evaporating,” two-component or “chemically reactive,” baking, oxidizing, and sublimation inks.
One-component inks, or “solvent- evaporating” inks cure by evaporation of a solvent. They do not always require the addition of a catalyst. (Some ink may be used with or without a catalyst.) One-component inks are available in matte and gloss finishes and work well with many plastic substrates.
Two-component inks, also referred to as “chemically reactive” inks, do require the addition of a catalyst prior to printing. The catalysts react chemically with the ink’s resins to cure by polymerization. This chemical reaction takes place independent of solvent evaporation over a period of time referred to as the “pot life” of the ink.
When working with two-component inks, it is necessary to add the catalyst in a specific ratio, usually by weight. Adding too much catalyst may significantly reduce pot life, and adding too little catalyst may result in the ink not achieving maximum performance once it is cured. Basically, if the base ink and catalyst are not weighed when mixing, inconsistent adhesion and image durability will result.
Once the pot life has expired, the ink must be replaced. Although it may be tempting to add solvents to achieve a visually acceptable print after the pot life has expired, it is not recommended because the ink may not achieve an optimal level of performance.
Baking inks come in two forms: a standard two-component ink with a different catalyst, or a specially formulated ink designed for use on glass, ceramics, and some metals. As the name implies, baking inks must be cured at elevated temperatures. To determine cure time, remember the higher the temperature, the shorter the drying time. However, high temperatures can cause brittleness, so use a low temperature for inks that need to maintain their flexibility.
Oxidizing inks absorb oxygen from the surrounding environment to polymerize, without the addition of a catalyst. These inks are typically used on flexible, synthetic substrates such as tires and keypads. Due to their slow drying and curing time, the use of oxidizing inks is limited.
Sublimation inks involve a special process whereby the substrate is heated to become porous directly after printing. The dyes in the ink change to a gas when they contact the heated substrate, then they pass into the surface of the substrate actually changing the substrate’s color. Once the substrate cools, the ink is permanently sealed into the surface.
The use of sublimation ink is common in computer keyboard printing and other applications where standard two-component inks may lack the required resistance to oils, perspiration, and abrasion. It is important to note that since sublimation inks actually change the color of the substrate, color matching is difficult, and the substrate must be lighter than the desired finished color because color changes to darker substrates may be less evident.
Specialty inks and additives
Other materials such as edible inks, silicone inks, lubricants, resists, conductive materials, adhesives, and specially formulated UV-curable inks may also be pad printed, although applications for these inks are limited. Again, the ability of these inks to rapidly become tacky will determine whether you succeed in efficiently transferring them to the substrate.
Also, there are numerous additives besides solvents and catalysts that may be combined with ink in order to adjust print characteristics and performance. Adhesion modifiers, matting powder, antistatic agents, and flow-control agents are a few examples. However, solvents have the most profound effect on printing characteristics.
The pad-printing process
Pad-printing ink is unique in its ability to rapidly become tacky. Other unique characteristics are found in the size and percentage of the pigments used in the ink formulation. The depth of the etched image for most pad-printing applications is 25 microns (0.001 in.) or less. For this reason, the pigments used for pad-printing inks are smaller than those used in most screen-printing inks. Additionally, since pad printing deposits on average approximately 20% of the ink film thickness that screen-printing inks deposit, pad printing-inks have a higher concentration of pigment in order to achieve acceptable opacity.
Since rapid changes in the tackiness of the ink are necessary, the solvents used for pad-printing inks evaporate faster than the solvents used in screen-printing inks. Inks such as UV-curable and water-based formulations either contain no solvents or have solvents too slow for use in the pad-printing process, making them very difficult or impossible to efficiently transfer.
Ink preparation
Now that we’ve covered the types of pad-printing inks and the role of those inks in the pad-printing process, choosing and correctly preparing the ink is essential in producing a successful print.
Ink manufacturers can recommend which inks may adhere to a given substrate. I said, “may” because not all inks will adhere as recommended all of the time. In order to select an ink, you need to know several things, including exactly what your substrate is and whether or not that substrate requires any pretreatment. You also need to know what colors are required and the degree of abrasion, chemical, and weather resistance the ink must have, as well as its recommended drying and curing schedules.
Whether you’re printing on a plastic, metal, glass, painted, or plated substrate, it is most helpful if you can determine what the chemical or trade name is. With the correct information, you and your ink supplier can eliminate a lot of guess work in the ink-selection process.
Once you have chosen the correct ink for your substrate, be sure that you prepare it exactly as recommended by the manufacturer. Most manufacturers provide a technical data sheet detailing which catalysts, additives, and solvents are compatible, as well as the correct ratios for mixing them. Most mixing is done by weight, not by volume, so a good scale is a necessity. I like to use a digital scale capable of weighing to within at least ±0.1 g. If you plan on color matching, use a scale capable of measuring to within ±0.01 g to avoid wasting ink in experimenting. Once your ink is correctly mixed with any applicable additives, it is time to thin it to the desired consistency with a suitable solvent or solvent blend.
Standard pad-printing inks usually have a variety of compatible thinners to choose from, including thinners with fast, medium, and slow evaporation rates. Manufacturers ordinarily recommend a range for adding thinner, which is 10-20% by weight. Deciding which thinner to use and in what quantity is considered by many to be a guessing game. This need not be the case.
When experimenting with a new application, I start by setting up my machine to achieve the desired cycle time and what appears to be optimal pad compression. Then I begin testing by adding a medium speed thinner at a percentage right in the middle of the recommended range. For example, if the range is 10-20%, I add 15% thinner. Since it takes a few cycles to wet the cliche and swell the pad, I run at least a dozen impressions on scrap material, adjusting my pad compression setting if necessary. If I see a problem with the quality of the image, I run this simple two-step test:
Step 1 Pick up the image at normal operating speed and stop the machine before it prints. Look at the image on the pad. If you can’t see the underside of the pad very easily by bending over to look at it, try using a little mirror. See if the entire image is on the pad and in the correct location. If so, clean the pad and proceed to Step 2. (Note: If part of the image is missing or the edges look jagged, it usually indicates that the ink is too thick. Add a measured amount of thinner, repeating the process until you get an acceptable image on the pad. If the image isn’t located where you think it needs to be, change the location.)
Step 2 Once you have an acceptable image in the correct location on your pad, print the substrate at normal operating speed. If the print is acceptable, you’re ready to begin production. If the image looks smeared, transparent, or fuzzy and ink remains on the pad, the ink is too thin. Either add a little more ink or select a slower press-operating speed.
In controlling ink characteristics, note that the effects of temperature and humidity are significant. As a rule, the warmer the temperature, the faster the solvents evaporate, and the faster the ink becomes tacky. However, humidity extremes present exceptions to that rule.
Humidity extremes are the single worst enemy a pad printer faces when trying to control ink at the press. Humidity in excess of 80-85% can cause the ink to tack very slowly, while humidity below 15-20% can cause it to tack too quickly. Whenever you have the extreme conditions of cold and dry, or warm and damp, controlling ink characteristics with solvents alone may no longer be possible.
A solution for expediting ink mixing for frequently repeated jobs is to develop what I call an Ink Mixing Matrix. Provided you run about the same cycle speed for each job you print, you can create a simple chart recording temperature along one axis and relative humidity along the other, as shown here. Where the two axes intersect, record the percentage of thinner required to achieve an acceptable print.
| | ||||||
| Relative humidity | ||||||
| 70% | 15% med. | 16% med. | 17% med. | 18.5% med. | 19.5% med. | 15% med. 3% slow |
| 60% | 14% med. | 15% med. | 16% med. | 17% med. | 18% med. | 14% med. 2% slow |
| 50% | 13% med. | 14% med. | 15% med. | 16% med. | 17% med. | 18% med. |
| 40% | 11% med. | 10% med. | 14% med. | 15% med. | 16% med. | 17% med. |
| 30% | 10% med. 2% fast | 10% med. | 12% med. | 14% med. | 15% med. | 16% med. |
| Temperature (° F) | 60° | 65° | 70° | 75° | 80° | 85° |
| Press Number: 2 Job Number: 9801 | Ink Type: 18 Series Color: Graphics White | Catalyst: 37-172 Thinner: Fast, Med., Slow | ||||
| The ink mixing matrix is a convenient way to record various temperature and relative humidity combinations and the solvent ratios required to print successfully under these varying conditions. | ||||||
While gathering and recording all of this information may seem like a waste of time, over a period, you’ll gather enough data to save more time than you spent gathering it. Additionally, keeping this handy chart will make ink preparation a lot easier if you ever need to employ a substitute press operator.
You may encounter a situation where in order to print at the desired speed, you may need to mix two different thinners. For example, if you can’t achieve an acceptable print with a minimum amount of medium-speed thinner, and a slow-speed thinner alone is not sufficient, you might need to mix medium and slow thinners together. If you use the matrix chart, be sure you record the formula for mixing the thinner blend (the percentage of each thinner by weight).
If you have to thin the ink frequently throughout the production run, mix the thinner with ink (and catalyst if you are using a two-component system) at a ratio of 1:1. Then add that mixture to the ink, rather than just adding thinner. Adding thinner frequently without adding any pigment and resin (and catalyst) can break down the resin system, resulting in the ink losing its opacity and flow characteristics. It is also a good idea to mix ink with retarder (a very slow thinner) if you really need to slow your ink down. However, adding retarder alone can also cause the ink to flow incorrectly.
Controlling the printing environment
We have looked at the importance of controlling ink during the pad-printing process. However, to successfully print a job, all variables must be controlled. This begins with correct setup for the machine and inks.
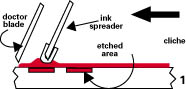
As Figures 1-6 illustrate, a lot is happening with both the machine and the ink during the process of flooding, doctoring, picking the ink up, and transferring the image. Each step in the process is unique in some respect; therefore, careful attention to detail in setting up the machine and adjusting the ink each time is critical for achieving the desired result. The trick is to control environmental conditions, the speed of the machine, the depth and quality of the etch, and the condition and compression of the pad to allow the ink to change as required in order transfer and result in an acceptable print.
After your machine is set up to cycle at the desired speed and with the minimal amount of pad compression necessary, next consider the printing environment.
Temperature and relative humidity within your printing environment may change daily. I’ve found optimal pad-printing conditions to be 68-72°F (20-22°C) with 50-60% relative humidity. In a perfect world, every printer would operate in these optimal conditions, but in the real world, we rarely do. Variations in temperature and relative humidity can significantly affect the entire process; therefore, it is necessary to minimize those effects as much as possible.
Short of building a climate-controlled facility in which to print and store your substrates, inks, additives, and pads, there are several things you can do to minimize the problem-causing variables in your printing area:
• Keep your machine and materials away from outside walls where temperature variations may be more pronounced throughout the day, or from season to season.
• Keep your machine and materials out of direct sunlight and out of turbulent airflow from heat/air conditioning ducts and fans.
• Store your inks, pads, catalysts, and substrates in the same environment that you’ll be printing in. If that is not possible, set them in the printing area a few hours before you begin, allowing the inks to acclimate to the environment. Condensation may occur when materials stored in cooler areas are introduced to warmer areas, and substrates may absorb water in environments having high relative humidity. Water and ink don’t mix. Even if you can’t see water, it may be there and it may affect printing.
• Keep your printing environment as clean as possible. Even dust from packaging materials, such as cardboard, can cause problems if it migrates into the ink or onto the surface of the pad. Vacuum and mop your printing area on a regular basis. Avoid using a broom because it stirs up dust. If you must use a broom, do so at the end of the day, or use a dust-collecting floor treatment, available from janitorial suppliers. If you clean parts before printing, vacuum the dust off, rather than blowing dust off with compressed air. Blowing dust off only causes the dust to relocate.
Conclusion
Although it may seem that maintaining proper ink characteristics is more like performing magic than controlling a process, it really isn’t. By carefully considering machine and environmental variables, you can avoid losing valuable time trying to solve ink problems that don’t exist.
About the Author
John Kaverman is pad print systems engineer with Service Tectonics, Inc., Adrian, MI. Kaverman, who holds a degree in printing technology from Ferris State University, has been involved with the screen- and pad-printing industries for more than ten years. For more information about pad printing, or to e-mail John, check out the Pad Printing Network online at www.padprinting.net.


Subscribe

Magazine
Get the most important news
and business ideas from Screenprinting Magazine.
Most Popular
-

 Art, Ad, or Alchemy1 month ago
F&I Printing Is Everywhere!
-

 Case Studies1 month ago
High-Density Inks Help Specialty Printing Take Center Stage
-

 Andy MacDougall1 month ago
Functional and Industrial Printing is EVERYWHERE!
-

 Columns2 weeks ago
8 Marketing Mistakes Not to Make When Promoting Your Screen Printing Services Online
-

 Editor's Note2 weeks ago
Livin’ the High Life
-

 Thomas Trimingham2 months ago
“Magic” Marketing for Screen Printing Shops
-

 Marshall Atkinson2 weeks ago
How to Create a Winning Culture in Your Screen-Printing Business
-

 News & Trends1 month ago
What Are ZALPHAS and How Can You Serve Them in Your Print Business?