Articles
Published
21 years agoon
When I saw the latest Hollywood hot-rod flick, “The Fast and the Furious,” I thought, “Man, I wish I could do that to my computer!” Just drop a hyper-performance engine into the case and watch everything on the screen start to blur. But then I realized it’s pointless to have a high-performance vehicle if the operator can’t handle the speed.
A good example of this reality is Adobe Photoshop–a program screen-printing designers use on a regular basis. Most artists who work with Photoshop use only a small percentage of the speed that the program can bring to the design process. To release the hidden power under Photoshop’s hood, you don’t need a new engine; you simply need to become a better driver by overhauling your procedures and work habits.
This article will explain how you can shift your separation tasks into overdrive by developing action scripts, layer styles, and quick keys in Photoshop. To help you understand these time-saving features, the discussion will demonstrate how they are applied in creating actual designs. Note that the instructions presented here are based on Photoshop for PC users. Mac users should substitute the Command key (apple key) for the Ctrl key and the Option key for the Alt key.
Action scripts
Creating an action script is one of the fastest ways to produce and separate a design in Photoshop. The program provides an Action palette that you can use to record commands using controls that resemble those on a tape recorder. When you have saved a set of commands and hit the play button, the action set runs just like a pre-recorded tape. The computer will follow every step that has been recorded without pause until it has executed all of the steps in the action sequence. Many off-the-shelf separation plug-ins for Photoshop are actually complex sets of actions that are developed specifically to separate artwork for screen printing.
Keep in mind that action sets do have limitations. Be wary of recording any steps or commands that are “location specific” when developing actions. For example, if you create an action that uses the lasso marquee tool to select a shape inside a layer, Photoshop will warn you that the particular function may not be recorded as an action. Any step that involves recording only one element of a layer instead of the whole active layer either won’t save or it won’t function correctly when it’s applied to a different shape.
Action sets are most useful when you are applying the same steps to different objects, type, or images. You’ll get more consistent results with less effort by using designs that share roughly the same resolution and size as the original on which you based the action. The best way to use action recordings is in applying effects and alterations to basic shapes rather than for creating complete designs. This way, the action script will work on many different layouts.
Begin by planning out how you will create your artwork. Visualizing the stages of the design process is an important step that you should complete before you attempt to record actions. For a design such as the one that accompanies this article (Figure 1), start with a basic layout in CorelDRAW! or another vector-illustration program. Export each object or shape from the layout into a separate Adobe Illustrator or EPS document. Then, create a new file in Photoshop and, using the Place command (File> Place), load each object as an independent layer in the Photoshop file (Figure 2).
Before recording an action for the sample design, create a gradient fill for each of the objects (applying the gradient fill first eliminates the chance thatit will be positioned off center). The standard Photoshop “Chrome” gradient was used in the sample image, and each object was treated with the desaturate command (Ctrl-shift-U). The resulting design (Figure 3) looks flat and boring, right? Now for the fun part!
Start developing the action set by holding the Ctrl key down and clicking on the top layer (the word “Photoshop”) with the mouse. This selects every pixel in the layer and brings up a selection outline around the word. Open the Actions palette (Window>Show Actions), click the little arrow in the upper right corner, and select New Action from the drop-down menu. Type “brushed metal” in the top area to identify the action for later use, and then hit the Record button. Every step that follows is preserved in the action script.
Create a bevel with some highlights by making a new channel based on your current selection. In the new channel, fill the selection with white and use the Gaussian Blur command (Filter>Blur>Guassian Blur) to blur the edges. Switch back and select the active layer (click on the layer while holding the Ctrl key), then apply the Lighting Effects filter (Filters>Render>Lighting Effects) with the Alpha channel selected as the texture to achieve the beveled appearance (Figure 4).
Next, contract the selected layer towards the center (Select>Modify>Contract) and specify 6 pixels to give the appearance of metal highlights. Then feather the selection by 2 pixels to blend it. On the keyboard, hit the “D” key to reset to the default (black and white) palette and then the “X” key to make white the foreground color. Finally, use the Stroke command with a pixel value of 2 to create the highlight edges (Figure 5).
To create the texture of brushed metal in the action script, start by duplicating the current layer, selecting the new layer, and filling it with 50% gray. Then apply the Graphic Pen filter (Filter>Sketch>Graphic Pen) with a long Stroke Length and high Light/Dark Balance. With the layer still selected, click on the opacity bar in the Layers palette and slide it down until the opacity is between 10-20%. Then use the Merge Down command to merge this layer into the beveled layer (Layer>Merge Down).
The last step in this action is making a drop shadow to separate the objects from the background. Create a drop shadow by duplicating the top active layer and then selecting this new layer. Move it below the original, feather it by 8-10 pixels, and fill it with black to create the drop shadow. Then hit the stop button to save the action.
This may seem like a lot to go through just to record an effect, but because you’ve saved every step under the “brushed metal” action, you can make quick work of the other two object layers. Simply select the remaining layers one at a time, change their names to Layer 1, delete any extra channels, and hit the play button (the triangle at the bottom of the palette). The other layers will be finished in a matter of seconds, leaving you with a completed design that’s ready for separation.
Action sets are also useful for prepping and separating files, especially if your art department receives a steady flow of similar-looking artwork that it has to retool in Photoshop. Formulate some action sets to handle the “prep-and-sep” by starting with simple one- or two-color art. Visualize the steps as a tiered process with multiple possibilities that require troubleshooting in order to perform consistently. By going through this exercise, you’ll be able to recognize which actions can and cannot be recorded. You’ll also develop more of a “programming mentality” for separating.
To separate the art in the sample design, create a second action and label it “Metal/Black sep.” Then hit the record button and start to separate the design. First, duplicate the file (this is always a good step because it’ll keep you from losing your original if the action doesn’t perform as expected). Next, Flatten all of the layers (Layer>Flatten Image). Then open the Curves menu (Ctrl-M) and adjust the edges of the curve slightly in toward the center to increase the contrast. With the contrast boosted, invert the file (Ctrl-I) to create an underbase gray (Figure 6).
Duplicate this gray file, then open the Curves menu again and bump just the white end of the curve about 25-30% toward the black end point. This adjustment to the curve will knock out the lightest areas of the Alpha channel and save the darker areas, which will result in a good white highlight screen. Finally, open the copy of the original file, create two new channels, and place the gray and white files you created into these channels. Hit the stop button on the Action recorder to save the separation action set. If, in the future, you have another image that requires this look, you’ll be able to use these actions to create and separate everything in minutes.
For more complex designs, such as colorful images that will be printed on dark substrates, simulated process-color is often the best separation option. But developing a simulated-process-color action script would take some significant programming knowledge, require lots of testing, and lead to significant downtime. Several reasonably priced separation programs are available for screen printers that have already done the hard work for you. By using such programs, you can avoid the trial and error of developing your own separation action scripts. Instead of being bogged down by the grunt work, you can focus your efforts on making minor alterations to the final separations so that you get the best printed results.
Layer styles
Photoshop 6.0 and later versions feature settings that you can use to control stylistic layer filters and effects. Using layer styles allows you to quickly modify, change, or remove effects without revising the original layer. Layer styles can also be saved just like actions, which allows you to apply them to future designs by using the Paste Layer Style command or just dragging and dropping the styles onto new object layers.
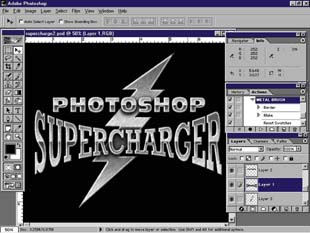
Figure 7 shows a sample design that was created using layer styles. To see what styles were applied to any layer, find the “f” symbol on the right side of the layer name in the Layers palette. Then click on the arrow beside the symbol to drop down a menu. The menu lists every effect that was used. Double click on the effects to open up the Layer Style window (Figure 8). In the sample image, a variety of effects are required to achieve the beveled, marble look in the word “Supercharger.”
The Layer Style window is very complex to use, so make one change at a time when adding effects to a layer. Books such as the Photoshop “Wow” series can provide more guidance for applying effects and creating layer styles. Alternately, you can refer to Websites, such as www.adobe.com, that provide a selection of layer styles that you can use for projects if time is too short to create your own styles.
In the sample image, the brushed steel gear shape in the background uses almost all of the available layer-style effects and brings them together to achieve a realistic look. The other layer styles in this design were created during the course of other projects. Getting them into this design was simply a matter of opening the original files, then copying and pasting the styles into the new file. This approach saves a lot of time and only requires a small bit of style adjustment in the final image rather than lengthy recreation of the styles. Incidentally, the background lightning in this image was also created quickly by using an action script from a different project.
The effects you have available in the Layer Style window are Drop Shadow, Inner Shadow, Outer Glow, Inner Glow, Bevel and Emboss, Satin, Color Overlay, Gradient Overlay, Pattern Overlay, and Stroke. While the terms that describe these effects are self-explanatory, it’s helpful to test the effects to see how they work together. Just turn them on and off in different combinations using the check buttons in the Layer Style window or the eye buttons in the Layers palette. Once you’ve developed new layer styles, save them. Also save a copy of the design file in which the styles were applied.
Before you separate a file that incorporates layer styles, make sure your imagesetting device can deliver a resolution level that’s high enough to support the effects. Also check to see if the effects change when you flatten and rasterize the design. If you created the design in RGB mode and your layer effects include a lot of color adjustments, some of the colors that are produced by the effects may be difficult to reproduce when you screen print them in process color. For this design, using simulated process-color separations would be a better option because it would allow you to capture the color vibrancy on a dark background.
Quick keys
Quick keys are another means of saving time throughout the design process. Your goal should be to memorize specific keystrokes in Photoshop for frequently used functions and commands so that you don’t have to look away from your work at all–you can just flow with the work. You’ll have to devote some time to mastering all the quick keys and shortcuts available in the system, but the practice is worth it. The less you have to stop the flow of your work, the more time you have to actually create and test new ideas. The sidebar “Photoshop Quick Keys and Shortcuts” on page 46 summarizes the key combinations and other tricks you can use to enhance your efficiency.
If you find yourself repeating a command over and over and don’t have a quick key to use, try using the Alt key combination for that command line. This is accomplished by holding the Alt key and pressing on the character that is underlined in the menu item you are trying to reach. For example, if you hold the Alt key down and strike “S,” “M,” and “C” in rapid succession, you’ll bring up the Contract window (Select>Modify> Contract). Once you memorize the underlined characters in frequently used menu sequences, you can quickly call up the desired function using this approach. And if you find yourself repeating two or more commands in a row, don’t forget that you can always create an action script that enacts these commands automatically. Even if you’re only dealing with two commands, the time saved by using Action scripts can help.
The need for speed
You don’t need to completely overhaul your computer system to significantly increase Photoshop’s operating speed. All you need to do is polish your own performance. Practice using actions, layer styles, and quick keys, and you will save hours of design time on future projects. Once you master these basics, you’ll be off to the races!
About the author
Thomas Trimingham is senior artist and head of research and development at Holoubek Inc., Waukesha, WI. He has created screen printing artwork and separations for more than 12 years, and his work has won awards in a number of national screen-printing competitions, as well as computer graphics, wildlife illustration, and logo design contests.


Subscribe

Magazine
Get the most important news
and business ideas from Screenprinting Magazine.
Most Popular
-

 Case Studies2 months ago
High-Density Inks Help Specialty Printing Take Center Stage
-

 Art, Ad, or Alchemy2 months ago
F&I Printing Is Everywhere!
-

 Andy MacDougall2 months ago
Functional and Industrial Printing is EVERYWHERE!
-

 Columns3 weeks ago
8 Marketing Mistakes Not to Make When Promoting Your Screen Printing Services Online
-

 Editor's Note2 weeks ago
Livin’ the High Life
-

 Marshall Atkinson2 weeks ago
How to Create a Winning Culture in Your Screen-Printing Business
-

 Thomas Trimingham2 months ago
“Magic” Marketing for Screen Printing Shops
-

 News & Trends2 months ago
What Are ZALPHAS and How Can You Serve Them in Your Print Business?