Prepress & Screen Making
Published
18 years agoon
Part of a graphics-printing business’s growth typically involves the company’s expansion into areas such as product development and implementation. At the same time, the business becomes more of a partner to its clients than just a provider of screen-printed signage and displays. Cultivating this type of relationship with customers often requires the screen printer to make an investment in at least one wide-format inkjet printer to further accommodate clients’ imaging needs.
Part of a graphics-printing business’s growth typically involves the company’s expansion into areas such as product development and implementation. At the same time, the business becomes more of a partner to its clients than just a provider of screen-printed signage and displays. Cultivating this type of relationship with customers often requires the screen printer to make an investment in at least one wide-format inkjet printer to further accommodate clients’ imaging needs. The purchase of digital printers presents the screen shop with additional opportunities to profit and explore new markets. However, doing so also brings new responsibilities into the picture—perhaps the most significant of which is the ability to consistently manage and match colors.
Most of our jobs at Pratt Corp. in Indianapolis, IN are part of a larger design, from permanent way-finding signage to monthly promotions. But regardless of the graphic or its purpose, everything has to match. Part of Pratt’s evolution involved the addition of digital presses and proofers. Our desire to keep quality at the forefront led us to build a color-management workflow that allows us to maintain consistency and repeatability on a variety of digital and screen presses. A color-managed workflow is essential, regardless of whether a job involves half a dozen automatic screen presses and wide-format inkjet printers or one clamshell press and a digital proofer. The fact is matching screen and digital printing is possible only with a color-managed workflow in place. This discussion will explain the principles and procedures behind color management and will demonstrate how they are applied in an actual print job.
The main elements of color management
The term "color management" gets tossed around pretty loosely. Let’s be clear about the vocabulary. Color management is using profiles to make one device simulate another. The input profile determines what colors are made from the builds in the proof. The output profile determines the builds that will make those colors on the intended device. Other important terms from the color-management vocabulary include the following:
Profiles A profile is a list of builds and the L*a*b* values of the colors those builds produced. Most profiles are created using black, cyan, magenta, and yellow, but this isn’t a barrier in the world of screen printing. If you want a duotone profile, then make a two-color target and print it. If you want to incorporate orange or green or some corporate spot color into your images, then make the color target and print it. There is screen-printing magic to be had in the creative use of profiles.
Builds A build is the dot percentages of black, cyan, magenta, and yellow that go into producing a printed color. A build (for example, 80% magenta and 90% yellow to produce a red) does not accurately communicate a color. When one says 80% magenta and 90% yellow, is the result rhodamine or rubine? At what solid density? Builds are device dependent. The input profile is the standard that converts a device-dependent build into a device-independent L*a*b*.
Undercolor removal (UCR) UCR keeps dark colors from using too much ink and turning into mud. UCR is applied in the output profile and uses a curve to pull back color smoothly as it approaches a defined limit, usually found through painful experience. A job will land on your doorstep that involves a dark blue velvet blanket in a shadow. Without color management, that image will have areas with three or more overprinting solids. You will hit your total color limit and dark shadows will start changing color unpredictably.
Gray component replacement (GCR) GCR makes an image easier to print. Cyan, magenta, and yellow are replaced with black not just where the image is black, but also in dark colors without changing the color of the image. Black control is much more accurate when applied by an output profile than when done in Photoshop. For digital printing, medium black replacement should begin at around a 40% tone. Use maximum GCR for screen printing, but reduce the black width to around 95% to soften light tones. These lessons can be learned by screen printing images that are neutral in nature, such as silvery screws and bolts arranged on a shiny steel surface. Don’t try to screen print big areas of light neutral colors without heavy GCR.
Compensation curves Compensation curves are used to correct dot percentages for both screen and digital printing. This is the most common method for correcting color. Here, the builds in the file are changed according to a table of compensation values in the imagesetter or digital press. Compensation curves work well, but few companies actually apply a compensation curve for each color. And among those that do, many cannot apply UCR or GCR. Although color is being managed, this scenario isn’t really a true example of color management.
Color-management philosophy
The infrastructure of any sort of color-management system must be maintained to ensure that a set of builds produces the same colors the next time it’s used. Digital devices need to be monitored and re-linearized or re-profiled when they drift out of specification. Screen printing relies upon consistency in file-prep, films, and screens. When the same builds no longer produce the same colors, one must carefully consider the situation and either eliminate the source of the variation or adapt.
Once you have a color-managed workflow in place, you’ll find that color-managed files are far easier to print than curved files, whether digitally printed, fixed in film, or imaged onto a screen. Color-managed files are also easier to create. Prepress can create files that are proofed and approved, eliminating the need to create builds for each device.
The color of the substrate must be taken into account. Any white elements in the graphics will be the color of the stock. There is no getting around that unless you flood each sheet with white ink. Color management allows you to choose whether or not to simulate the color of the stock. However, stock simulations in the proof or print are so light and so near to neutral that they are best left alone. Pratt uses relative colorimetric rendering, which does not simulate the stock color but does include the stock’s color in every build. The only practical way to accurately proof the effects of stock color is to proof and print on the same substrate.
A common input profile allows prepress to have a standard set of builds. Pratt used to run two 300-dpi Arizona inkjet printers side by side. The printers’ serial numbers were within five digits of each other, yet the same builds produced very different colors on those devices. Files were built to run on Arizona #1 or Arizona #2. If a job was moved or a press broke down, then those files went back to prepress to be reworked. These days, prepress operators build files using a standard MatchPrint input profile, and the builds are changed in the workflow to accommodate each output device.
Color-managed workflows use an input profile to convert a build into L*a*b* color space and then convert that L*a*b* image back into a build using an output profile (Figure 1). Color management makes one device simulate another. So how is that useful? A company’s first steps into color management usually take the form of profiling a printing press and using that profile to simulate the press on their digital proofer. Those printers end up with a menu of proofs that simulate each device. Their files have not been truly color-managed and therefore have not benefited from controlled UCR and GCR. They are not managing color so much as predicting it. Compensation curves are still driving the workflow.
Pratt treats every device like a proofer. When a company decides to do this, then every file must be color-managed. UCR is set according to prescribed limits, and GCR is liberally applied.
Building a color-managed workflow
Pratt uses the following tools to construct and maintain its color-managed workflow: GretagMacbeth’s ProfileMaker 5 software for creating and editing color profiles, SpectroScan T spectrophotometer, iQueue software for color-management workflows, and a program we developed in house to monitor and control color.
The following steps are the foundation to building a color-managed workflow in which every device produces matching images. First, select a standard for proofing, and either create an input profile or select one. Next, profile each device on each substrate, and create workflows with the standard proof as the input and the intended device as the output. Routinely check the accuracy of the workflow. Finally, take appropriate action to keep the workflow accurate, and seek continual improvement. The sections that follow explain each of these steps in more detail.
Select a standard for proofing Selecting an input profile is an important first step. Prepress uses this profile to build the file. Pratt developed its standard by using a low-gain commercial MatchPrint made from 150-line/in. film at ReyHan PGF. You’ll find that profile settings for input profiles do not matter and that UCR and GCR are not an issue because the purpose of an input profile is to convert builds to L*a*b*, not to create builds. Try to proof on something that approximates the color of your stock or on a material that is whiter.
Profile each output device on each substrate Pratt used linear film to print its color targets, but there is no reason why you can’t apply a profile to curve-compensated film or direct-to-screen compensation curves. We simply find it easier to linearize every device. The important thing to remember is that you must be able to return your presses to this profiled condition. Use new squeegees, the same ink, the same screens, the same settings, and so on. If a screen press is profiled with worn squeegees, then the profile will work best with worn squeegees.
Print like you mean it Examine the printed color target for skipping or smearing before you allow it to become a profile. It’s a good idea to include an image with faces and familiar imagery so the press operators see what ballpark they are in. The solid densities of the color target should be at or above the solid densities of the proof. If the proof has higher solid densities than the printed color target, then the press’s gamut will be smaller than the gamut of the proof. Colors will get clipped, and banding may occur. An output profile can reduce color by converting solids to tones, but it cannot add color beyond a solid.
Program iQueue with the standard proof and output profile Pratt uses GretagMacbeth’s iQueue to implement color-managed workflows. When a prepress operator drops a file in an iQueue hot folder, the software picks up the file, executes its programmed color-management routine, and then writes a new file on the server. The program will manage any number of queues. Pratt creates a queue for each substrate on each device at each line count. For example, we have profiles for a styrene substrate that we’ll print on our M&R Conquest at both 55 and 85 lines/in.
Most imagesetters, direct-to-screen systems, and digital presses these days are sophisticated enough to apply input and output profiles. A color-managed workflow is possible without a workflow program like iQueue as long as a RIP that applies the profiles resides somewhere in the process. We find it easier to keep all of our output devices linear and apply the profiles in iQueue. Even our VUTEk 2600 and Inca Eagle inkjet printers are linearized.
How do you measure success?
We used to measure color bars on proofs and prints to evaluate our quality. We even went through a stage where we tweaked our profiles to produce the proper values on the color bars. But the process didn’t seem quite right—it was too image-dependent.
Tweaking profiles can turn a 50% yellow into red and leave the 49% yellow a perfectly good yellow. That’s a bad tweak, of course, but it shows what can happen. We experimented with a variety of methods for making profiles better, but we were missing the point. A profile is just a big list of builds and L*a*b* values. It’s not as complicated as it might seem. If builds cease to produce the colors you expect, you need to quickly act to find out what changed. The builds produced those colors when the profile was made, and that’s the best information you’ve got. Don’t tweak your profiles; tighten your process.
Color bars contain extreme colors at the outermost edge of the gamut: pure cyans, magentas, and yellows. Our experience has taught us that tweaking a profile to get better color bars will cause other, less obvious, builds to be off-color.
So now that I’ve trashed tweaking and color bars, you may be wondering how Pratt measures success. We use the same color target that created the profiles. If we put a color target through our workflow, it should have the same colors when it prints as the one we made from a MatchPrint. A color target contains nearly a thousand builds—the perfect thing for someone who needs to know about color. Put a color target through the workflow—your digital proofer, for example—and read it on a spectrophotometer. The measurement data are written into a text file.
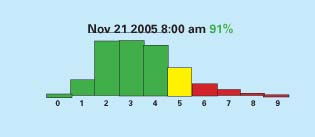
You have in your hands the Delta E (the difference between a sample color and a reference color) information for a thousand colors. These data tell you how well the workflow reproduces color. I have written an Excel workbook to take advantage of this information. The workbook reads the measurement data for the MatchPrint and compares them to the measurement data for a color-managed target. The information is then collected into a frequency distribution of Delta Es (Figure 2). Another way to check the performance of the equipment in the workflow is to select a range of builds that are impractical to print and eliminate them (Figure 3). An example might be a build of 300% total color (100C, 100M, and 100K).
Proofing
Stock is a big factor in proofing. The difference in very light colors between a proof and a print has more to do with the difference in the color of the proofing base compared to whatever stock you use for the job. Some styrenes are, for example, a little blue. How can you print a faint touch of blue that is less blue than the stock is already? Well, you can’t. If the customer wants a white baseball, then it’ll be the color of the stock. Four-color process just works that way—unless you flood the sheet with white ink, which we do when we print four-color-process graphics on blue PVC.
Leave stock simulations alone. We had this bright idea once to get some really white proofing stock—whiter than anything we print on—and use it as a base on which we would simulate the stock we intended to use in production. The process was tedious and painful. It yielded some great proofs, but we saw enough awful proofs that we decided to try other approaches. We even had our consulting guru, Mike Ruff from ReyHan PGF, tied up with this thing. If you can make stock simulations work, that’s great. But we have found that our stock colors are so light and so neutral that they require a finer touch than the inherent variation in the proofer.
I once asked Tony Mazzocco, our color-management specialist, to put a styrene simulation on the proofer. A few hours later, we had a very good simulation. A few days later, that stock simulation looked awful. I gave the proof to Tony, and he quickly came back and showed me that the so-called bad proof measured less than 2 Delta E quadratic of a MatchPrint, well within the inherent variation of the proofer. This scenario kept Tony hopping for months as he chased down paper simulations. This example was particularly objectionable to the eye, but it was within specifications.
People are very perceptive and able to discriminate between hues in the range of very light neutrals—colors that are extremely close to white. We can simulate most MatchPrint colors within 3 Delta E quadratic and hold that simulation within 2 Delta E quadratic day after day. But when the entire background neutral shifts 1 or 2 Delta E quadratic, the effect can be very objectionable. Using Delta E 2000 (tuned to human perception) a 2 Delta E quadratic between two very light neutrals will be as much as 6 Delta E 2000, closer to our actual perception. The same change of 2 Delta E quadratic in a red or green will probably be 2 Delta E 2000, which means you can’t see it. We nearly dedicated Tony’s career to simulating stock colors and tweaking that proofer within 1 Delta E every day. We finally dropped the stock simulations and freed Tony to work on things that benefited us for more than just a few days at a time.
The moment color-managed tones appear in our proofing or printing, they include the color of our MatchPrint’s super white base and take into account the color of the stock for every color except white. White is the color of the stock showing through, and we leave it alone. A green print on yellowish stock, for example, will have the yellow ink pulled back because some yellow is already coming through from the stock.
Applying the workflow to a job
Let’s follow a promotion for John Deere through the workflow and gauge the results. The John Deere promotion was for a display in Lowe’s stores. The artwork for John Deere’s campaign (Figure 4) was designed with large black and green vignettes. If you’ve screen printed vignettes, you know they tend to band when the dots first touch up. So we put a form up on our new six-station Thieme 5000XL inline press and banded the heck out of that black vignette. I’m a quality-control guy, so the first phrase that comes to my mind in situations like this is "without recourse to trial and error." Everything came to a stop, and we rethought our approach.
To fix the problem, I met up with Dennis Hunter, who manages screen printing, and Teddie Linder, who manages prepress. I manage quality. We’ve been through a lot together in getting this color-management thing right. Tables have been banged and lines have been crossed, but so far nobody has laid hands on anybody—although it’s been close. Good thing, because Teddie is some sort of martial-arts instructor. We’re not sure exactly what sort of belt she holds or in what discipline—or if that stuff even means anything past a certain level—so we all just speak a little softer around her and treat her with loads of respect.
Teddie, Dennis, and I are familiar with the banded-vignette problem, and we were able to work out a solution. Teddie changed the film separations to use hybrid dots.
The conventional halftone (AM) choice is basically between two bands at 40% and 60% using elliptical dots, or one slightly harsher band at 50% using Euclidean dots. Our normal halftones use Euclidean dots, but to cope with these large vignettes we opted to use a hybrid dot. Harlequin Dispersed Screening (HDS) is both AM and FM (frequency modulated or stochastic). It changes the frequency of conventional halftone dots, but the dots also change in size—like FM. They go from dots to little worm-like shapes and then reverses of worm-like shapes and reverses of dots (Figure 5).
We always use a yellow hybrid screen to avoid the green moiré that plagues all screen printers, but we also use HDS for large vignettes and have even begun to create profiles with all HDS dots. When HDS sees that the next pixel in a dot will cause the dots to touch up, it is free of the AM constraint of making traditional dots. Instead, it might make a couple of little worm-like shapes or one worm-like and one circular dot. Tones transition so smoothly that the effect is a smooth vignette.
The green vignette
With traditional halftones, one must choose to generate moiré in either red, green, or blue. There are 90 degrees within which to work, so black, cyan, and magenta—the three darkest colors that create the most objectionable moiré—can be kept 30 degrees apart. But where does yellow go? Any two colors closer than 30 degrees will create moiré in certain tones, guaranteed. So in all our separations, we use a hybrid yellow dot that doesn’t have an angle.
The hazard in using hybrids to avoid angle-based moiré is that they have strange dot-gain characteristics. Do not attempt to combine hybrid dots with halftones unless you have color management in place—or at the very least a separate compensation curve. A hybrid yellow is a beautiful thing; it allows you to keep cyan, magenta, and black 30 degrees apart. No more little green tweedy-looking moiré! Using a hybrid or stochastic yellow is no secret, but without color management the yellow out-gains cyan, magenta, and black, and everything turns yellow. The color has been sacrificed to eliminate moiré.
Using color management, a yellow hybrid combined with a cyan, magenta, and black halftone creates beautiful greens. Green is a common color in a lawn and garden section, and we’ve gone to great lengths to get it right.
Production
Once we had those big vignettes under control, we began printing in earnest. Banners were printed on our M&R Processors, beam labels and signs on the Thieme inline, and other signage on our Inca Eagle flatbed inkjet. Using maximum GCR and a selection of hybrid dots, these jobs were set up in a dozen prints or less and sailed through production. Bill Balbach, our director of promotional programs, hovered over his promotion but found little to do after saying he didn’t like the banded vignette from our first print.
Our press operators locked in on the proofs by zeroing their instruments on the call-outs on the proof and then reading the print (Figure 6). We print color bars on all four sides, but color bars are a troubleshooting tool. If an operator has hit the colors in the call-outs, then he has matched the proof in every way that matters. For example, in the image that is almost entirely green and yellow, we don’t particularly care whether the solid magenta in the color bar is off-color, because there is no solid magenta in what we’re selling to our customer. We won’t extend a setup to obtain a meaningless number.
Sustaining
When we first began this journey, it was tough to get all the variables under control. Mike Ruff of ReyHan PGF was called in as a consultant, and his company’s Chromatix program has been instrumental in our success. We have yet to achieve Chromatix certification—Holland & Crosby in Canada beat us to being the first—but we are headed down that road and would not be where we are today without Reyhan’s help.
Consistency in screens, inks, substrates, and technique is key to any sort of screen printing. When you pair this consistency with effective color management, you’ll open up your window of operations and make jobs more forgiving of variations and easier to set up. Recognize that the initial improvements come from flipping switches, and always keep your attention on improving techniques and materials. If you stay focused on fundamentals, your newly found capabilities will prevent variables from eroding your quality and productivity.
About the author
Rick Auterson manages quality assurance at Indianapolis, IN-based Pratt Corp. During his 34 years in the printing industry, Auterson has worked in photopolymers, printed circuits, lithography, flexography, and more. He also was a founding partner of Digital Color Systems, a company that manufactured scanning densitometers and color-data-management software. Auterson has been with Pratt since 2001.


Subscribe

Magazine
Get the most important news
and business ideas from Screenprinting Magazine.
Most Popular
-

 Art, Ad, or Alchemy1 month ago
F&I Printing Is Everywhere!
-

 Case Studies1 month ago
High-Density Inks Help Specialty Printing Take Center Stage
-

 Andy MacDougall1 month ago
Functional and Industrial Printing is EVERYWHERE!
-

 Columns2 weeks ago
8 Marketing Mistakes Not to Make When Promoting Your Screen Printing Services Online
-

 Editor's Note2 weeks ago
Livin’ the High Life
-

 Thomas Trimingham2 months ago
“Magic” Marketing for Screen Printing Shops
-

 Marshall Atkinson2 weeks ago
How to Create a Winning Culture in Your Screen-Printing Business
-

 News & Trends1 month ago
What Are ZALPHAS and How Can You Serve Them in Your Print Business?