Garment Printing
Published
14 years agoon
Demands for special effects on screen-printed apparel are at an all time high. In many markets, such as boutique and fashion stores, there are more special effect prints than any other kind. The challenges to producing these types of prints fall into four separate areas: the artwork, the separations, the inks (or effect items), and the production. Within each of these areas are certain variables that are specific to that particular effect, and the best way to control these variables is to start with the artwork and then work through the process long before any prints are made. In this manner, a lot of problems can be caught in the planning stages of print production rather than on the press.
To look at special-effect printing in its environment, we had to go to the source. In this case it was an honor to have an open door into one of the nation’s premier special-effect screen printers, Shockwaves Promotional Apparel in Arlington Heights, IL. Shockwaves’s president and founder, Greg Gaardbo, walked us through some of the hottest trends in special effects. Then he showed some award-winning examples of how different effects could be executed and combined in final products.
Discharge printing
Assuming this is a special effect, the technique of discharging the dye from a garment leaves the printed piece with a perfect surface for adding other effects on top. For this reason, Gaardbo emphasizes it as a foundational special effect—one that needs to be on top of the list for printers who want to be more fashion oriented (Figure 1).
Art Designing artwork for discharge printing isn’t very different from traditional screen printing. The biggest concern is that any halftone needs to be kept slightly larger to avoid small dots drying into the screen and losing detail through clogging.
Separations When separating a discharge print, note that each color likely will need to be a discharge ink, so an underbase may not be used as in traditional screen printing, depending upon the art and the process.
Inks The discharge ink is created from a water-based ink with an activator added to it, which will then make the ink discharge the shirt dye upon curing. This activator requires special handling and careful ventilation.
Production Discharge prints run identically to regular water-based inks. The ink doesn’t keep, however, so it is important to mix only what is needed for the production run. You must give the ink has enough time in the dryer to cure and/or discharge the dye from the garment. A gas dryer with a long tunnel is recommended for this style of special effect.
Foil
The shiny foil application creates the perfect accent for a discharge and water-based print on a lightweight garment (Figure 2). Foil has made resurgence in the past few years because using it is a simple process and creates one of the brightest possible reflective surfaces on a T-shirt.
Art Foil art is created by printing adhesive. Foil applications is the second step. “Watch the details and small dots. Depending upon the thickness of the adhesive layer, foil applications will sometimes gain in size or bleed together due to the pressure of the heat press,” Gaardbo advises.
Separations Separating the foil accent from a surrounding discharge print is simple enough. But if you intend to stamp foil on top of another type of print, the best method is to use a discharge or water-based print so that the foil has no chance of attaching to the ink.
Inks/Foil You can use lots of inks as foil adhesive. The most common is a gel-type ink that gets very sticky. The adhesive gel can be colored to look like the foil. If an area doesn’t release perfectly, then it will not be as noticeable. There are many types of foils, so make sure that the foil is made for releasing onto screen-printed ink from a heat press.
Production The shirt is printed with the normal process and then run through the dryer. The garment is then laid onto the surface of a heat press and a foil sheet is placed over it with a cover sheet on top. After pressing for the recommended time and pressure, the foil can be cold-peeled off of the print.
High-density blister base
There are several ways of producing a high-density print. Some high-density styles involve stacking layers of ink onto the shirt in a technical, pyramid-type structure. These are highly specialized prints and are very difficult for the standard printer to execute. The style of high-density creation shown from Shockwaves is a more production-friendly model (Figure 3). The design used a combination of blister base that was printed through a thick stencil so it would then bubble up and create a print that looked like stone.
Art “This type of ink creates a nice elevated size, but it remains really stretchy and very durable with a cool-looking texture,” Gaardbo says. The art still needs to be simple for the effect to work well; otherwise, details will melt together and areas that are too large can make the shirt feel heavy.
Separations Make some allowance for ink expansion. Blister base can be printed on top, but details will tend to get blurry in the dryer as the ink bubbles up.
Ink Blister base can be mixed with different color boosters to create a custom look.
Production The ink creates a high-quality lift when printed through a thick stencil made with capillary film. The print should be made with a hard flood to fill up the stencil and with a light print stroke to release the ink onto the shirt. Consult with your ink supplier to obtain the proper stencil, curing, and handling instructions to achieve the best quality.
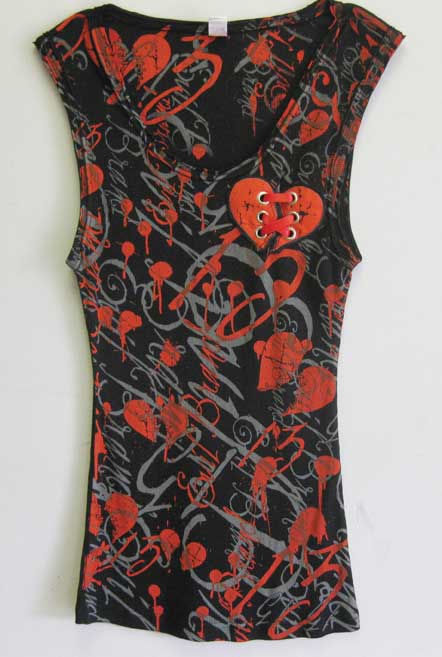
Rhinestones
There is no doubt that rhinestones and studs are hugely popular right now in fashionable stores and printing shops across the country. Combining this type of heat-press application with screen printing produces eye-catching results (Figure 4).
Art If you’re just getting into rhinestone application, consider creating a relationship with a supplier of rhinestone transfers. You can send vector art to the supplier who will map out the transfer with stones according to the directions given.
Separations This type of heat-press application is similar to foil, but the adhesive will be on the transfer itself (or the backs of the rhinestones on the transfer) and not printed onto the shirt. A very common practice is to print the garment with water-based inks, cure, and then apply the transfer to the garment. The layout of the stone transfers shouldn’t be too precise. If layout is critical, then the map you send to the transfer supplier should be from a final print, not a digital file. Mapping from the print ensures accurate placement when the transfers are created.
Production The garment is printed, cured, and then laid onto the transfer machine. The transfer is then carefully positioned and pressed into the shirt. The transfer is then cold-peeled.
Gel printing
In recent years, gel has become more of an overprint that will gloss or shine up an underprint, rather than a thick glob that is melted onto the shirt. The thicker style of gel that is commonly used on boys’ shirts to look like mud or goop is typically printed through a thick stencil made with capillary film. In the case of an overprint, the garment is printed, overprinted with the gel (use mesh with a low thread count), and then cured to gloss up the print (Figure 5).
Art Overprinting is simply a matter of knowing how the ink will look and then creating an extra layer in the art that represents the gel layer that will, in turn, create the shiny area.
Separations You can proceed as normal with separations once you make an extra layer for the gel overprint.
Production Make sure you have a flash left at the end of the cycle for the print before you overprint the gel. Printing gel on top of wet ink causes the ink to bleed and can reduce the gel’s gloss.
Flock
Flock printing is very popular in some high-fashion brands, and certain shirts that are decorated with flock can really command a higher price level. The equipment for flock printing can be costly, and the process takes some practice to get right—but the results can really be great to feel. Little flock fibers are charged, made to stand up through a static current, pressed or shot through a gun or wand onto an adhesive layer on the shirt, and then cured. Flocking gives the shirt a very fuzzy feel (Figure 6).
Art Flock art is best kept somewhat simple so that the fibers have enough surface area to grab on the garment. Flock should be designed with the whole garment in mind. Too large an area of flock can make a garment very heavy.
Separations Experience is needed when dealing with flock separations. An adhesive layer must be printed so that it will separate from other areas of normal print. Flock can sometimes be overprinted onto a regular print to achieve a variety of effects.
Production The biggest hurdle for applying a flock print is to get enough practice with the equipment for a proper application using the static charge. The flock fibers are first charged to make them stand up and then the garment is charged. The flock will then zap over through the adhesive layer and stick upright to maintain a fuzzy feel. Some automatic presses can be set up with flock attachments that allow for high-volume production (flocking can take a long time when using the smaller wands).
Burn out
This is a process where a chemical is printed onto a cotton/poly blended shirt and then the acid in the chemical dissolves the cotton in the blend. When the shirt is washed, all of the cotton in the specific areas on the garment is washed off, resulting in a transparent poly garment in just those places (Figure 7).
Art Ink application is similar to the process used in discharge, and effects aren’t really visible until the garment is washed. The same variables that apply to discharge inks apply to the burn-out inks. Producing artwork for this process requires that the artist be familiar with the final look so that the best effect can be created.
Separations Remember that the garment will become very transparent in the burnout areas and that other prints that rely on the cotton will not be visible after the wash when the burnout areas overlap them.
Ink Special handling of ink and waste ink is recommended, as is adequate ventilation.
Production Remember that the final effect is only shown after the wash, so an onsite washer and dryer can be crucial to make sure the ink with the activator is working properly to dissolve the cotton in the printed areas.
Combination printing of effects
The samples shown from Shockwaves emphasize how effects can be combined and work together to create a very unique, valuable garment that is sought after by customers and has an incredible point-of-sale attraction (Figure 8).
“It is important to learn how each effect is done separately and then which ones will work well with another to then start to combine effects,” Gaardbo says.
Water-based discharge is clearly one of the first, and then the others can be built upon this foundation to create some original printing styles. The best way to create successful and consistent special-effect prints is to test them and then control the variables individually. Then you can combine several effects to achieve a really exciting final product.
Other Popular Special Effects
Crackle
This is an ink that gets very hard and can then be cracked to appear old.
Chino base
A plastisol ink that sinks into the shirt and appears and feels like a water-based print.
Suede
This base or additive will print and then expand slightly and become fuzzy like suede.
Puff ink
Though less popular these days, this ink expands and lifts off of the shirt to create a 3D effect.
Glow-in-the-dark
Phosphorescent inks that charge up in daylight and then glow in the dark.
UV ink
This ink appears clear in regular light but changes to full color when exposed to sunlight.
Glitter
Particles of reflective poly are either dusted onto an adhesive on the shirt or printed with a clear base to achieve a sparkly surface.
Neon
Prints are made with fluorescent ink to create a really bright, retro-looking design.
Reflective ink
Little glass beads are suspended in the ink to make the ink reflect light.
All images and graphics property of Shockwaves Promotional Apparel, Arlington Heights, IL.
Thomas Trimingham has worked in the screen-printing industry for more than 15 years as an artist, art director, industry consultant, and head of R&D for some of the nation’s largest screen printers. He is an award-winning illustrator, designer, and author of more than 45 articles on graphics for screen printing. He can be reached at ttrimingham@yahoo.com.


Subscribe

Magazine
Get the most important news
and business ideas from Screenprinting Magazine.
Most Popular
-

 Case Studies2 months ago
High-Density Inks Help Specialty Printing Take Center Stage
-

 Art, Ad, or Alchemy2 months ago
F&I Printing Is Everywhere!
-

 Andy MacDougall2 months ago
Functional and Industrial Printing is EVERYWHERE!
-

 Columns3 weeks ago
8 Marketing Mistakes Not to Make When Promoting Your Screen Printing Services Online
-

 Editor's Note2 weeks ago
Livin’ the High Life
-

 Thomas Trimingham2 months ago
“Magic” Marketing for Screen Printing Shops
-

 Marshall Atkinson2 weeks ago
How to Create a Winning Culture in Your Screen-Printing Business
-

 News & Trends1 month ago
What Are ZALPHAS and How Can You Serve Them in Your Print Business?