Embroidery
Published
17 years agoon
If you’re wrestling with the idea of adding embroidery to your screen-printing shop, knowing what is involved beforehand can mean the difference between success and failure. First you’ll need to decide the following: Will it be a retail or contract operation? Will it be a storefront or manufacturing plant? Who will be my customers? The answers to these questions will determine which setup is best for your business and what equipment will be needed to start. Ideally, you should do your homework and due diligence before you purchase any equipment.
If you’re wrestling with the idea of adding embroidery to your screen-printing shop, knowing what is involved beforehand can mean the difference between success and failure. First you’ll need to decide the following: Will it be a retail or contract operation? Will it be a storefront or manufacturing plant? Who will be my customers? The answers to these questions will determine which setup is best for your business and what equipment will be needed to start. Ideally, you should do your homework and due diligence before you purchase any equipment.
What you need to know about machinery
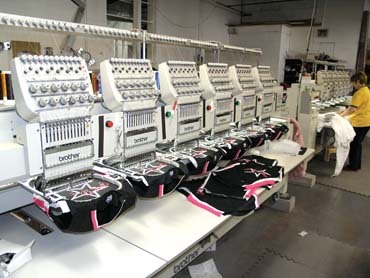
First of all, let’s define what a high-volume shop is. Shops with more than 500 sewing heads have fast become a dying breed. Today, a typical high-volume shop has about 24 heads. A handful of mega-huge direct merchants easily have in excess of 1500 heads, but that’s probably not the type of business you have in mind. Multiple smaller embroidery machines (four- and six-head units) provide greater flexibility and versatility (Figure 1). Embroiderers aren’t seeing the really large orders anymore, so it’s just not as efficient to run machines with more than 12 heads. Smaller machines also give you more options when configuring your shop.
"We recommend that you initially start with at least two four- or six-head units, plus a single head for personalizations and samples," says Steve Hobbs, northeast regional sales manager (IPD Embroidery Systems) for Brother Int’l Corp. "Go to industry trade shows to see all the machines available up close, watch them sew, talk to the manufacturers, and ask them all your questions. I tell potential customers to find a business similar to one they want to model after, but be careful it’s not someone they would compete with, and they’ll be surprised at how helpful and willing they are to share their experience and knowledge."
Since most embroidery machines have similar features and functions, it’s best to buy one from a manufacturer that will give you great service, support, and training. What good would it be to have state-of-the-art equipment that you and your staff don’t know how to operate? What happens when your machine breaks down in the middle of a large, critical job and the technician says he can’t get to you for another few days? Don’t necessarily purchase from the cheapest guy—it may cost you big-time in the end.
All about accessories
After selecting the machinery for your shop, you’ll need to stock up on essential accessories to keep your business operating smoothly. You’ll need needles, thread, pre-wound bobbins, backing, topping, scissors, hooping aids, aerosol sprays, machine parts, tools, and other miscellaneous accessories and ancillary equipment.
The most common needle size is 75/11. It comes in sharp point for tightly woven goods, denim, and terry cloth; and ball point for knits, piques, and fleece. Polyester thread size 40 is the most common thread used for embroidery. Thread comes in 5000-m cones and 1000-m spools. Invest in a spool chest that holds 360 spools, which is great for that last minute customer that wants an odd color, and keep a color card or swatch book for color matching. You’ll need plenty of pre-wound sided or sideless bobbins, which are available in L and M styles and either white or black.
Backing, which goes underneath the fabric to be embroidered to keep the fabric stable while sewing, comes in two basic types: tear away and cutaway. Tear away backing is a non-woven material that tears away easily, is best used on stable fabrics such as canvas and denim, and comes in sheets and rolls. Cutaway backing is a woven or non-woven material that can be trimmed away, best used with fine knit or loose fabric, and also comes in sheets and rolls. Cap backing is a tear away backing sized for cap panels. It comes in pre-cut pieces or rolls.
Use topping material when embroidering on any loose fabric texture because it prevents stitches from sinking into the fabric and appearing uneven. The topping goes on top of the garment fabric, then the designed is embroidered through the topping, garment fabric, and backing, resulting in a uniform design. Water-activated topping dissolves in water and steam. Heat-activated topping dissolves when heat is applied.
Scissors are essential for every embroidery shop. Embroidery snips have fine points that are used for close trimming, thread snips are used for quick and easy trimming, and 8-in. dressmaker shears are great for cutting backing and material.
Hooping aids help ensure proper placement of the embroidery on shirts, jackets, and hats. Clamping systems help to avoid hoop burns and are great for hard-to-hoop items, such as hand bags, computer cases, CD cases, jackets, and products that mark easily.
Aerosol spray adhesives are great for holding die cuts, puffy foam, backing, and fabrics in place. Compressed-air sprays can be used to remove lint and dust and to keep the rotary hook and bobbin cases of your embroidery machines clean.
To minimize operating down-time, keep spare machine parts on hand, such as rotary hooks, bobbin cases, presser feet, needle set screws, hoop screws, any small screws or items that can be dropped during use, and hoop rings. You can find many of the tools you’ll need at any hardware store. Keep a few Phillips and flat-head screwdrivers and ball-headed Allen wrenches handy. Most machines use metric fasteners. Stock your shop with a hot knife to seal and cut fabric edges to prevent unraveling. Use tweezers for threading needles and for holding thread while trimming from embroidery work. Also purchase a heat-sealing tool that has a non-stick Teflon coating and variable temperature control to use for heat-activated appliqué, as well as pen oilers for oiling rotary hooks and for hard to reach areas.
Miscellaneous accessories include ink pens to touch up unsightly bobbin thread and small goofs that require filling small areas, soapstone marking pens for temporary marking on fabrics, and invisible marking pens to mark different type of fabrics (marks disappear with water and time).
Additionally, every embroidery shop needs a steamer, which removes ring impressions and hoop marks from garments after they’ve been embroidered. Steamers also can be useful for removing the small pieces of topping that remain within the small areas of your design.
The art of digitizing
Digitizing or punching designs is the process of converting artwork, such as vector or raster artwork into digital embroidery. This can be done by the use of digitizing software and a skillful digitizing artist to interpret that particular design. Digitizing can only be done correctly and with good results when the digitizer has strong knowledge of and experience with the sewing process and the properties of various fabrics and threads. Just because you can make a design look great on the computer doesn’t guarantee that it will look good when sewn.
To digitize, you don’t have to be an artist, but you must have good artwork. In the beginning, start with the easier designs and build up to more difficult decorations. Your abilities will grow as you experiment and learn what works and what doesn’t. You should have between six months and one year of real-world embroidery sewing experience before attempting to digitize your designs. In the meantime, you can outsource work to a professional digitizer—or hire one.
Most manufacturers include digitizing software with the purchase of embroidery machines, but you also can purchase software separately. Most, if not all, digitizing packages include lettering and editing functions, but some have more bells and whistles. Use the software that came with your machine(s), and don’t buy any additional software until you know what you need and want.
Training to use digitizing software typically takes about four days in smaller class sizes of four to ten people and is usually included with the purchase of the software. Lettering and editing are taught first because the user must learn how to import, manipulate, and add text to stock designs and to have them sew properly before they learn to digitize. In addition, they must learn how the machine works and how good and bad designs sew on the machines. A good digitizer knows how to maximize the efficiency of every design. The digitizer’s goal is to have the design run efficiently, with as few trims and machine movements as possible. After all, efficiency equals profitability.
The embroidery workflow
High-volume embroidery shops require fast production and optimal efficiency. When considering the layout and configuration of your shop, make sure it provides for a clear workflow to make every job and transition a smooth one and to create efficient production and reduce downtime. Let’s start with the single-head layout.
For a single-head layout (Figure 2), keep everything in a U shape for quick access to items you or your operator will need. Start at the hooping/staging area, where you keep your merchandise to be embroidered, hoops, backing, toppings, etc. This is usually a standard, 36-in.-high table with an open bottom. The computer is used for quick name drops; other designs should be sent from the design center. However, if this work station is primarily used for name drops, then you may want to have the design center set up the names for the operator and remove the computer station from this location. The operator moves from left to right, ending up at the trimming/folding table for finishing after the garment has been sewn. You may add a rolling laundry cart for the finished garments. Good lighting is a must!
For a multihead layout (Figure 3), you will need a minimum of 36 x 36 ft of floor space and good overhead lighting—but skip the carpeting (too hard to clear away thread and doesn’t do a good job of absorbing sound). In this scenario are two stations of four- or six-head-machines with the hooping station in the middle and the trimming/steaming/folding area close by, but separate. Keep hoops, backing, needles, etc. on the lower shelf of the 36-in.-tall tables. Keep the thread storage on a nearby wall for fast access. Use commercial laundry carts at key production points to store the items ready to be sewn and those already embroidered and to ease the process of moving the goods to the next destination. Items to be sewn are wheeled in from the design center. Included in the cart are the design files on a disk and printed instructions for the job. The operators will put the finished garments into another rolling cart, initial the work order and any comments, and send the goods to the shipping department, sales floor, or elsewhere.
If you’re running a four-head machine, then the same person can hoop and sew, but a six-head machine requires two operators to eliminate or reduce downtime. The machines should always be running. One person can hoop while the other tends to the machine. The person who is stationed at the trimming/steaming/folding table should also be cross-trained in how to hoop.
You should have four check-points throughout the sewing process. First, the receiving department should count the items for the job, confirm they are the correct products and sizes, and verify that there are no defects or stains. Next, the hooper repeats the process. After that, when the job has been completed, the operator counts the items, verifies that they were sewn correctly and that there are no defects or stains, then puts the items into the rolling cart to go to the finishing table. Finally, the finisher does the steaming and folding, counts and inspects the items, writes the verification on the instruction sheet, and puts the items back into the rolling cart with the original design disk and instructions. These four checkpoints help to eliminate or reduce errors and returns, thereby improving profitability.
Most large shops find that keeping a huge inventory of garments is not cost-effective. Keeping large quantities of many sizes and countless types of garments in anticipation of future orders is very risky, and at best just a guess. Instead, find manufacturers or distributors that can supply you within a day or two. You may even find someone in your immediate area who will give you same-day delivery.
Another thing to consider is how many shifts to run. Approximately 30% of all large shops run two shifts: 7 a.m.-4 p.m. (first shift) and 4 p.m.-12 a.m. (second shift). Third shifts are typically counterproductive because the workers tend to have day jobs that leave them exhausted by night. A better solution to achieve increased production is to add more embroidery machines. However, there are exceptions to this rule. For instance, if you’re a licensed sports retailer and the Super Bowl teams were just announced, you’d have to add a third shift in order to meet the deadlines.
Tips for efficient job setup
Before you purchase any equipment, invest in some grid paper and chart the flow of your shop. This will also help you determine exactly what equipment you’ll want when you start. Your top goal is to avoid machine downtime. Downtime costs you money. With that in mind, consider the following tips for efficient job setup:
1. Have the next job ready to be loaded on to the embroidery machine. Complete the changeover as quickly as possible.
2. If the next job requires thread of a different color, change the thread while the last run is sewing. Just replace the thread on the needles not sewing (most embroidery machines have between nine and 15 needles, and chances are you are not sewing a design with nine colors). But watch those fingers!
3. Avoid changing over the machine as much as possible; for example, from flat goods to caps. Change-overs are very time consuming, and it’s much more efficient to run all the shirts together, then all the caps, even if you’re mixing jobs. You can also set up certain machines for sewing caps only and feed these machines all of the caps. Some shops run caps only two days a week to avoid the wasted time of constantly changing frames. The order of sewing or mixing jobs doesn’t matter as long as you meet the deadline.
4. Different products and fabrics require different needles, so make your first six needles ballpoint and the rest sharp to minimize changing them. Six ballpoint needles are recommended because corporate logos are usually six or fewer colors, and sharp needles damage knit shirts.
A few words about training
Manufacturers typically provide training as part of a machine purchase—about a day and a half of training on a single-head machine and approximately four to five days for a multi-head unit. You’ll want to train your employees to handle the basic operation of the machine. They should be taught to enter designs, delete designs, rotate designs, load and offload garments, select needles, tension bobbins and threads, when to oil, and how to break down the machine from flat goods, caps, and clamps. They should also be well versed in hooping and proper placement, as well as which type of backing and toppings to use with each garment. After 30 days, they should be able to do all of these things. Keep the mistakes (ruined garments) to use as a learning and training tool—samples of what should be avoided.
Employees should spend the next 30 days learning basic machine maintenance and troubleshooting and how to stick appliqué and puffy foam. Encourage them to attend classes and seminars offered at industry trade shows. Those resources will help them improve their work.
Ready, set, sew
Adding a high-volume embroidery business to your shop can be a lucrative and rewarding experience, but it also is a complex undertaking that requires substantial research and consideration, a workable plan, and adequate capital. With all of these in place, you’ll find that embroidery is an excellent way to stitch up new opportunities and profits for your company.
About the author
Sherry Higgins is a marketing consultant and president of Total Marketing Solutions LLC, a full-service agency specializing in marketing strategy and design. She has 20 years of experience in marketing and public relations. Higgins holds a bachelor’s degree in marketing from Kean University. She can be reached at 908-686-9031 or sherrylhiggins@hotmail.com.


Subscribe

Magazine
Get the most important news
and business ideas from Screenprinting Magazine.
Most Popular
-

 Art, Ad, or Alchemy1 month ago
F&I Printing Is Everywhere!
-

 Case Studies1 month ago
High-Density Inks Help Specialty Printing Take Center Stage
-

 Andy MacDougall1 month ago
Functional and Industrial Printing is EVERYWHERE!
-

 Editor's Note1 week ago
Livin’ the High Life
-

 Columns2 weeks ago
8 Marketing Mistakes Not to Make When Promoting Your Screen Printing Services Online
-

 Thomas Trimingham2 months ago
“Magic” Marketing for Screen Printing Shops
-

 Marshall Atkinson1 week ago
How to Create a Winning Culture in Your Screen-Printing Business
-

 Press Releases2 months ago
Big Frog Custom T-Shirts & More of Round Rock Celebrates Grand Opening