Pad Printing
Published
21 years agoon
Much has been written about pad-printing machines. Closed-cup, open-ink-well, single-color, and multicolor systems are regularly explored in industry trade journals. When you get right down to it, the goal with all these machines is simply to lay down a controlled thickness of ink and replicate the original artwork consistently. Although the pad press is at the heart of this process, what can really make the difference between an accurate and efficient printing system and a complete disaster is the way ancillary equipment and consumables are involved.
Much has been written about pad-printing machines. Closed-cup, open-ink-well, single-color, and multicolor systems are regularly explored in industry trade journals. When you get right down to it, the goal with all these machines is simply to lay down a controlled thickness of ink and replicate the original artwork consistently. Although the pad press is at the heart of this process, what can really make the difference between an accurate and efficient printing system and a complete disaster is the way ancillary equipment and consumables are involved.
The trap that most people fall into when they buy their first pad-printing press is that they don’t prepare for its arrival. They fail to think through the entire process and all the other components and procedures that must be in place for it to work properly. For many, this lack of preparation can lead to months, or years, of suffering with an unpredictable and uncontrollable system. The printers blame their difficulties on inherent faults in the equipment that they feel they have to live with. What they don’t realize is that they must understand and control the variables that affect the process for pad printing to become an effective decorating method.
On the following pages, we’ll explore a range of concerns that newcomers to pad printing frequently overlook. We’ll also explain how these issues can be overcome with certain tools and techniques that should be familiar to every pad-printing operation.
Ambient conditions
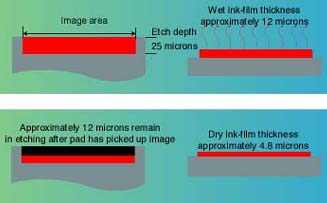
The image-transfer mechanism of pad printing is based on the evaporation of solvents in the ink (Figure 1). As solvents evaporate from the ink, they increase the surface tack of the ink film, which enables the ink to transfer from the cliche to the pad and from the pad to the final substrate. The speed at which evaporation occurs depends on the solvent mix used in the ink, as well as the temperature, humidity, and air movement around the machine. Altering any of these conditions will affect the solvent-evaporation rate and, consequently, the effectiveness of ink transfer. You want the solvents to evaporate fast enough to increase surface tack while keeping the ink fluid below the surface so that it lifts from etched cliche and transfers from the pad.
Ideally, a pad press should be operated in an air-conditioned environment at a temperature of 65-72°F (18-22°C) with a relative humidity of 55%. If you don’t have the luxury of air conditioning, create as stable an environment as possible, away from windows and doors to the outside and the blast of forced-air heaters. Don’t be tempted to put equipment on upper floors of multistory structures, where heat can rise dramatically during the day. Instead, opt for colder areas of the operation.
If the area where you locate the machine is colder than the optimum temperature range listed previously, you can use a hair dryer to alter the ambient conditions at the print station. When the area warms up during the day, you just switch off the hair dryer. It sounds pretty crude, but it works. Should the results still fall below your quality needs and reject tolerances, then you either have to relocate the machine or invest in more sophisticated equipment to control the environment (i.e., an air-conditioning system). The bottom line is that a badly sited machine can produce rejects faster than you can make components.
Positioning the machine
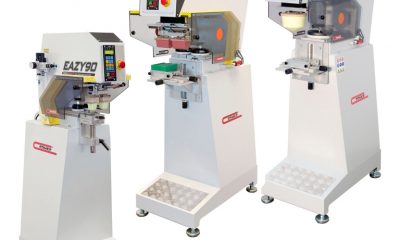
The area where you will locate the machine must be clean and well lit. The press must be easy to access, and parts must be able to move freely to and from the machine(Figure 2). The press should have sufficient area around it to allow for components to air dry if you’re not using some form of forced-drying system. If a forced-drying system is used, make sure it is easily accessible from the press.
The ergonomics that result from the press’s position often have a great impact on its performance. To achieve optimum performance on manually loaded machines, parts should be presented so that all the operator has to do is pick up a part with minimum turning or bending, load it onto the machine, and unload it before it moves on to inspection or drying. The part-delivery system might involve incoming and outgoing conveyors positioned adjacent to the press or simply boxes from which parts are drawn and trays onto which they are placed after printing.
Depending on the configuration of the press, you may require two operators: one to pack and unpack the parts and the other to control printing functions. Even with the most sophisticated automated pad-printing systems, you will need somebody to keep an eye on the machine when it’s in use to ensure that it’s operating properly and delivering the desired print quality.
Packaging and cleanliness of components
Being able to move parts freely to and from the press is only part of the equation for efficient production. Unless these parts are immediately ready for printing, having them on hand at the press becomes meaningless. The two main concerns you have in terms of part readiness are packaging and cleanliness.
Packaging The vast majority of parts that are pad printed are made of plastic and typically arrive packed in a plastic bag that is sealed in a cardboard box. With this double packaging, removing parts for printing can create a bottleneck. Because pad printing is best carried out as a continuous process, individually unpacking and printing one component at a time can lead to a slow or erratic pace and eventually can cause print problems. However, by establishing a part-unpacking routine as a separate step prior to production, you can eliminate these problems.
The plastic bags in which parts are generally packaged lead to another concern as well. These bags are normally polypropylene or polyethylene, and separating them from the parts they contain is an excellent means of generating static on the parts. This static can have an adverse effect on the print quality, causing ink to spiderweb across the parts during printing and fail to adhere. Static also attracts dust and debris that can further diminish print quality. We’ll look at this problem more closely in a following section.
Cleanliness Once you have parts unpacked, the surface condition of those parts becomes a crucial consideration. Each part must be free of contaminants that can affect ink adhesion. Contamination can be as simple as a fingerprint or leaching of plasticizers or other additives in plastic materials.
Dust is another real pain. Cardboard from packaging, for example, releases fine fibers that can settle on components and ruin the print. Other dust sources include clothing, human skin, and debris carried in from outdoors on garments and shoes. Floors and surfaces near the machine never should be brushed to remove dust; instead, these surfaces should be wiped with a wet rag or mop, or simply vacuumed.
Contamination can come in less obvious forms, too. For example, if parts are brought into the production area from a cold, dry storage location, the warmer, more humid air in production can cause moisture to form on the part surfaces until they warm up. If the parts are immediately printed, this invisible layer of water can compromise ink adhesion. So always let parts acclimate to the production environment.
Static elimination
Static electricity can be a serious problem in pad printing, not only because of the problems it causes with ink adhesion, but because it attracts dust that can lead to additional print problems. As mentioned previously, static can occur on blank plastic parts when they are packed in plastic bags for shipping. But this isn’t the only cause.
Static electricity is an inherent byproduct of the pad-printing process. It is generally caused by the compression of the silicone-rubber pad onto the plastic parts being printed. The static charge can affect ink transfer to such an extent that printing is not viable. Very low humidity levels only make the problem worse.
If static problems can’t be solved with simple solutions, such as slowing the print cycle or adding antistatic additives to the ink, it may be time to consider the use of static eliminators. These devices produce ionized airflows that are directed at the part during printing and draw off static charges so that the items are receptive to the ink. Static eliminators come in a variety of shapes and sizes that support virtually any pad-printing equipment and a range of production configurations.
A final alternative for reducing static is to use printing pads that are less likely to generate the static charge in the first place. One new type of silicone-rubber pad that is emerging inhibits the generation of static electricity and even removes the need to wipe down pads with solvent during production runs.
Solvent balance in inks
Assuming you have all the previous conditions optimized, it’s time to turn your attention to optimizing the solvent balance in the ink. Whatever balance you deem to be ideal for the type of inking system you use (open well or sealed cup), this is the balance that must be maintained every time you print.
The only way to achieve consistent and repeatable ink characteristics is to measure ink components by weight when mixing. While some pad-press users mix according to glugs, squirts, or dollups, more precise units should be used–we suggest grams. Only mix as much as you need for the run, because even in a sealed container, the mixed ink will degrade over time. Once you’ve mixed the ink and added the necessary amount to the machine’s inking mechanism, keep the remainder in a sealed container until you need to top off the system.
Maintaining the solvent balance during the run is also vital. In a closed-cup system, this is much easier because solvent has very little opportunity to evaporate from the cup, and, consequently, the ink maintains its printability longer. With an open-cup system, you must establish a standard regimen for solvent addition during production in order to maintain the correct balance in the ink.
Drying the ink
As noted early in this article, pad-printing ink uses fast-drying solvents to support the image-transfer mechanism. Many of the ink systems suitable for the process dry so quickly that it is possible to print wet ink over colors that were printed only moments earlier on multicolor jobs. While the previous colors may not be completely dry, they are dry enough to remain intact on the print surface without affecting subsequent colors.
In spite of these ink characteristics, accelerated drying methods are often used to ensure a dry ink film that will withstand handling soon after printing. The methods vary depending on the ink type used, the substrate being printed, and other application requirements. The most common types of drying systems are radiant heat units (short-wave, medium-wave, and long-wave infrared), hot-air blowers, and flaming systems.
Radiant heat Dryers based on radiant heat are the type most commonly used to accelerate drying in pad-printing applications. Short-wave infrared (IR) systems are used for applications that require heat exposure for a short duration. In these devices, the heating elements are essentially high-powered light sources using either reflector-based emitters or tube emitters.
Short-wave systems produce very bright visible light along with heat en-ergy they emit. As a result, the performance of these system is color sensitive, meaning that dark colors will absorb the heat energy more readily than light colors. If you were printing white ink onto a black substrate, the substrate would absorb the energy and heat up while the white portion would reflect the energy and remain cool.
Radiant-heat dryers are generally incorporated in conveyorized drying lines. Printed parts are loaded at one end and moved under radiant-heat emitter panels and exit fully dry at the other end. With these systems, maintaining the right conveyor speed is critical if you with to avoid melted parts.
Another way in which short-wave IR emitters may be used for drying is to situate them above one of the stations of indexing conveyors in a multicolor pad-printing system. When a component is presented underneath the emitters, they pulse on for the duration of the print cycle. Afterwards, the part moves on to the next production station.
Medium-wave and long-wave IR emitters are slower in building up their heat. Long wave is the slowest, but it has no light component and its effectiveness is therefore uninfluenced by the color of the ink or substrate. However, long-wave energy is not able to penetrate as far into the substrate as is short-wave IR.
Regardless of what wavelength an IR emitter uses, it’s important to make sure that all evaporated solvents are extracted from the drying chamber. If the enclosure becomes saturated with solvent vapors, the system may be unable to dry subsequent prints and the risk of explosion and fire increases, particularly with the hotter-running short-wave systems.
Hot Air Combining high-speed air movement with heat is a very efficient means of drying solvent-based pad-printing inks. For many pad-printing applications, industrial hot-air blowers are ideal drying systems. These devices will generate temperatures up to 1470°F (176°C) and can accelerate drying substantially. However, great care must also be taken to ensure that printed parts aren’t damaged by these systems.
Flaming Flaming is generally thought of as a means of pretreating polypropylene or polyethylene to increase its surface energy for improved ink adhesion. But flames can also be used as a post-printing method for flash drying conventional pad-printing inks. In certain applications, flaming not only provides the fastest drying solution, but actually promotes ink adhesion better than other alternatives.
One example is when you are pad printing on certain engineered plastics. Flame treatment creates a bond between the ink and substrate that would be minimal if another drying method were employed. The dyes in sublimation inks can also be transferred into certain copolymer plastics with the careful use of flaming. Should you decide to use flame drying, make sure you’ve eliminated all potential hazards by incorporating the proper safety devices and cutoff systems.
Other, more specialized, drying systems may also be called for, depending on the application. Sensitive substrates might require a static oven that applies a very controlled heat level without air movement. Newer ultra-violet (UV) curing pad-printing inks require a UV dryer to provide the proper wavelengths of energy to achieve a cured state. And when pad printing is used to apply frit-based colors for glass and ceramic decorating, a high-temperature kiln or lehr is required to "fire" the inks to the substrate and form a permanent coating.
The broader perspective
Pad printing can be a very effective and efficient decorating method if you consider all the components of the process and the way they work together. The ideal system requires more than just the right machinery; it requires knowledge of the variables that influence printing success and the means to control those variables. By following the suggestions presented here, you’ll be closer to achieving that ideal system and boosting the quality and consistency of your products, as well as the productivity of your printing operation. Gloves and Personal Safety
One important facet of pad-printing production that gets little recognition is worker safety, particularly as it relates to the use of protective gloves. Pad printing uses volatile, often aggressive solvents and inks that contain highly reactive resins. Skin contact with these materials can lead to their absorption into the user’s bloodstream, which may cause adverse health effects in the long run. If nothing else, users repeatedly exposed to these chemicals may become highly sensitized to them, so much that they are unable to work with or near particular inks or solvents.
Most pad-press operators, if they use gloves at all, use basic household gloves of thin latex or vinyl. While these gloves may be suitable for warding off occasional drips and splashes, they are a poor line of defense against heavy coverage or complete immersion in pad-printing inks and solvents. Pad-printing solvents, in particular, can destroy these household gloves in a very short time.
No single glove material (or combination of glove materials) provides unlimited resistance to all chemicals used in pad printing. Any glove material will eventually fail to protect the wearer from aggressive chemicals, which can find their way to the user’s skin in one of three ways:
*Permeation: The process by which a chemical agent migrates through the protec tive glove at a molecular level.
Penetration: The bulk flow of the chemical agent through closures, pores, seams, pinholes, or other imperfections in the protective glove.
*Degradation: A damaging change in one or more physical properties of the pro tective glove as a result of exposure to a chemical agent.
When choosing work gloves for your operation, seek help from a glove supplier. You will need to inform the supplier of all the chemicals you use. You may get assistance from you ink suppliers, whose Material Safety Data Sheets should indicate compatible glove materials. Good working practices must be part of your glove-use policy. Minimizing contact with harmful chemicals is much more effective than only relying on a barrier in the form of gloves.


Subscribe

Magazine
Get the most important news
and business ideas from Screenprinting Magazine.
Most Popular
-

 Case Studies2 months ago
High-Density Inks Help Specialty Printing Take Center Stage
-

 Art, Ad, or Alchemy2 months ago
F&I Printing Is Everywhere!
-

 Andy MacDougall2 months ago
Functional and Industrial Printing is EVERYWHERE!
-

 Columns3 weeks ago
8 Marketing Mistakes Not to Make When Promoting Your Screen Printing Services Online
-

 Editor's Note3 weeks ago
Livin’ the High Life
-

 Marshall Atkinson3 weeks ago
How to Create a Winning Culture in Your Screen-Printing Business
-

 Thomas Trimingham2 months ago
“Magic” Marketing for Screen Printing Shops
-

 News & Trends2 months ago
What Are ZALPHAS and How Can You Serve Them in Your Print Business?