Prepress & Screen Making
Published
21 years agoon
Working in the art department exposes us to all kinds of nasty, poorly prepared art. Sometimes it’s the client’s fault. Many times it’s simply ignorance that causes all this grief. I can’t tell you how many times we’ve had to magically resurrect an essentially dead-on-arrival art file. Some of the art that comes in is so bad it would be funny if it were not for the fact that we are under deadline to produce the job–and the salesman has committed the company to delivery, regardless of how bad the art is.
Working in the art department exposes us to all kinds of nasty, poorly prepared art. Sometimes it’s the client’s fault. Many times it’s simply ignorance that causes all this grief. I can’t tell you how many times we’ve had to magically resurrect an essentially dead-on-arrival art file. Some of the art that comes in is so bad it would be funny if it were not for the fact that we are under deadline to produce the job–and the salesman has committed the company to delivery, regardless of how bad the art is. So this month I would like to go over some of the really cool tricks I’ve learned to use over the years to salvage bad situations.
To begin, you will do yourself a huge favor by publishing your art guidelines. These include information about the programs you support and the parameters under which you want the file to be produced. I’m not guaranteeing that this will do much good, but at least it’s a start. Having guidelines in hand is at least a deterrent to bad art. On the outside chance that some creative director will actually look at the guidelines means that you have minimized your exposure to problems. If you do receive bad art files from someone who has read your guidelines, you at least have a fighting chance to successfully fix the problem. That said, let’s take a look at some of the major problem areas common in customer-submitted art and ways you can minimize or repair the damage.
Wrong resolution
This happens a lot. Either the file is terribly low in resolution, or it is so high you could make a billboard from the file. In the case of low resolution (low res), you are in trouble. These are often art files captured or downloaded from the Web. They may look fine at 100%, but when 100% is 1 x 2 in. and you need 10 x 20 in., you’re stuck.
Enlarging, or up-sampling, a low-res file introduces all sorts of artifacts into the art. The image-manipulation program (usually Adobe Photoshop) has to guess what values to insert between the existing pixels in order to make up for the missing information. Up-sampled images are not as sharp, nor do they have as much detail, as the original. If the enlargement is up to 125% (1.25x original size), you may stand a reasonable chance of successfully creating a printable image. I have seen some images up-sampled by 200%, but beyond this, you’ll definitely have a blurry, choppy image.
To up-sample, choose an interpolation method that gives the best results. In Photoshop, follow this path: >Edit>Preferences>General. With the General Preferences open, choose Bicubic. This is the slowest, but smoothest, rendering method. Even though the image may be slightly blurry, you can further improve the results by applying several passes of Unsharp Masking from the >Filter>Sharpen>Unsharp Masking area. More on this in a moment.
Down-sampling images creates fewer issues. Here, the main problems are files that are way too large or have too much detail in them. In the latter case, the extreme details become unprintable on reduction. When interpolating down, you can use either native Photoshop or Bicubic format with no damage to the file. The only thing you need to be aware of is that when you downsize, you discard information that cannot be recovered. If you downsize, you cannot resize back to the original dimensions without problems.
Another solution to improper resolution is to convert the resolution-dependent raster file to a fractal file. This is a mathematical translation that is similar to resolution-independent vector files. If you use a product like Thunder Lizard’s Genuine Fractals Pro, you convert the file to mathematics that are truly independent of size. I have seen 2000% (20x) enlargements of fractal files with virtually no distortion. Likewise, a fractal file can be downsized to 2% (50x reduction) for easy transmission over the Internet. This works great for large-format printers.
Remember, if you have bad art to begin with, it will only get worse when you enlarge it. However, bad art sometimes can be salvaged if it’s reduced enough. When in doubt, always ask your customer to give you a file that is larger than what you need.
CMYK files
In the early days of digital scanning, all files were prepared as CMYK. This was because CMYK was the only way full-color printing was done on paper. So scanner manufacturers, such as Crosfield, Hell, and Dainippon, all made their scanners generate native CMYK files.
The problem is that CMYK for paper is not what we need for screen printing. The tone curves, dot gain, gray balance, and ink densities are all different. Every printer I know has experienced the joy of having to make someone else’s CMYK scans print. Most of the time, it simply does not work. Thankfully, this problem is beginning to go away.
Color management systems (CMS) began to take a serious foothold about four or five years ago. The technology was around before that time, but not enough companies used it to call it a productive solution. As drum scanning has given way to desktop scanning and digital photography, CMSs also have really changed. CMSs use an RGB workflow. The image is acquired in RGB and then converted using a device profile for a specific CMYK device. This means that while an image printed on a printing press has a different profile than, say, an Epson 9500 inkjet proofer, the image will look the same on either device if the CMS profile is properly prepared and applied.
The heart of the CMS is the use of profiles. As you begin to study and understand how profiling works, it is possible to do profile-to-profile conversions. This allows for the conversion of an image prepared under one profile to be converted to fit the profile of a new device. It is complicated, but completely achievable for the knowledgeable prepress technician. The CMS workflow is continuing to evolve, and it is getting more and more understandable.
Poor image quality
For the sake of this discussion, poor image quality has to do with image defects, tone, and contrast. It also may involve color correction and cast removal. While each of these subjects warrants an article of its own, I’ll just focus on the essentials here.
Problems with customer-prepared art often fall into two main categories. The first has to do with image sharpness and focus. If the problems are not too extreme, you can use Unsharp Masking, as mentioned earlier, to greatly improve those aspects of the image file. David Blatner and Bruce Fraser devote almost 100 pages to sharpening techniques in their Real World Photoshop series. The techniques for rescuing images are numerous and impressive and include dealing with film grain, facial complexions, edge sharpness, water, ice, subject textures, and many others. If you have an image you feel is too far gone, consult Real World Photoshop before you give up. You will be pleasantly surprised.
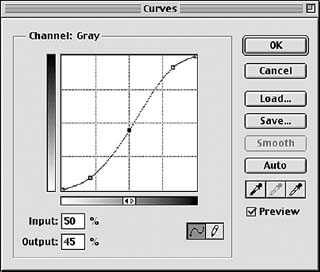
Tone and contrast are two other big problems. Images lacking in these departments look dull and lifeless because all of the values are in the same area. An example might be a lady wearing a gray coat, riding a gray horse on the beach in the fog. Not much life there! Adjusting tone and contrast can save these types of images. This is done in Photoshop under >Image>Adjust>Curves. To add contrast to an image, you would typically apply a classic, contrast-correcting "S" curve. <B>Figure 1 </B>shows a typical curve where the highlights are lightened, the shadows darkened, and the midtones slightly lightened. This is the quickest and easiest way to dramatically improve the appearance and printability of a flat image.
JPEG file format
JPEG is a file format used to save digital photographs. It is a compression method that greatly reduces the size of the stored file. But the problem comes in the fact that JPEG is a "lossy" compression method. This means the data are lost forever when the file is compressed. The method by which JPEG works generates strange digital artifacts in the image. Artifacts typically appear as regular squares mixed into the pixels of the image. Artifacts also are highly visible along the edges of items in the image file, and often look like smoke or heat waves.
The JPEG format progressively destroys digital images. More information is lost each time an image file is opened and closed. If you were to open and close an image enough times, you would degrade the image to the point where it would no longer be useable in a commercial way.
If JPEG is so bad, why is it used? JPEG works well if the image has high pixel density. In other words, if the image were 300 ppi or higher, the visible nature of the artifacts would almost be impossible to see. Virtually every digital camera saves captured images in JPEG format. But this is tolerable as long as the picture is not enlarged. We already know we receive images that are the wrong resolution, and when that’s the case, JPEG is a death sentence for the digital image.
Web-based screen grabs are another example of where JPEG is very problematic. These are low-res (usually 72 dpi) images that are already in JPEG format to make them load quickly. If a client does a screen grab, or downloads the image from the Web, the damaging artifacts will be everywhere. Immediately converting the file format to TIFF (.tif) or Photoshop (.psd) is the best way to prevent the damage from getting worse.
There are several filters on the market designed specifically to repair damaged JPEG files. Alien Skin’s Image Doctor and Visual Infinity’s Grain Surgery are examples of commercially available Photoshop plug-ins that run on either Mac or PC. These plug-ins do an excellent job of saving damaged images.
Inappropriate design programs
How many times has a client of yours provided a layout in Microsoft Word or PowerPoint? It seems ridiculous that someone would prepare art for printing in a presentation program or a word-processing application. Alternately, a customer may provide a CAD drawing file generated with AutoCad, Solidworks, or similar software and ask you to produce screen prints from it. In both cases, the clients figure that if they can lay the drawing out and print it on an office inkjet printer, it also should work in a commercial printing environment. Well, these files don’t work, and there are serious consequences in store for those who think otherwise.
In the case of Word or Powerpoint, your options are limited. About the only thing you can do is try to extract the images and recreate the layout in the correct program. Keep in mind that images embedded in these types of programs are often too low in resolution to be useful.
CAD-generated images are a bit different than those produced in Word or PowerPoint. Most of these files are high-resolution and, therefore, suitable for graphics work. The key is to translate the files to a format compatible with the color-separation process. Programs like Equilibrium’s Debablizer can be invaluable for doing file-format translations. Debabilizer supports the file-to-file translation of more than 100 different formats, including animation-rendering formats, such as PIXAR and SGI. In the end, however, you’ll find there’s simply no substitute for properly prepared and submitted artwork.
Calling the art police
It would be nice if there were "art police" patrolling our customers–you know, guns drawn, shouting, "Step away from the keyboard and keep your hands where we can see them!" But the reality is that you must deal with less-than-perfect design files yourself. As computer technology progresses and more of your customers assume greater roles in art production and preparation, your job is to find ways to make their bad art look good. You’ll be able to do this and save a boatload of money and grief by learning and remembering the tricks suggested here.


Subscribe

Magazine
Get the most important news
and business ideas from Screenprinting Magazine.
Most Popular
-

 Case Studies2 months ago
High-Density Inks Help Specialty Printing Take Center Stage
-

 Art, Ad, or Alchemy2 months ago
F&I Printing Is Everywhere!
-

 Andy MacDougall2 months ago
Functional and Industrial Printing is EVERYWHERE!
-

 Columns3 weeks ago
8 Marketing Mistakes Not to Make When Promoting Your Screen Printing Services Online
-

 Editor's Note2 weeks ago
Livin’ the High Life
-

 Marshall Atkinson2 weeks ago
How to Create a Winning Culture in Your Screen-Printing Business
-

 Thomas Trimingham2 months ago
“Magic” Marketing for Screen Printing Shops
-

 News & Trends2 months ago
What Are ZALPHAS and How Can You Serve Them in Your Print Business?