Articles
Published
19 years agoon
Digital color management is an effective system for ensuring accurate and repeatable color reproduction through screen printing. When you have a color-management system in place, your clients can feel confident that that the prints you just produced will match the ones you generated the month before and any you will produce in the future. Furthermore, a color-managed workflow will help keep screen printing competitive with continually improving inkjet technology, and it will allow you to easily match digitally printed graphics with screen-printed versions and vice versa.
But for a color-management system to work for the screen-printing process, the system must be built on a firm foundation in which print-production variables are carefully controlled. In the first part of this series (Oct. 2004, page 38), I began dissecting the primary variables that influence the color rendering capabilities of screen printing by focusing on the factors that affect the density and tone of printed colors. These variables included screen parameters and several press-setup adjustments. This installment will conclude the discussion by covering important control points related to squeegees, floodbars, inks, and shop environment. It will explain how to optimize these factors so that you can apply color management reliably.
The squeegee
Often overlooked, the squeegee is one of the most important variables to control in screen printing. There are many different squeegee types and options available on the market that can lead to consistent results, but I do have personal preferences that I’ll discuss in a moment.
The role of the squeegee is to shear the ink with just enough force to move the ink from the inside of the screen to the substrate surface. This is accomplished with a combination of blade durometer (hardness), edge sharpness, and squeegee angle.
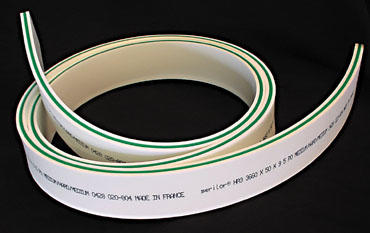
I have experienced the most consistent results by using a triple-durometer blade–a three-layer sandwich of polyurethane (Figure 1). The blade I prefer has outer layers of 70-75 durometer and a single, 90-durometer inner layer. The outer layers are softer to accommodate variation on the print bed. This includes positioning guides, tape, masking, substrate thickness, and so forth. The slightly softer durometer conforms more readily to surface irregularities without pinching the mesh. Single high-durometer blades (80 or 90 durometer) are not forgiving enough in long production runs. Consequently, screens and stencils fail prematurely. The last thing I want to do is change a screen out when I am in production and the print is going well. The 70-75-durometer outer layers help prevent this costly downtime.
The 90-durometer center core of the triple-durometer blade is designed to resist blade deflection. It really helps to focus the squeegee pressure directly on the edge of the blade–the part that will cut, or shear, the ink. Focusing the energy on the edge is very much like focusing the sun’s energy through a magnifying glass. Small amounts of force are multiplied to do a great amount of work. If the blade deflects under the squeegee pressure, the center of gravity shifts and the edge no longer cuts, but skims–or hydroplanes–over the screen’s surface. You cannot effectively move ink through the screen when this happens. Keeping the blade from deflecting maintains its cutting edge with minimal applied pressure.
The squeegee blade’s edge needs to be very sharp. The best way to test this is to drag your fingers lightly over the edge of the blade (moving across the edge perpendicular to its length, not down the length of the blade). If you can feel the individual ridges of your fingerprint, the blade is sharp enough to print half-tones. If you can’t, the blade needs sharpening. I should also add that you need to sharpen even brand new blade material, because it is impossible to mount a new blade perfectly true in the holder. The blade distorts as soon as you tighten the nuts that hold it. Look down the length of the blade. Any kind of wave, bend, or deflection is unacceptable. You need to sharpen every single time you use the squeegee. It is the only way to make sure that the edge remains a constant and not a variable.
Squeegee angle is a factor that is very difficult to define. The reason is that any measured angle is inaccurate if there is any deflection in the blade at the print surface (Figure 2). This is why a stiffened blade is critical to controlling an accurate angle. The range of acceptable angles is fairly wide. I tend to set the angle between 15-25° from vertical (65-75° from horizontal or parallel to the substrate). The precise angle is not super critical. The more vertical the angle, the less ink that will be deposited. The flatter the angle, the more difficulty you will have keeping the blade from deflecting and becoming even flatter. If you have a choice, go with the vertical direction. I rarely change the angle of the blade when printing halftones. When you find an angle that gives good results, stick with it. That way one more variable is eliminated.
Finally, there is squeegee pressure. Less is definitely better. Printers use far too much pressure, only because they can. It is not necessary. I think excessive pressure is the number one most common flaw I see in print shops. Back off until the image does not print. Then bring the pressure in a quarter turn on each side at a time. You want to observe how the entire sheet is printing. If the image comes in a little at a time, it is an indicator of changing dynamic tension on the screen. You should be balanced to the point where a half turn of the pressure control makes the difference between no print and an acceptable print. Anything more and the system will be out of balance. When this happens, you will experience uneven pressures and variation in dot gain and ink thickness, none of which is good.
The floodbar
The floodbar is important, but not quite as significant as the squeegee. For halftones of 65 lines/in. and lower, a traditional snowplow geometry works fine. This profile rolls the ink in the direction of the flood stroke, filling the mesh with ink. It can cause excessive dot gain if the flood pressure is too high. With excessive pressure, the ink is prematurely pushed though the mesh opening and past the stencil edge, resulting in loss of detail and image control. The same situation can occur if you back off the floodbar pressure so much that a thick ink layer is deposited on the mesh. The weight of the ink in the screen can cause the ink to drip through the open mesh areas, resulting in excessive dot gain.
The more precise, but far less common blade profile, is the chisel-shaped or “cow catcher.” This chisel-shaped profile is set to an obtuse angle (greater than 90°) to the mesh. As the flood stroke moves across the screen, the ink rolls away from the mesh opening. This greatly reduces premature filling of the mesh opening and is especially helpful on halftones 85 lines/in. and higher. Both floodbar geometries are depicted in Figure 3.
I prefer to use only enough flood pressure to thinly coat the screen and return the ink to the head of the stroke. Anything more and you risk excessive dot gain. If the ink layer is too thick, the weight of the ink layer can have a negative effect on ink transfer as well.
With both flood and print stroke, the strokes should occur as fast as possible. The faster you print, the better the ink shears. As you will shortly see, thixotropic halftone inks are designed to shear. High stroke speeds (1 m/sec or higher) have multiple advantages:
* minimum ink deposit (thinnest layer possible)
* minimum squeegee and flood pressure
* maximum ink shear at the blade contact point
* minimum dot gain
* high production speed
* minimum squeegee friction at the stencil interface
* minimum contact time with the substrate (better separation from substrate with minimum peel setting)
Printers rarely realize all of these advantages because they have not controlled enough of these variables. But if you follow the guidelines outlined here, you can run your press at full speed and get superb print quality. The high shear rates achieved with cylinder presses are one of the reasons they deliver a superior halftone print. However, you can achieve similar results with clamshell and parallel-post flatbed presses by simply speeding up the print cycle.
Ink
Halftone inks must be engineered to be thixotropic, a fluid property in which the resting viscosity of the material is higher than its viscosity under shear stress. As shear increases, viscosity decreases and flow is promoted. Shear is produced from a combination of squeegee pressure, speed, edge sharpness, and blade angle. Under optimum conditions, you should be able to wipe your finger across the inside of a screen after the print and not have any ink on your finger. If you do, the ink is shearing on itself and not at the stencil interface. The result is a print with poor ink deposit or excessive dot gain.
The ideal consistency of the ink is what I call the wiggly worm. This is a totally non-technical description of a critical ink characteristic. Aggressively stir the ink in the container with a stainless-steel spatula. Pull the spatula out and let the sheared ink fall off the blade. When the ink finally stabilizes and no longer drips off, there should be a thin strand of ink, 1.125-1.250 in. in length, hanging from the tip. When you gently shake the spatula this ink worm will wiggle but stay on the blade.
When the ink is adjusted to this consistency, you can successfully hold halftone details up to 150-lines/in. The shorter the worm, the less detail you can hold. The longer the worm, the tackier the ink and the more pressure and less speed you will be able to maintain. It is a fine, but attainable, balance. Moving outside of this range results in less than optimum production conditions and print quality.
Printroom environment
The conditions in your pressroom are important, but don’t get too worked up about it. With a few reasonable adjustments, you can maintain print consistency within a few percentage points of the original values. But ignoring the influence of environmental factors can cause your original profile to become completely invalid.
There are two factors that have a disproportionate effect on print consistency: temperature and screen and squeegee exposure to UV or solvent inks. In the case of temperature, you should be most concerned with temperature fluctuations. Is the temperature constant, or does it change throughout the day? Temperature is not only about the climate in the pressroom. It also is about what is happening with the ink on press.
Large amounts of heat can be added to the press and substrate over the course of the run, depending on the kind of equipment you have. This is particularly true if you have UV dryers between colors, or flash dryers in the case of garment printers. As the print run progresses, these units dump enormous amounts of heat into surrounding areas, including the ink on the screens. You will experience big problems unless you measure the temperature profile of your inks.
Monitoring is easy to do. It involves the use of an inexpensive non-contact IR gun. These are available for less than $100 from just about any supplier. Measure the ink temperature at the beginning of the day. Take progressive readings every half hour until you reach a stable value. This is the temperature you should use when making your initial ICC print profile because it is the most stable temperature.
Think of it this way. Inks have resins that are sensitive to temperature. The warmer they get, the softer they get. As they soften, they flow faster. Therefore, any press settings made before the ink has reached its stable temperature will be wrong. As the viscosity constantly changes, press settings must be continuously adjusted, and print quality, color, and tone will vary. No further press adjustments are necessary once the ink reaches its stable temperature. But until you know what that temperature is, you are chasing your tail.
Also be aware of changes in atmospheric temperature. As the day heats up, the capacity in the surrounding area becomes less able to accept excessive heat from the dryers and press. This causes temperature stagnation and a dramatic increase in press temperatures. It also is responsible for ink viscosity breakdown. Remember, if you measure it, you can devise a plan to control it.
Finally, there is stencil and squeegee exposure to UV and solvent-based inks. The aggressive chemical nature of these inks causes both the stencil and squeegee to swell. Ink transfer is affected in both cases. You will see this as a change in ink density and in dot gain. You will often see both. The best way to observe this effect is to measure print samples every 50 sheets over a four-hour period. Monitor midtone dot value and solid ink density. You will see both change over time before they stabilize.
During the course of many different runs you will begin to see definite relationships develop between temperature and printing system performance. These are predictable relationships for which you can compensate. It is these changing relationships, and the point at which they stabilize, that you are interested in finding. They become the basis for a stable ICC profile.
Focus on control
There is a lot to think about here. Many variables change simultaneously and challenge the stability that you need to maintain in order to support a color-managed model. Until you reach a point with your printing system where stability exists, your color-management profiles will be invalid and fail to deliver as expected. When you identify the stable points over time and learn to maintain them, your profiles will become solid as a rock and your prints will reflect the benefits of duplicating this solid set of conditions.
Until you systematically approach all of the variables with the intention of stabilizing them, you will only have unpredictable variables. Once you find stability, the variables become constants and you achieve an expected outcome every time. These concepts are not easy to master–achieving control of them requires a focused, professional effort. But once you do, you enter a very rare field–the field reserved for the champions, the pros who can deliver a consistent product with predictable results on demand, whenever their clients need it.
About the author
Mark A. Coudray is president of Coudray Graphic Technologies, San Luis Obispo, CA. He has served as a director of the Specialty Graphic Imaging Association Int’l (SGIA) and as chairman of the Academy of Screenprinting Technology. Coudray has authored more than 250 papers and articles over the last 20 years, and he received the SGIA’s Swormstedt Award in 1992 and 1994. He covers electronic prepress issues monthly in Screen Printing magazine. He can be reached via e-mail at drdot@aol.com.


Subscribe

Magazine
Get the most important news
and business ideas from Screenprinting Magazine.
Most Popular
-

 Art, Ad, or Alchemy1 month ago
F&I Printing Is Everywhere!
-

 Case Studies1 month ago
High-Density Inks Help Specialty Printing Take Center Stage
-

 Andy MacDougall1 month ago
Functional and Industrial Printing is EVERYWHERE!
-

 Columns2 weeks ago
8 Marketing Mistakes Not to Make When Promoting Your Screen Printing Services Online
-

 Editor's Note2 weeks ago
Livin’ the High Life
-

 Thomas Trimingham2 months ago
“Magic” Marketing for Screen Printing Shops
-

 Marshall Atkinson2 weeks ago
How to Create a Winning Culture in Your Screen-Printing Business
-

 News & Trends1 month ago
What Are ZALPHAS and How Can You Serve Them in Your Print Business?