Prepress & Screen Making
Published
11 years agoon
If there is one component of the screen-printing process that has a greater impact on the quality of the finished product than any other component, it is the screen. The truth of this statement lies in the number of facilities that have made the investment to maximize the quality of the screens. While some still get by with whatever they have available, a majority of garment screen printers have either upgraded their frames, mesh, or stencils, or they’ve or completely revamped their screen departments altogether.
If there is one component of the screen-printing process that has a greater impact on the quality of the finished product than any other component, it is the screen. The truth of this statement lies in the number of facilities that have made the investment to maximize the quality of the screens. While some still get by with whatever they have available, a majority of garment screen printers have either upgraded their frames, mesh, or stencils, or they’ve or completely revamped their screen departments altogether.
Philosophy
Among the greatest challenges that screen printers face are understanding the importance the role of the screen plays in their shops and adopting the philosophy that the screen is the key to producing the quality that customers demand. It is this philosophy that drives the shop manager or owner to make the required investments and changes to assembling a screen department with the sole purpose of producing the highest quality screen from production run to production run.
Art preparation
There are few things in the world more frustrating than discovering an error in your artwork after you have already exposed your screens—or worse, set up your press and printed a strike-off. The work required to fix this type of mistake means a loss of time and money.
Let’s look at artwork separation from two different angles: outputting to film and direct-to-screen (DTS) imaging. In either case, you should always have a second pair of eyes to review a separation prior to it being sent to film or your DTS system. There are numerous aspects to a set of separations that have to be reviewed to ensure that there are no errors when the art is ready for the screenroom. The simplest and most common error that should be double checked is spelling. It’s easy to catch and correct while still in the art department.
For film-output separations, you should be able to review the finalized art on the computer monitor and be able to ensure that all is correct prior to sending the art to the film-output device. Once you’ve reviewed and finalized the art and it has been properly reviewed and approved, it can be sent to the film-output device and the films sent to the screenroom.
The same general procedure also applies to the separations for the DTS imaging system. The primary difference here is that there is no film to check, so you must be 100% confident that the art is correct prior to sending it to the DTS to ensure that the image being applied to each screen is correct from the start.
The screenroom
The best time to design and engineer a screenroom is during the startup period of the facility. It is at this point that you must determine the required amount of space needed for current production, as well as the amount of additional space needed for future growth. Keep in mind that the screenroom you are currently designing may not only need to double its output in time, but also serve multiple shifts. Therefore, the original design of your screenroom may seem excessively spacious—but with any increase in growth, that space will be used in short order.
Another key element in regards to designing a good screenroom is to plan the environmental aspects into the design. The simplest means for maintaining the proper environmental conditions within your screenroom is to have the screen area added onto the central air system that you use to air condition your office work space. Attempting to use room-air conditions is generally a bad idea because it will dramatically increase the relative humidity and, as a result, hinder the screen-drying process after reclaiming or coating.
Screenroom layout
The layout of the screenroom should be designed for a smooth and even flow of work orders through the department. You do not want people backtracking or, in the case of multiple screenmakers, getting in each other’s way.
The screen department should be broken into individual work areas/rooms if possible. The flow of work passing through the screen department should start with the screen-drying area as the first stage. The department needs to be kept as dust-free as possible, which is why the first area should be used for the screen drying that takes place following screen reclamation. This area can also be used as storage for clean, uncoated screens.
Coating area and procedures
The next work area will be used for coating and drying. Of all the work areas within the screen department, it is here that you need to ensure that dust and garment lint are kept to a minimum. You need sufficient racking to allow for the drying of an adequate screen supply that you can cycle on regular basis to meet production demands. The greatest determining factors here are the number of presses you have to service, run size, and number of colors per graphic.
Screen coating varies from facility to facility—one and one, one and two, two and two—but the process has basically come down to whatever works for each respective printing facility. The most popular costing procedures are one coat on the print side of the screen and one coat on the ink side, or two coats on the print side of the screen and one coat on the ink side. The latter of these two processes is preferred by many, as the initial two coats on the print side of the screen will determine the overall stencil thickness while the remaining coat on the ink side of the screen will transfer the emulsion to the print side of the screen and encapsulate the mesh to ensure durability.
The overall total thickness of the emulsion coating will also depend on the radial edge of the coater, the speed at which the screen is coated, the pressure applied, and the viscosity of the emulsion at the time of application.
Manual vs. automated coating
From the standpoint of consistency and quality, you must also look at the option of automated coaters as opposed to the age-old manual process. Although you can produce a high-quality screen stencil with either process, you cannot surpass the advantage of consistency that an automated coater brings to the process. It is with the automated system that you ensure perfect consistency from screen to screen and run to run (Figure 1).
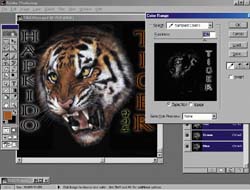
You can use the same work area for drying the screens prior to imaging or exposure once the screen is coated. The next area is screen imaging. You have two general processes here that are used: film, which has been the industry norm for decades, and DTS imaging (Figure 2), which has taken off in the past decade as the technology has developed.
Although film has been the norm, the introduction of DTS has shown numerous benefits. The initial investment in a DTS imaging system can be costly, but it can pay for itself within the first year in film savings alone (depending on your facility’s work volume). In addition, the productivity of these units, which was once rather slow, is now increased dramatically. You also have the ability to have a DTS imaging system calibrated to align your screens with whatever registration system you may use on your press. I highly recommend this because it minimizes the setup and registration time of any production run, regardless of whether you’re running two colors or 12.
In the last facility I established, I had my frames locked into place with a three-point registration system. This was again correlated to the registration system on the press. Setup time was as low as 15-25 minutes on a multicolored graphic.
Although DTS imaging represents the latest and most efficient means, of imaging, you should keep your film system active and functional in case any issue with the DTS system arises. Should you wish to remove the film procedure from the production process altogether, you can always go with two DTS units, thereby ensuring ongoing productivity. Otherwise, is it a good move to keep the film process functional as a backup system to the DTS.
Screen exposure
The next area needed for the screenmaking department is the exposure room. Screen-exposure units have been modified to stay in tune with the diversifying screen imaging systems (Figure 3). Facilities using strictly DTS systems will use exposure systems with no glass or vacuum (they are not needed). Because the image is already in direct contact with the stencil, there is no need for either a glass table top or a vacuum to keep the image (film) and stencil in contact with each other. This also eliminates the issues that glass brings to the table, such as light refraction, scratches that can reproduce on the screen, and—worst of all—broken glass.
Facilities using the DTS process and keeping a film-processing system in house as a backup can use a dual-purpose exposure system that allows for the use of a glass/vacuum system when the film process is required and can double as a DTS exposure unit where the screen stencil is exposed directly to the exposure source without the need of the glass or vacuum.
Should you have a standalone exposure system, one of the easiest ways to expose screens imaged with a DTS imaging system is to simply lean your screen (within an enclosed area) against a wall and directly expose the screens without an enclosed exposure unit. It is important that you test for proper exposure and ensure that you do not allow light to expose the screen from the ink side.
Screen washout
The screen-washout process is one that I feel is taken far too lightly in most facilities. It is, of course, taken seriously when the screen reaches the press, is set up, and inked only to learn that a screen has to be remade. This is a complete loss of productivity and profit.
In the screen-washout process, there are two critical aspects that ensure that you are going to produce a quality screen. First and foremost is the use of a good, backlit sink (Figure 4). It does you no good to wash out a screen stencil when you cannot properly observe the stencil being washed away.
The second aspect is the use of a water source with the proper pressure needed to process the screen. This requires a hose assembly along with an adjustable nozzle to allow you to alter the concentration of the spray to process your stencil. I have seen facilities that use a small pressure washer, a piece of equipment that typically produces negative results as the pressure of the water is not determined by how close the nozzle is to the screen.
The screen-washout area is the one part of the screenmaking process that does not have to be in the screenmaking area itself, although it is a good idea to keep the washout area as close to the screen-exposure area as possible for expediency and productivity.
Once this final process is complete and the screen is dried, the screen should be ready for any touchup of potential pinholes and prepped for the press with tape and any additional prepress procedures you may have.
Screen reclaiming
Two things to remember: The location of the reclaiming sink to the entrance to the darkroom is designed to minimize handling and moving of the screens from one area to another. The second aspect is that a sink being used in the process should also be backlit to allow for easy inspection of the mesh while the screen is being reclaimed/degreased.
I also recommend the use of a minimum of 2500 psi for washout. A unit of that size allows for maximum productivity with relative ease of removal of the stencil from the screen. The high pressure also helps maximize the removal of the ghost image that resides in the knuckles of the mesh. Lower pressures are not as efficient at removing these images. In such cases, haze removers are required. Low-tension screens will also contribute to issues here.
It is critical to ensure that the screens going into the screen department for coating are completely free of debris and any type of mesh obstructions. This simply helps guarantee a quality screen for the next applied graphic.
The primary key to ensuring a quality screen is to establish and use standardized procedures, quality equipment and supplies, and a properly planned workflow to allow for maximum efficiency in your screenmaking routine.
Rick Davis has more than 30 years of experience in the textile-manufacturing and screen-printing industries. He currently serves as the southeastern regional sales manager for Triangle Ink Co. Davis has published more than 200 pieces on all aspects of the industry and printing processes, and he’s a member of the Academy of Screen Printing Technology.


Subscribe

Magazine
Get the most important news
and business ideas from Screenprinting Magazine.
Most Popular
-

 Columns1 month ago
8 Marketing Mistakes Not to Make When Promoting Your Screen Printing Services Online
-

 Press Releases1 month ago
Sports Inspired Clothing Market: The Influence of Sports on Fashion Forward Looks
-

 Editor's Note1 month ago
Livin’ the High Life
-

 Marshall Atkinson1 month ago
How to Create a Winning Culture in Your Screen-Printing Business
-

 Press Releases4 weeks ago
Hope Harbor to Receive Donation from BlueCotton’s 2024 Mary Ruth King Award Recipient
-

 Case Studies1 month ago
Screen Printing for Texture and Depth
-

 News & Trends2 months ago
What Are ZALPHAS and How Can You Serve Them in Your Print Business?
-
 Headlines1 month ago
Live Poster Printing Raises $30K for Charity