Prepress & Screen Making
Published
17 years agoon
A screen-printing stencil has to perform four functions. Two are important for any type of screen printing, since the stencil must first reproduce the image that is to be printed and be resistant to abrasion and chemical at-tack. The last two functions are particularly important for high-quality line or halftone printing, because the stencil can help to control the amount of ink that is printed. The stencil is also responsible for controlling image accutance, more commonly referred to as print-edge definition.
A screen-printing stencil has to perform four functions. Two are important for any type of screen printing, since the stencil must first reproduce the image that is to be printed and be resistant to abrasion and chemical at-tack. The last two functions are particularly important for high-quality line or halftone printing, because the stencil can help to control the amount of ink that is printed. The stencil is also responsible for controlling image accutance, more commonly referred to as print-edge definition.
Clearly, the stencil plays a critical role in the overall success of a screen-printing job. This article will review the variables associated with stencils and describe how to minimize them and remedy the harmful effects they may impart to your work.
Rz value and stencil profile
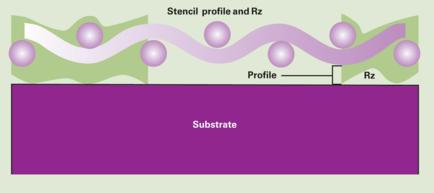
The two parameters that affect print quality are Rz value and stencil profile. Rz value regulates edge definition, and the stencil profile contributes to ink deposit (Figure 1). You can measure and control both, regardless of which type of stencil system you plan to use.
Stencil profile is used, along with the screen mesh chosen, to control ink deposit. A thick stencil is beneficial for certain applications; for other applications it is advantageous to minimize the stencil buildup. Rz or surface roughness of the finished stencil controls the print’s edge definition. For most types of printing, an Rz value of 10 microns or less will result in good edge quality. For highly demanding printing, such as small, reversed text, or high-line-count halftones, a value closer to 5 microns is necessary. Below 5 microns, if the stencil becomes too glossy, then ink splattering or cobwebbing can occur when printing on glossy substrates.
Capillary film stencil systems are manufactured in different thickness grades, each designed for optimum performance on a narrow range of mesh counts. Best results are obtained by selecting the correct grade for the mesh count being used. Excess water is removed from the mesh during processing with a light squeegee action. Pressure is not required, and would in fact lead to detrimental results as the film could become overdissolved. If the correct capillary film thickness is used, the water that remains is sufficient to absorb half to two-thirds of the original emulsion layer into the mesh. What remains comprises the stencil profile and controls the Rz value (Figure 2).
With direct emulsion, the factors that are important in controlling the stencil parameters are the solids content/viscosity of the emulsion and the coating procedure that is employed. High solids content is desirable, as it minimizes shrinkage on drying. Shrinkage of the wet emulsion layer on drying leads to high Rz values and poor print quality, even if you’re using a high-solids-content emulsion, unless you pay particular attention to the method of coating.
In order to optimize stencil profile, and minimize Rz, you must optimize the coating procedure for each application. In general, with a high-solids-content emulsion of around 40% solids, it is possible to achieve good results with simple wet-on-wet coating procedures. For very coarse screen mesh, such as 61 threads/in., the open weave and high percentage open area of the fabric requires but two coats on the print side followed by one coat on the squeegee side. For 110-thread/in. mesh, two coats on each side should suffice. Once we get to 230-thread/in. mesh, two coats on the on the print side and three on the squeegee side will duplicate the results that we’d achieve with capillary film. The additional coats on the squeegee side of the screen in effect cause a build up of emulsion on the print side, which is where we need our stencil. The only time when an additional coats is necessary, after the initial coats have dried, is when printing four color process with UV curable inks.
The very high mesh counts, such as 380 and 460 threads/in., which are best at minimizing ink deposit, are also good at preventing emulsion buildup during coating. The easiest way to minimize both stencil profile and Rz value for this highly demanding application is to face coat the screen after drying. This ensures that the thin stencils required to minimize ink deposit will also provide a tight gasket fit onto the substrate and prevent ink from bleeding beyond the image area under pressure from the squeegee, a condition that causes sawtooth lines and the star-shaped halftones that lead to excessive dot gain.
Emulsions formulated with lower solids content are unable to bridge the coarsest mesh counts effectively with simple wet-on-wet coating methods. This property effectively limits the mesh count range on which they can productively be used (Figure 3).
Exposure
Correct exposure is of paramount importance in optimizing stencil performance, no matter which type of stencil system you plan to use. Producing a screen-printing stencil, even for use with the fine mesh counts designed for printing halftones, involves exposing a coating that is very thick in comparison to those used for other photographic or imaging processes. Because of this, depth of cure through the stencil becomes a real issue.
Poor through-cure, or underexposure, will cause one or more of the following problems: loss of detail during processing, excessive pinholes, scum leaking into and then blocking image areas, premature stencil breakdown during printing or cleanup, and last but not least, difficult or impossible reclaim. Remember, we’re talking about expensive screen mesh.
Overexposure, in comparison, causes detail to shrink on the screen, with eventual loss of parts of the image altogether. This effect is usually most severe and easily noticeable with halftones.
A minimum vacuum pressure of 20 in. Hg in the exposure frame is required to ensure good enough contact between film positives and the screen during exposure. This prevents the undercutting of the image, and subsequent loss of detail, that occurs when light leaks under the positive. A good light source fitted with a metal-halide bulb is recommended to produce optimum results. The output spectrum of such a bulb is a good match for the maximum sensitivity of most stencil materials. It’s also important to have the placement of the lamp—and the reflector design—optimized so as to ensure even coverage of the entire image area during exposure.
Even coverage is essential for accurate reproduction of the image, as well as stencil durability. If coverage is very uneven, then the exposure latitude of the stencil material may be exceeded and areas of the screen may be either under or overexposed, or sometimes even both on the same screen. In this respect, dual-cure emulsions possess the widest exposure latitude, although being very similar overall to diazo products in optimum exposure time. Photopolymer emulsions, because they expose in a fraction of the time and have inherently much less latitude, really do require more even exposure intensity in order to produce consistent results.
Use an exposure calculator or 21-step grayscale to determine optimum exposure. An exposure calculator usually consists of a repeating piece of artwork overlaid with a series of increasingly darker gray neutral density filters. For example, one test exposure can simulate five different exposure times.
Examination of the developed and dried stencil reveals rectangles where the strong yellow color from residual unexposed diazo alters the color of the stencil. The trick is to pick the exposure factor for the rectangle that just becomes indistinguishable from the background—this corresponds to the optimum exposure time. An exposure time long enough to give seven solid steps on a developed stencil is generally very close to the optimum with a 21-step grayscale. Because photopolymers do not change color on exposure, the 21-step grayscale method is a more reliable method of determining optimum cure than an exposure calculator—although you can use the calculator to determine the level of resolution that you can achieve at different exposure times.
The use of direct emulsion makes it impossible to expose a collection of different mesh counts at once and en-sure that the correct exposure time is given. Longer exposure time is required for thicker coatings, and the coarser the mesh, the thicker the layer of emulsion that has to be cured.
Screen drying is another important variable that should not be overlooked as a cause of possible problems. Both capillary film and direct emulsions require very thorough drying prior to exposure, because any residual moisture present in the coating will react preferentially with the photosensitive resins that are supposed to harden the stencil. When you expose a damp screen, you end up with a stencil that exhibits the symptoms of having been underexposed—except that no improvement is ever seen when you increase exposure time.
The type of artwork used can also have a big effect on the properties of the finished stencil. Most film positives have a dense black image area (a high Dmax) and a clear background (a low Dmin). Vellum, on the other hand, rarely achieves a Dmax much greater than 1.5, and at the same time, the Dmin is usually around 0.30. What this means is that the vellum only allows 50% of the light to reach the stencil. Before optimum exposure is reached, the insufficient Dmax has let light penetrate to the image area, compromising washout properties and detail. The expression about stuck between a rock and a hard place definitely applies to vellum.
Mesh preparation
Mesh preparation should also not be ignored as an area that can affect stencil performance. Although screen mesh is thoroughly washed after manufacture, dust and oils from handling—along with adhesive overspray—cause contamination that you should remove prior to coating.
Degreased mesh, although it may be squeaky-clean, is, with the exception of stainless-steel wirecloth, not very conducive to good stencil adhesion. Polyester mesh is woven from slick, smooth PET fibers. Photoemulsion, or water-based paint, does not stick well to untreated PET. For this reason you’ll to prepare the mesh properly in order to maximize stencil adhesion. You can improve physical adhesion by lightly roughening the surface of the mesh with a specially designed abrasive degreaser. Improving chemical adhesion can be as simple as treating the mesh with a formula that contains a wetting agent. After rinsing, an adhesion-promoting surface primer remains on the mesh that enables the stencil to stick more effectively. Mesh-prep systems are even available that combine degreaser, abrasive, and wetting agent all in one product.
The improvements seen in adhesion are most noticeable at underexposure. Photopolymer stencil materials benefit the most of all from good mesh preparation, because they do not contain a diazo that bonds to the mesh during exposure.
Limitations
Screen mesh is composed of two parts. First are the threads, and we need enough of these to support all of the detail in our image. Second are the holes, the size and number of which, along with the stencil profile, control how much ink is laid down. The main factor that influences ink deposit is the mesh count of the fabric, or how many threads per inch, particularly when working with 305 threads/in. or less. The mesh count becomes less important once we get above 305 threads/in. Here, the actual thread diameter and weaving construction—plain or twill—becomes the dominant factor in determining ink deposit. Obviously, the higher the mesh count, the finer the detail that can be supported on the screen. However, the fact that threads are in the way at all does place limitations on what we can realistically screen print (Figure 4).
As far as fine detail is concerned, there’s a minimum size of opening in the stencil that will consistently allow ink to pass, regardless of where it sits on the weave of the mesh. Once the size of the detail on the screen, whether fine lines or halftone dots, becomes narrower than one mesh opening plus one and a half thread diameters, then it can be obscured by passing over the threads and the knuckles of the weave where the threads cross.
Choosing mesh with a thinner thread diameter can help squeeze out a little more detail, but at the cost of producing a more fragile screen. Mesh woven from thicker threads produces a more robust screen you can use at a higher tension level for better registration with multicolor printing, and it provides better adhesion at the shadow end of a halftone range—or for holding fine lines with reverse printing. Once the small specks or strings of stencil that have to block the flow of ink and differentiate between shadow tones or delineate text become smaller than two mesh openings plus one and a half thread diameters, they may only adhere to one or two threads and lack sufficient adhesion to withstand the rigors of processing, never mind printing.
As an example, with halftones, the line count determines the tonal range that can consistently be printed on any particular mesh count. As the line count increases, the smaller dots enable viewing from a closer distance without the individual dots themselves being visible. However, increasing the line count effectively decreases the range of tones that can be held before highlights experience moiré—and then cease to print—and separation between midtones and shadows is lost as everything collapses to a solid print. This phenomenon is illustrated for a 380-thread/in. mesh in Figure 5. If you set a target in which you try to print from 10% in the highlights up to 85% in the shadows for a print with good separation between all the tones of the halftone range, then each mesh will have a limit on how high the line count of the halftone can be (Figure 6).
A perfectly prepared stencil is, in fact, capable of resolving finer detail than it is physically possible to print, because of the intervening influence of the mesh. However, in order to make the perfect stencil, you have many screens ahead to expose, obstacles to be overcome, and variables to control.
Ross Balfour is research and development manager for Saatichem, a division of the global screenmaking product manufacturer, Saati Group (Como, Italy). Balfour directs the research and development of emulsions, screen-preparation products, and screen-reclaiming products from Saatichem’s facility in Chicago, IL. He is a graduate of The Royal Society of Chemistry in London and has more than 20 years of experience in the printing industry.
Editor’s note: This article was adapted from SaatiPrint’s Tech Tips for Screen Printers Handbook.


Subscribe

Magazine
Get the most important news
and business ideas from Screenprinting Magazine.
Most Popular
-

 Case Studies2 months ago
High-Density Inks Help Specialty Printing Take Center Stage
-

 Art, Ad, or Alchemy2 months ago
F&I Printing Is Everywhere!
-

 Andy MacDougall2 months ago
Functional and Industrial Printing is EVERYWHERE!
-

 Columns3 weeks ago
8 Marketing Mistakes Not to Make When Promoting Your Screen Printing Services Online
-

 Editor's Note3 weeks ago
Livin’ the High Life
-

 Marshall Atkinson3 weeks ago
How to Create a Winning Culture in Your Screen-Printing Business
-

 Thomas Trimingham2 months ago
“Magic” Marketing for Screen Printing Shops
-

 Case Studies3 weeks ago
Screen Printing for Texture and Depth