Articles
Published
22 years agoon
For those involved in pad printing, control of the printing environment is a continuous quest. But over the past few years, pad-printing equipment manufacturers have seriously undertaken this pursuit, and the result has been an important innovation: the sealed-cup ink well. Today, sealed-cup pad presses have become popular alternatives to traditional open-well machines and have brought a range of new benefits to decorators, including faster cycling speeds, better multicolor printing capabilities, and the ability to print larger image areas.
In principle, the sealed-cup inking mechanism is designed to protect the ink from contamination and prevent solvent evaporation. The goal is to provide the decorator with a maintenance-free device that preserves ink rheology by eliminating several common variables from the pad-printing process.
However, as with any equipment modification, this new approach introduces a series of cause-and-effect relationships unfamiliar to some decorators. As many shops using these systems have discovered, sealed cups resolve the nagging problems surrounding ink maintenance, but create a new range of print concerns to address. To understand the changes brought about by the sealed cup, it’s helpful to review how the more common open-well machines function.
Pad printing with an open ink well
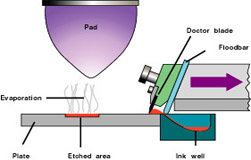
Pad presses with open or sheathed ink wells differ from sealed-cup systems primarily in their plate-doctoring configurations. The typical open-well design (Figure 1) has a separate ink well that usually resides behind the etched printing plate (frequently called a cliche). The well is manually filled with ink that has been previously adjusted to the correct working viscosity.
A two-part flooding/doctoring device is hinged over the etched plate. The device comprises a stainless-steel doctor blade and an aluminum floodbar. Pneumatic force propels the assembly, causing the floodbar to dip into the ink well and drag ink across (flood) the surface of the plate (Figure 2A). As the assembly retracts, the doctor blade scrapes excess ink off the plate’s surface, leaving ink only in etched (image) areas (Figure 2B).
Note that the removal of ink by the doctor blade is controlled by downward pressure, the level of which can usually be adjusted with small screws located across the expanse of the doctor-blade attachment. Although the adjustment process is somewhat time consuming, this system provides a high degree of control over the doctoring process.
The importance of doctoring accuracy becomes apparent when you face poor-quality print results caused by an improperly cleaned plate surface. If the doctor blade doesn’t remove all the ink from non-etched areas of the plate, or removes ink from within the etched area, you can end up with excess ink transferred outside the image area, buildup of ink on the printing pad, or voids in the printed image.
The introduction of sealed-cup systems altered several aspects of the printing process in ways unforeseen by equipment manufacturers. These alterations involve not only mechanical and physical differences in the equipment, which are fairly obvious, but also the impact of these differences on areas such as etched plate performance, adjustability of the doctoring device, and various housekeeping and maintenance procedures.
To maintain and protect the properties of the ink, sealed-cup systems use a round cup that is closed at the one end and has either a steel or ceramic ring secured at the base of the opposite end. The cup is filled with the prepared ink and inverted so that the steel or ceramic ring is in contact with the etched surface of the printing plate (Figures 3A and 3B). The closed side of the cup is then attached to the printhead, where, depending on press configuration, the cup is either driven pneumatically across the plate or locked in a stationary position with the plate shuttled beneath it.
The main distinction between open-well and sealed-cup systems now becomes apparent. Unlike the two-part inking/doctoring system described earlier for traditional open-well systems, the ring of the sealed system acts as both the floodbar and doctor blade. Since the ring has the same geometry no matter which direction it moves, it provides flooding action when it travels over the etched surface (Figure 3A) and doctoring action when retracted (Figure 3B).
Plate considerations
The introduction of sealed-cup machines forced decorators to become much more critical of the plate materials they used. Initially, the materials selected were the same ones used to produce plates for open-well presses:
1. hardened steel from 6-10 mm thick
2. thin steel, which is generally less than 1 mm thick and won’t support heat treatment for hardening
3. metal-backed polymer, which is very pliable and available in a variety of thicknesses
None of these materials were initially designed for use in pad printing, yet they have all proven effective when used properly with open-well technology. Also, this material variety emerged more as a result of plate cost and durability concerns than because of print quality. Thick, hardened-steel plates provide the longest life at the greatest expense. Thin steel is less durable than thick steel, but provides a relatively long life at a “mid-price” range. Polymer plates typically offer the shortest lifespan, but do so at the lowest cost.
From a print-quality perspective, the polymer plate usually supports the highest resolution levels because the plate surface is made from photopolymers that can be directly exposed. However, this plate type forfeits resolution by degrading much more quickly than the steel varieties.
The etched quality of steel plates is influenced by the grade of steel, the quality and consistency of the photoresist coating used to etch the plate, exposure parameters, developing techniques, and numerous other variables. However, both hardened and thin steel plates are significantly more durable than polymer plates and provide more consistent results from job to job.
While these plate materials were all viable for open-well inking systems, their use with sealed-cup systems introduced several problems. The first concerns the issue of plate flatness. For the doctoring ring on sealed-cup to make complete and even contact with plate, the plate must be perfectly flat. Otherwise, the cup may leak and/or “chatter” as it strikes high and low spots on the plate surface, leaving ink in non-image areas.
With open-well systems, you can generally make adjustments across the length of the doctor blade to correct for plate-surface irregularities. But the design of sealed-cup systems is not as flexible, and the cups can ride on high spots or dig into the plate’s surface. The lack of consistent flatness, particularly in hardened- and thin-steel plates, results in dimples, scratches, and other marks on the plates. So decorators began turning to the only other alternative: polymer plates.
As printers began using polymer plates, however, a new problem emerged: The sharp edges of steel-ring cups tended to bite into the soft surface of the plates, degrading their etched surfaces after only a few cycles of the machine. On systems using cups with ceramic rings, the plates fared somewhat better, due to the ceramic ring’s lower coefficient of friction. But after a short period of cycling, these rings also caused blemishes, such as divots and polished spots, to appear across the plate surface.
In order to accommodate the steel doctoring ring and reduce the problems caused by ceramic rings, higher durometer polymer plates were developed. Initial success seemed to point to these harder products as the long-awaited solution. The harder polymer plates proved so successful that, in many circumstances, press cycle rates approached the levels anticipated from machines using steel plates. However, this early success was soon replaced by disappointment as decorators saw the blemish and spotting problem return with continued use of the plates.
It became clear that correcting these problems with plate improvements brought only limited success. So the industry’s attention returned to the pad presses themselves, and manufacturers began to look critically at the cup design and the mechanisms for controlling pressure between the cup and the plate surface.
Controlling cup pressure
On some pad presses, magnets are embedded within the ink cup. These magnets are attracted to the metal backing of the polymer plates, forcing the cup against the plate surface. On other machines, cups are held against the plate surface with a pneumatic or mechanical plunger. The final approach commonly employed is to hold the cup in a stationary position and simply slide the plate back and forth beneath the cup.
All these methods have drawbacks, though. For example, on systems that hold the cups with magnetic force, the plate has a tendency to pucker upward toward the magnet as the metal backing is drawn toward the magnet. Consequently, the cup may rub grooves into the plate where it crosses the resulting surface irregularities. On cups forced in place with a plunger, press operators may set plunger pressure levels too high, which again can lead to plate damage. Finally, the stationary-cup approach allows limited pressure adjustment and depends on long plate-travel distances that can lead to additional plate damage.
To alleviate some of these concerns, press manufacturers began to experiment with different magnet strengths and positions within the cups, plunger-rotation capabilities, and additional adjustments they could provide to aid in controlling cup pressure. In all cases, the goal was to provide better, more efficient doctoring at pressures that would not degrade the plate surface.
Most machines currently available provide much more flexibility in pressure control than their predecessors. But to realize the full benefits they offer, you have to minimize and control variables in all aspects of the pad-printing process.
The steps to achieving quality prints on sealed-cup systems begin in prepress and continue throughout production. Guidelines to help you fine tune the process are listed below:
1. Expose and cure plate correctly Proper exposure and curing of polymer plates is imperative to assure good print results. Although the majority of polymer plates have fairly forgiving latitudes for exposure, you need to take care throughout plate processing. After initially exposing and washing out (developing) the plate, you must make sure the plate is thoroughly dry, then subject it to a final exposure to ensure that the plate surface reaches its ideal level of hardness.
To promote efficient post-processing of the plate, most plate-exposure units offered today combine drying and exposure capabilities. However, it’s important to make sure the plates are completely dry before they receive the final exposure. Otherwise, moisture present below the photopolymer surface of the plate will be encapsulated there by the final exposure. This trapped moisture will soften the plate surface, making it more susceptible to damage and early wear.
2. Inspect subplate for debris, burrs, and flatness When a machine is set up to run thick steel plates, the plates can be fixtured directly to the print head. But before a polymer plate can be mounted on the press, it must first be affixed to a rigid platform called a subplate, which makes the plate rigid enough to support the sealed-cup assembly.
Poorly maintained or unclean subplates are major culprits in the early demise of polymer plates. So before placing the polymer plate onto the subplate, check the subplate’s surface for foreign matter, burrs, or dimples. Any of these inconsistencies can lead to plate damage if they fall below the path of the cycling ink cup. Most subplate surfaces are made of anodized aluminum or comparable materials, but they still can be easily scratched or damaged. So take care to protect them during handling and storage.
Check the subplate’s overall flatness as well. Although the polymer plate is somewhat forgiving, an uneven subplate surface can lead to an uneven plate surface. If the subplate is not flat or free of irregularities, you may be able to compensate by placing the protective liner that covered the unexposed polymer plate over the subplate. It will serve as a makeshift shock absorber and may compensate for minor irregularities. But the best solution is to replace the damaged subplate.
3. Inspect plate’s metal backing for debris and burrs Once the subplate has been checked, it’s time to look over the metal backing of the polymer plate with equal care. Make sure no dry ink or foreign matter is evident on the backing. Scouring the backing lightly with a fine steel wool or similar product may reduce unwanted contamination and burrs. As a final step, wipe the backing with a dry, clean cloth or similar material to remove any other residue before mounting the polymer plate on the subplate.
4. Inspect doctoring ring for dried ink and imperfections Now it’s time to turn your attention to the ink cup, specifically the doctoring ring. Any dried ink or imperfections on the edge of the ring can abrade the polymer surface, causing scratches, grooves, and divots. Rings should always be maintained with a finely honed edge. Also make sure that the ink level in the cup and the solvent content of the ink are maintained. Otherwise, the cup may run dry, and dry ink particles may damage the plate surface during cycling.
5. Begin cycling press with low downward pressure on the ink cup Although manufacturers generally specify acceptable pressure levels between the cup and plate, you’re best off to begin cycling the press with minimal pressure, usually 3-4 bars (1 bar = approximately 14.5 lbs/sq in.). Increase pressure only if you determine that the cup is not doctoring the plate adequately. Also, make sure that your evaluation takes into account additional sources of pressure, such as magnetized cups. Note that even under ideal circumstances, a thin haze of ink may be left on the plate after doctoring, but this ink will normally not transfer to the substrate.
6. Clean plate and ink cup when printing is interrupted Many printing flaws originate during short breaks or shift changes. Prior to restarting the press, use a small amount of solvent to clean out etched areas of the plate, as well as the travel path the cup will follow across the plate. Use a small squirt bottle to apply solvent around the doctoring ring to dissolve any hardened ink that could prove abrasive during cycling.
7. Avoid exposing plate to solvents for extended periods Increasingly, printers using single-component inks are incorporating procedures to maintain the inks for extended periods. For example, some remove plates or perform other maintenance and setup procedures while the ink-filled cups are still in position. In many cases, they will also add excessive amounts of thinner to the inks when the press is idle, in the hope that the solvents will slowly evaporate, leaving the ink at the proper viscosity when printing resumes. However, this approach can lead to pigment shock, disrupting the pigment balance, color, and other properties of the ink.
Another problem can occur when inks cups filled with solvent-laden inks are left in contact with a polymer plate’s surface for extended periods. In such situations, the polymer has a tendency to absorb the solvent, which causes the polymer to swell and soften. As a result, plate life and durability decrease.
8. Store plates properly after removing them from the press When a job is complete and you have to remove and store the plate for future use, it’s essential to clean, dry, and carefully wrap it. Cleaning should be as thorough as when the plate is being prepared for printing. Debris and dry ink can lead to damage if other items are stored on top of the plate or rest against it during storage.
Before wrapping the plate, expose it to another drying cycle. This will evaporate most of the residual solvents remaining on the plate and can prolong the life of the polymer. Once the plate is dry, use some form of soft, non-abrasive packaging material to wrap its surface. This will prevent the plate from being contaminated with foreign matter and protect against scratches and other damage during handling and storage.
Finally, give some thought to how the plate will be stored. Logic would seem to dictate that the plate should be stored with its etched polymer side facing upward. But this is not the case. Polymers tend to contract during storage as small amounts of residual solvent continue to evaporate. As a result, the plate will tend to curl toward the etched surface. To prevent or reduce this effect, store the plate face down, ideally with some sort of weight on top of it.
Conclusion
When any new technology is introduced, expect a trial period during which bugs in the system come to light and modifications are made to solve these problems. Sealed-cup pad-printing presses were developed in response to concerns about solvent exposure in the work environment, and to reduce operator involvement in ink maintenance. Inevitably, the first generation of sealed-cup machines were rolled out with the best intentions to address these concerns, but provided lackluster performance due to the unforeseen consequences they introduced to the process.
Although sealed-cup systems are still evolving, much progress has been made in reducing the problems they create. And further refinements are emerging that will make sealed-cup pad printing as user friendly as the well-established open-well technology. Some of these developments include
1. Rotating ink cups that provide even wear of both the doctor ring and the plate surface.
2. Adjustment capabilities for the valves that control pressure between the cup and plate.
3. Solvent-replacement devices that can meter the ink’s solvent content and add appropriate amounts of solvent to maintain ink viscosity.
4. Ink-mixing discs that float inside the cup, keeping the ink mixture homogeneous and evenly distributed throughout the cup’s interior.
5. Refined doctoring-ring materials and production techniques that provide better edge characteristics and lead to reduced wear on plate materials.
6. Single-pass cup movement, which reduces press-cycling time by allowing the cup to ink and doctor larger graphics, then park at the opposite end. When the print stroke is completed, the cup inks and doctors the plate again as it returns to its original location.
Other improvements that sealed-cup pad press users–especially multishift operations–will appreciate include new inks designed to provide longer pot life. Additionally, microprocessor controls, simple user interfaces, and a range of automated and self-regulating features promise to further streamline the sealed-cup pad-printing process


Subscribe

Magazine
Get the most important news
and business ideas from Screenprinting Magazine.
Most Popular
-

 Columns1 month ago
8 Marketing Mistakes Not to Make When Promoting Your Screen Printing Services Online
-

 Press Releases1 month ago
Sports Inspired Clothing Market: The Influence of Sports on Fashion Forward Looks
-

 Editor's Note1 month ago
Livin’ the High Life
-

 Marshall Atkinson1 month ago
How to Create a Winning Culture in Your Screen-Printing Business
-

 Press Releases4 weeks ago
Hope Harbor to Receive Donation from BlueCotton’s 2024 Mary Ruth King Award Recipient
-

 Case Studies1 month ago
Screen Printing for Texture and Depth
-

 News & Trends2 months ago
What Are ZALPHAS and How Can You Serve Them in Your Print Business?
-

 Headlines1 month ago
Live Poster Printing Raises $30K for Charity