Pad Printing
Published
18 years agoon
The origins of pad printing may have been in decorating flat watch dials, but times have changed (no pun intended). The era of plastic molded everything has required printers to adapt to printing on the most unusual of objects. Every printer can think of at least one project in which the shape of the part made the print job difficult. The long hours, repeated artwork revisions, and load of scrap parts generated before finally getting that perfect print make pad-press users appreciate those flat watch dials.
The origins of pad printing may have been in decorating flat watch dials, but times have changed (no pun intended). The era of plastic molded everything has required printers to adapt to printing on the most unusual of objects. Every printer can think of at least one project in which the shape of the part made the print job difficult. The long hours, repeated artwork revisions, and load of scrap parts generated before finally getting that perfect print make pad-press users appreciate those flat watch dials.
Unfortunately, even experienced printers have trouble when it comes to 3-D objects. Factors such as artwork distortion, equipment capabilities, and tooling contradict conventional, flat-surface pad printing. These projects provide you with valuable experience—but only after you’ve pulled out a little of your hair. Consulting equipment and supply vendors and being prepared is the best offense when accepting a difficult print job.
These projects can be very profitable if you’re willing to take them on. But what you must realize before starting a challenging project is that it requires a unique approach to prepress and production. Awareness of the issues presented in this article will help you accept more jobs of this nature and complete them with greater success.
Artwork distortion, registration, and location
Let’s say you need to print on a rubber ball. When you look at artwork on your computer, you see it as a one-dimensional image. So you print your artwork to film, expose your cliche, and set up your machine for printing. Then you print a ball and take a good look at it. Hmmm…not exactly like the artwork on the computer, is it? That’s because artwork for an unusual object may need to be larger on the cliche than it appears on the object. Artwork distortion is to blame. In the ball example, the distortion is caused by the multidimensional surface of the ball. What you are looking for is a print on the part that is identical to the artwork as it appears on your computer monitor. On a 3-D object, this is sometimes not possible to achieve without modifying the artwork. This is where the hair pulling comes in.
The solution is to account for the print distortion in the artwork itself. It’s a trial-and-error process. The artwork must be modified to be proportional to the part once it has been printed. Using the rubber ball, for example, the artwork on the cliche should be larger in diameter to cover the surface of the ball. This type of modification requires rotating, minimizing, skewing, and even stretching the artwork, which in turn requires re-etching and re-testing each piece of artwork until the distortion is eliminated in the final print. This will give you the proper registration of the image to the part being printed.
The process is an arduous one that can take several cliches before you’re ready for production. However, your suppliers have probably encountered similar projects and likely can offer quick solutions to reduce the time and number of cliches lost during this procedure.
The same considerations hold true for printing process colors and raised lettering. Both involve considerable time spent on trial-and-error testing. For multicolor prints, issues arising from artwork distortion can be compounded by registration problems. Registration of the print is sometimes confused with location. Location refers to the part, whereas registration refers to the cliche. With correct registration and location, the ink will only be transferred where you want it.
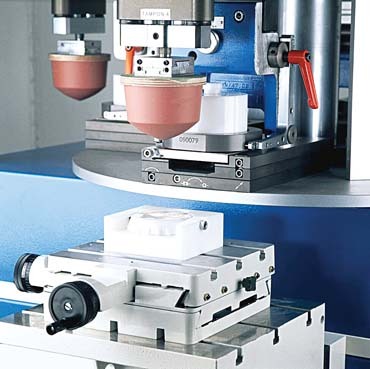
The location of the part generally can be adjusted by means of an x-y table or fixture (Figure 1); registration is corrected directly through the artwork on the cliche. Some pad-printing machines also offer the option of registration via the cliche holder. This unique feature is usually found only on multicolor pad presses. It eliminates much of the prepress setup time by allowing the operator to adjust each image during machine configuration. If your press doesn’t have this feature, you’ll have to adjust the artwork and etch a new cliche until the registration issues are fixed.
Equipment capability
This is where it gets a little tricky. One of the criteria for selecting the right equipment for printing on unusual objects is not the image size, but the cliche size. For a flat watch dial, equipment size can be selected based on the size of the flat, unmodified artwork before a cliche is even etched. However, with artwork that needs to be distorted, the print-image size can be significantly larger than original size, thereby requiring a bigger cliche. This, in turn, ultimately requires a larger machine. Now you’re confronted with another issue: Is your equipment capable of handling a change in image size like this?
An open-inkwell pad-printing machine may provide the ability to cover the broader image area, but a closed-cup press may not. If you use a closed-cup machine, your images will be limited to the diameter of the cup. So if the modified image does not fit within the restrictions of the cup, you won’t have the option of using that printer for the job. And if you don’t have a machine with a larger cup size, you won’t have the option of printing the job at all.
When choosing a pad-printing machine for this type of application, keep in mind that the larger artwork will also require a larger pad. This may also limit which equipment type is used. Some machines may not be able to exert enough pressure to compress the pad. Others may lack the ability to accommodate a pad that is significantly larger than the cup size. The machine manufacturer should be able to clarify this for you.
In extreme cases, modifications may need to be made to the pad-printing press to accommodate the part. Jobs involving extra-large parts present a unique problem: The part must be located correctly and centered under the printhead. This is usually impossible with a standard pad press. However, many equipment manufacturers offer modifications or will build a custom machine for your part. This can take a significant amount of time, testing, and investment, so keep this information in mind when you’re first approached to handle such a job. If you purchase a pad printer for a specific application, make sure it has the capabilities to complete this job and others in the future. Doing so will help you avoid pulling out even more hair later on.
Cliches
You can move on to cliche production once you’ve corrected your artwork. The options for cliche types and materials vary with each supplier. If you run 1,000,000 cycles or more, consider a steel cliche. As a general rule, the higher the production run, the higher the price for the cliche. Do not underestimate the value of steel cliches. They can pay for themselves several times over at the end of production.
Take a look at polymer cliches for unusual print jobs that require multiple artwork revisions. You can etch these cliches at your own facility, and polymers are available for water-wash and alcohol-wash etching. These materials are designed for both high- and low-production runs. Decide what is best for your application, and tell your supplier what you expect from the cliche in production. The supplier should be able to offer a solution that will cover your printing needs.
If you do not have the equipment to do so, have your supplier test for you and etch the final cliche. There is usually a charge associating with testing cliches, but your supplier’s experience and equipment may actually be able to save you money when you compare the costs with those you would incur by setting up to conduct your own tests. If you etch the plates at your facility, make sure you expose the cliche again after etching to completely harden the polymer material. This step prolongs the life cycle of the cliche and saves time and money during production.
Pad Selection
Involving your supplier in pad selection for your odd job can also help you avoid problems during production. There are literally hundreds of standard pads to choose from, and your supplier will know what would work best for your application. When printing an unusual part, the pad should cover and extend past the modified artwork. A good rule of thumb is to always use a pad that is too large rather than too small. However, make sure you have proper pad support to prevent the pad from overextending and distorting your image.
The basis for any pad selection is to attain a rolling effect of the pad onto the part. It is crucial that the pad used is able to produce this rolling action throughout completion the entire production run to avoid problems in the printed image.
Some parts require special considerations for pad selection. For example, a pad bar may be necessary for objects that require a print on more than one level. The pad bar holds two or more pads of different sizes to print the images simultaneously. What about objects that are cylindrical or breakable? Your supplier can provide you with a hollow pad to wrap around the object. Most suppliers can also pair the proper pad hardness with the job at hand. Remember that textured surfaces generally require a harder and steeper pad—not softer. This is a common misconception among printers.
In some cases, your needs may not be met by a pad pulled from the stock shelf, and your part may require a customized pad manufactured specifically for your print project. In this case, you may have to cover the costs of the master and the mold with some suppliers. But thereafter, you would only have to purchase the replacement pads. This is a worthwhile investment in the long run for a difficult part that’ll you’ll revisit.
Tooling and fixtures
The pad you’ve selected needs sufficient support to provide a high-quality print. A properly designed part-holding fixture is part of the solution (Figure 2). The fixture provides both pad support and part stability. It should be designed for easy loading and unloading. If the part is not easily removable from the fixture, you will slow production and possibly damage the part during removal. However, if the part is too loose, the fixture will allow for part movement. Either way, problems with image registration and part location will occur.
Pad support also is essential for providing a sharp print. Some applications require a special fixture that supports the pad during printing to avoid distortion. As the pad strokes downward onto the part, it must be stopped a certain point just past the image; otherwise, it will cause the image to stretch. In other words, the image goes wherever the pad goes. The fixtured part must encourage the rolling effect of the pad through the entire pad stroke. By supporting the pad on all sides of the part, the pad will roll the image onto the part then roll off smoothly.
Part stability is crucial for repeatability of the print position. Unusual objects and difficult shapes are notorious for movement during the print cycle. Machines that are not stabilized (tabletop presses or presses on casters) create movement during continuous-cycle printing. This can cause repeatability problems if your part does not have the appropriate fixture. If fixtures are properly tooled for optimal repeatability, your print jobs will progress smoothly and with fewer scrap parts.
Special tooling
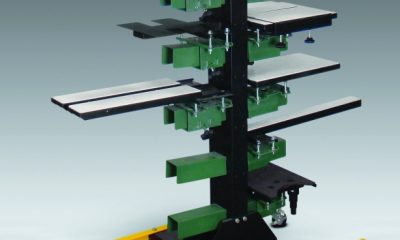
Custom-made tooling (Figure 3) is sometimes required. It may be in the form of a unique pad configuration or a means to provide support on the inside of a part to prevent the part from collapsing. For instance, small plastic bottles my need air pressure to remain inflated during the compression of the pad. If the bottle collapses during the print cycle, your image will be distorted.
Additionally, custom fixtures with the ability to rotate or accept adjustment can be designed for jobs that involve multiple prints on a single object. This type of application-specific tooling will allow the user to move the loaded fixture to the secondary print location with the same optimal repeatability.
Custom fixtures can also support glass and other delicate items. Without proper support, these breakable items can be crushed by the pressure of even the softest pads during the print cycle.
Ink and substrates
The shape of the part isn’t really a deciding factor when selecting an ink. As with all prints, the part’s material composition dictates which ink will work best. Ink manufacturers have formulated an array of inks with specific properties that facilitate adhesion to virtually any substrate. Familiarize yourself with the materials on which you’re printing, and ask your supplier to recommend an ink that will best adhere to the substrate and resist damage caused by abrasion.
Some materials, such as those in the polyolefin family, require surface treatment before printing. The options range from corona or flame treatments to simple ink additives. But if you’re unsure of the material, ask your supplier to recommend an ink and test it for you. Make sure you send enough samples for your supplier to test several different inks. There may be more than one that will do the job. Post treatment procedures may also be required.
Additionally, be sure that your supplier can provide the ink in any color. Be aware that you will be charged extra for color matching than what you would normally pay for your supplier’s standard line of colors. There are several universal systems of identifying color. Most suppliers can work with all of them. If needed, your supplier may be able to match to a wet sample, or even a printed sample, of the part.
Once you have selected the right ink for the job, make sure you use auxiliaries that are compatible with your production run. Pad-printing ink is available in one- and two-component formulations. One-component ink requires only a thinner, whereas two-component inks require both a hardener and thinner. Two-component inks usually have only one hardener of choice. However, the thinners required are available with different rates of evaporation. Thinner selection is based on the production environment. Identifying your machine speed, image size, facility temperature, and humidity will help to narrow the field of choice. Again, consult your supplier for assistance.
If you plan to use a two-component ink, make sure you are aware of the ink’s curing time. There is a significant difference between drying and curing. Single-component inks can dry within seconds, whereas two-component inks can take as long as several days for the chemical curing process to complete. Allow for this time when preparing for production. If the temperature of the part changes significantly prior to curing, then the chemical process will stop and the part will have adhesion problems later on. You should allow the ink to fully cure before you package the part. Curing can be accelerated, but consult your supplier for the best options regarding your particular project.
Approaching the unusual
Accepting a strange or challenging pad-printing job can be a nerve-racking proposition. But if you take the time to understand the demands such jobs bring to the process, you’ll save yourself time and money—and most of your hair. Correcting artwork distortion on your cliches, using the best pad for the image, selecting proper tooling and pad support, and bringing a compatible ink to press will help production run smoothly and leave you with plenty of hair to spare.
About the author
Linda Huff has eight years of experience in pad printing and consulting as consumables sales manager for Tampoprint International Corp., Vero Beach, FL, a manufacturer of pad-printing equipment and supplies.


Subscribe

Magazine
Get the most important news
and business ideas from Screenprinting Magazine.
Most Popular
-

 Case Studies2 months ago
High-Density Inks Help Specialty Printing Take Center Stage
-

 Art, Ad, or Alchemy2 months ago
F&I Printing Is Everywhere!
-

 Andy MacDougall2 months ago
Functional and Industrial Printing is EVERYWHERE!
-

 Columns3 weeks ago
8 Marketing Mistakes Not to Make When Promoting Your Screen Printing Services Online
-

 Editor's Note3 weeks ago
Livin’ the High Life
-

 Marshall Atkinson3 weeks ago
How to Create a Winning Culture in Your Screen-Printing Business
-

 Thomas Trimingham2 months ago
“Magic” Marketing for Screen Printing Shops
-

 Case Studies3 weeks ago
Screen Printing for Texture and Depth