Articles
Published
20 years agoon
Screen printers the world over battle with the ubiquitous pinhole, a stencil defect that reduces production efficiency, profitability, and print quality. Printers who are continuously plagued with pinholes spend more time and money to complete jobs than competitors who have taken steps to reduce, if not eliminate, pinholes from their production process. This article will identify the many causes of pinholes and explain screenmaking procedures that any shop can use to keep pinholes out of their stencils.
What are pinholes?
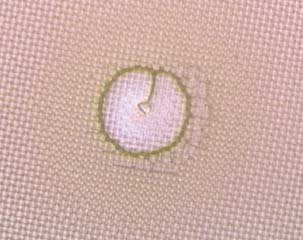
According to the Specialty Graphic Imaging Association (SGIA) Glossary of Screen Printing and Related Technologies, a pinhole is an “imperfection in the form of tiny transparent dots that appear in printing screens or in process films after development.” For this discussion, we’ll expand the category of pinholes to also include the fisheye, defined in the Glossary as “a flaw in an emulsion-coated screen that results in a generally circular thinning defect in the emulsion film.” Fisheyes (Figure 1) are essentially large pinholes that occur when a screen contaminated with oil or other chemicals is coated with emulsion.
Sometimes the term “pinhole” is used to describe an imperfection in a film positive or stencil before the screen leaves the screenmaking department. Press operators also may describe a job as”pinholing on press” if a stencil that appeared sound when it left the screen room begins to get pinholes during a print run. As Table 1 shows, many factors can influence whether pinholes occur in prepress or on press. This month, we’ll take a closer look at conditions that can lead to pinholing in the screen department. The factors that contribute to pinholes on press will be next month’s focus.
| Table 1 Causes of Pinholes in Prepress and On Press | |
| Causes of prepress pinholes – Mesh contamination – Poor drying techniques after degreasing – Dirty screenmaking department – Improperly prepared emulsion – Particles in the emulsion or stencil film – Poor emulsion quality – Improper coating speed or trough design – Incomplete drying of emulsion prior to exposure – Improper exposure – Contaminated exposure glass and/or film positives | Causes of on-press pinholes – Chemical breakdown -Mechanical breakdown – Improper coating technique |
Mesh contamination
All mesh requires thorough degreasing and rinsing prior to coating. Even new mesh is not clean mesh. Sizing chemicals and lubricants are used during mesh manufacturing and may still remain on mesh fabric, despite the fact that mesh is washed by the manufacturers after weaving. Additionally, dust, dirt, and oils will likely accumulate on the mesh due to handling by the manufacturer, local distributor, and/or employees in your own shop.
You should use a commercial-grade mesh degreaser and apply it with a soft, nylon-tipped brush to the mesh of any new or reclaimed screen prior to emulsion coating or stencil-film application. Make sure to brush both sides of the mesh. A complete rinsing should follow. This can be done with a pressure washer to thoroughly dislodge any debris caught in the mesh openings.
Be particularly careful and thorough when rinsing frames that have channels and grooves in them. These frames are more apt to hold contaminated water and chemicals that may drip onto the mesh after rinsing and cause pinholes and fisheyes. Complete the process with a low-pressure, high-volume rinse to remove any contamination caused by potential blowback from the washout booth during the high-pressure rinsing stage.
Many screen printers are now purchasing automatic ink-washout and emulsion-removal systems. If you are not among those fortunate printers and are using one washout booth for all steps of the reclaiming process, a word of caution: When you use one booth for several wet processes, such as degreasing, developing, reclaiming, and ink or haze removal, you should be prepared to carefully clean the entire washout booth daily to reduce the chance of debris splashing back onto a clean screen. It is best to have dedicated washout booths–one booth for degreasing and developing, another dedicated to reclaiming, and if possible a third for ink residue and/or haze removing. A dedicated solvent-recirculation tank to capture ink residue also is a good investment.
You should only abrade mesh to improve stencil adhesion if you use in-direct and capillary stencil films. When properly degreased, coated, and exposed, direct-emulsion screens should not need abrading, because the emulsion encapsulates the mesh to form a very durable stencil.
Poor drying techniques after degreasing
A common technique for drying a freshly degreased screen is to place the wet screen on the floor in front of fans. The problem with this technique is that the floor and the fans are usually the dirtiest things in the room. To illustrate this point, try wiping the floor with your hand to see if you pick up any dirt. If you do, there is a good chance the fans also are picking the dirt up and blowing it onto your wet screens.
Another technique I don’t recommend is to set the wet screens outside in the sun to dry. Of course, it is nice to take advantage of cost-free drying with a warm sun and fresh breeze, but the great outdoors also is not the cleanest environment for a wet screen.
To reduce the chance of contamination, some shops drip-dry screens without fans, placing the screens on the floor or in a rack. Although this method is the safest mentioned so far, it still involves wet screen mesh, and it takes an unnecessarily long time. If water is allowed to sit on the mesh too long, it acts like a magnet and attracts just about any airborne particle, including dust, lint, skin, hair, and threads from clothing.
Probably the best option for screen drying is to use an enclosed drying cabinet with racks for multiple screens. Drying cabinets are available with filtered fans and their own heat source to accelerate the drying process.
For those who can’t justify the expense of a drying cabinet, my suggestion is to use a water-extraction device after degreasing the screens. This device consists of a wet/dry shop vacuum that is equipped with a wand designed specifically for screens (Figure 2). A vacuum system like this can effectively remove more than 90% of the water from a screen in a matter of seconds. You can buy a shop vacuum in almost any major hardware or department store, and the special wands are available from most screen-printing supply distributors.
When using a vacuum device for screen drying, it is important to keep the tip of the suction wand clean. It should be clipped to or hung up on the washout booth or a wall for storage and not allowed to touch the floor. After vacuuming water from a screen, the screen frame should be wiped off with clean rags or towels. Then the screen should be stored in a clean place, preferably off the floor. Screen-racking carts are often used for this purpose.
Extracting water with a vacuum will help improve screen turnaround time, allowing the screens to dry in about 5-10 min, instead of 45-60 min. The shorter drying time means less chance for contamination and fewer pinholes. Some printers use compressed air to dry their screens, but I’ve found this to be a slower process, and if the air is not completely clean and oil free, it can recontaminate the mesh.
Screens should be coated as soon as they are completely dry. The longer the screens remain unused between drying and coating, the more contaminated they can become. If the screens have sat around for a long time, you might consider using a tacky roller to remove any loose debris they’ve collected.
Dirty screenmaking department
The screenmaking process should be done in a clean-room environment. The coating and drying area should be the cleanest area in the department because airborne contamination is attracted to screens freshly coated with emulsion. Unfortunately, this area is often neglected.
An ideal screen-coating and drying room is one in which the walls and ceiling have a flat surface and are painted with gloss-finish paint. Flat surfaces have less surface area on which dust can collect, and they are easier to clean. The gloss finish will provide a durable surface that can withstand frequent washing. The same principle applies to the floor–the flatter the surface, the easier to clean. Using a sealant on the floor also will help.
Whether you are a T-shirt printer or a glass printer, screen rooms set up this way will be much easier and faster to clean. Cleaning involves washing all surfaces as frequently as necessary to keep the dust down to an absolute minimum. Some shops damp mop their floors every day just prior to coating screens.
Incorporating a portable air purifier in the coating and drying area helps to clean or “scrub” the air and is recommended for achieving an even cleaner environment. For less than $200, these units will filter airborne particles down to 0.3 microns in size. Most use a HEPA (hospital grade) filter, as well as a charcoal filter, and often employ an ionizer to attract particles. An air purifier will exchange the air in the room up to several times per hour and provide a better method of circulating the air than a dirty fan.
Improperly prepared emulsion
If the sensitizer is not thoroughly dissolved when using diazo-sensitized emulsion, hard, insoluble agglomerations (particles) may form on the screen. These particles show up after stencil developing as specks of emulsion locked into the mesh throughout the coated area of the screen. Make sure the diazo is totally dissolved in water before adding it to the emulsion. Then make sure to thoroughly mix the sensitizer into the emulsion.
When mixing diazo-sensitized emulsion in a room with yellow safelights, it is often difficult to see if the sensitizer has been thoroughly stirred in because the yellow safelights mask the yellow color of the sensitizer. By taking the mixed emulsion into a room with white light, it will be very easy to see if the sensitizer has been properly mixed. The emulsion is not very reactive to white light while it’s in the bucket, because there is so much water present in the emulsion. Mixed diazo-sensitized emulsions do not become fully light reactive until the water is removed. This is why we need to get emulsion-coated screens thoroughly dry before exposing them.
Distilled water is recommended for mixing the diazo sensitizer because tap water may have high iron content that can have adverse effects on the emulsion. Using warm water will make it easier to dissolve the sensitizer. It also is helpful to fill the diazo bottle only half full initially, so that when it is shaken, the agitation of the water will better dissolve the diazo crystals. Pour the dissolved sensitizer into the emulsion and fill the bottle only half full again. Shake to dissolve any remaining residue and pour the rest of the sensitizer into the emulsion.
After mixing diazo-sensitized emulsions, let the air bubbles escape by allowing the emulsion to rest undisturbed for a couple of hours, or preferably overnight. Any air bubbles remaining in the emulsion after mixing can transfer to the mesh if the screen is coated too soon.
When using presensitized SBQ “pure photopolymer” emulsions or their derivatives, it is not necessary to stir before use. This will only introduce air bubbles into the emulsion and delay the use of the product while the air disperses. Stir only if there is water on the surface of the emulsion due to condensation in the bucket or if there is an obvious separation of the product.
Particles in the emulsion or stencil film
On rare occasions, the components of the emulsion can form hard, insoluble particles that do not react with the sen-sitizer. This is a condition that cannot be totally controlled during emulsion manufacturing–it can occur at any stage in the life of an emulsion.
These solid particles form false or “pseudo” pinholes that appear as clear, bright spots when viewed against a backlight, but are actually areas of emulsion in which no pigment is present. Depending on the ink chemistry and types of solvents used on press, these false pinholes may or may not form on-press pinholes that allow ink to leak through.
To maintain optimum control over this intermittent condition, monofilament mesh between 175-240 threads/in. may be used to filter the emulsion after it has been sensitized. Filtering also will assist in reducing the amount of air that is trapped in the emulsion. Other contaminants, such as hair, dust, lint, etc. also seem to find their way into the bucket of emulsion, especially if you pour un-used emulsion from a coating trough back into the bucket. Filtering the emulsion will help assure that you remove any undesirable debris from the product.
Capillary film is not immune to contamination either. If the manufacturing process is not closely controlled to prevent contamination from airborne particles, the film can form stencils with pinholes.
Poor emulsion quality
Making a defect-free coating requires high-quality, expensive, raw materials. Low-end emulsions may not contain these materials and, hence, are more likely to form pinholes, especially when other conditions are less than perfect.
Improper coating speed or trough design
Coating too fast can cause air to become trapped in the mesh. This is usually the result of the emulsion not being able to flow through the mesh fast enough to keep up with the coating trough. The emulsion will begin to roll over itself in the coating trough, picking up air in the process, which then gets deposited into the mesh (Figure 3). These air bubbles can break open during the printing process to form pinholes.
The emulsion’s viscosity and its characteristics under shear play a part in how fast you can coat screens. Less viscous emulsions flow faster into the mesh without the tendency to roll in the coating trough, and therefore may be easier to coat. However when coating very coarse mesh counts, the low-viscosity emulsion may tend to drip as it is drying.
Coating troughs are designed with different edge diameters that range from less than 1 mm to about 2.5 mm. Each style has its place and function, but be careful with the sharper trough designs–they tend to introduce more air into the coating. When possible, use a trough with a larger edge diameter.
Incomplete drying of emulsion prior to exposure
If the emulsion is not absolutely dry when the screen is placed into the exposure unit, the stencil will show signs of underexposure after developing. This can happen even if you calculate and use the appropriate exposure time. Improperly dried emulsion is a difficult problem to catch because the emulsion may feel dry to the touch.
When too much moisture is left in the emulsion coating, it prohibits the chemical-crosslinking reaction between the diazo sensitizer and the polyvinyl alcohol (PVA). This causes the stencil to remain somewhat soft instead of hardening all the way through. Under these circumstances, some of the unreacted emulsion will wash away from the squeegee side of the screen when the stencil is rinsed for development. As a result, the emulsion loses its encapsulation around the threads of the mesh, creating weak spots in the stencil. Some of these weak spots may show up as prepress pinholes, while others may show up as on-press pinholes. Additionally, areas of the stencil that have very little emulsion, such as fine emulsion lines and dots that will print as negative images, may fall off the screen during printing because they are poorly anchored to the mesh.
To ensure complete drying of screens, it’s important to control the drying environment. For best results, dry screens in a room or cabinet with a temperature of 80-100


Subscribe

Magazine
Get the most important news
and business ideas from Screenprinting Magazine.
Most Popular
-

 Case Studies2 months ago
High-Density Inks Help Specialty Printing Take Center Stage
-

 Art, Ad, or Alchemy2 months ago
F&I Printing Is Everywhere!
-

 Andy MacDougall2 months ago
Functional and Industrial Printing is EVERYWHERE!
-

 Columns3 weeks ago
8 Marketing Mistakes Not to Make When Promoting Your Screen Printing Services Online
-

 Editor's Note3 weeks ago
Livin’ the High Life
-

 Marshall Atkinson3 weeks ago
How to Create a Winning Culture in Your Screen-Printing Business
-

 Thomas Trimingham2 months ago
“Magic” Marketing for Screen Printing Shops
-

 Case Studies3 weeks ago
Screen Printing for Texture and Depth