Articles
Published
20 years agoon
In the current garment market, screen printers are finding a great deal of demand for exciting, glossy, three-dimensional designs that maintain rich and true colors. Many printers are responding to the demand by expanding on their experience with high-density inks. Applying a variety of glossy ink types with techniques used in high-density printing, these innovators have taken the next step–producing well-defined, three-dimensional garment graphics with a variety of surface finishes.
This discussion explains several methods you can use to enhance high-density prints by adding a variable amount of gloss to the printed inks. While these suggestions are based on procedures I’ve developed that have proven effective in several high-volume print shops, there is never really just one right way to do things. I encourage you to experiment and adapt these techniques to suit your own operation.
The dryer’s role
The first thing to understand is that almost any plastisol ink will exhibit an increase in gloss with additional heat and time in the dryer–this is just the nature of plastisol products. Your ability to vary the amount of gloss by adjusting dryer settings is the key to achieving top-quality results. If you’re not willing to change your dryer’s temperature and belt speed, you’re only limiting your ability to produce the most desirable types of high-density designs.
When you start to adjust the dryer, modify the time and temperature together slowly. As you send printed shirts through the dryer, decrease belt speed and increase temperature in small increments, stopping when the prints exhibit the finish you desire. But be careful to not expose the garments to excessive heat or time in the dryer.
Also keep in mind that the lower the height of the ink deposit in the design, the easier it is to produce a gloss surface. Lower-viscosity inks will usually achieve gloss at lower temperatures and in less time than thicker formulations because they form thinner ink deposits when printed. However, while they may be printed over thicker inks to impart some degree of gloss, the result will rarely be the distinct raised areas and glassy appearance that most customers want. To get the greatest control of gloss level and best edge definition in three-dimensional prints, you need to use the types of high-viscosity inks discussed in the following sections.
Gel inks
The most common method currently being used to create a raised, glossy print is to cover a standard flat ink, or even a high-density ink, with one or more layers of clear thick ink, typically known as a “gel” formulation. It is very important that the clear ink have a very high viscosity and proper shear characteristics. Look for a viscosity level that is close to the maximum that your shop can comfortably print. The clear ink also should have the extremely short body common to all high-density plastisols. The thicker the viscosity of the clear ink, the more efficient production will become and the better the overall quality of your prints will be.
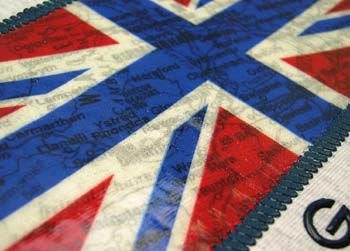
This method was used to produce the image shown in Figure 1. Standard red, blue, white, and black plastisol inks were printed first, then flash cured. Next, a thick, clear gel was printed through an 86 thread/in. mesh with a stencil that was 400 microns thick. After this layer was flash cured, another layer of gel was printed on top of it using an identical screen with a thinner, 300-micron stencil.
Applying the clear ink in progressively thinner layers with decreasing stencil thicknesses assists in creating a smooth and even surface. The design was completed by printing a standard high-density ink last to simulate stitches. Dryer time and temperature were carefully adjusted to gloss the gel-coated flag portion of the image without unintentionally adding any gloss to the stitches.
Note that even if you use a proper clear gel ink, overprinting a standard flat ink may not give you the desired print height. And if you attempt to print gel over standard high-density inks, your images may exhibit rough surfaces and have some serious durability issues. In most cases, you should avoid printing a clear ink deposit on top of high-density inks. Other issues you face when printing gels on top of standard and high-density plastisols include the potential for color shifts to occur with certain colors and press limitations that restrict the total number of colors, gel layers, and flash-curing steps that you can apply. But all these concerns can be greatly reduced by using the technique detailed next.
Creating custom inks
Less common, but generally more useful than overprinting conventional and high-density plastisols with gels is to create glossy, 3-D prints with a single ink formulation that provides both a thick ink film and good glossing characteristics. You can create such a custom formulation by mixing a high-viscosity clear gel with standard high-density plastisol at a 50/50 ratio by weight. The resulting ink will provide a very rich, glossy appearance without the undesirable color shifts that can occur when overprinting with clear gels. And just as with standard high-density inks, this custom mixture will be very opaque and will not require an underbase. Just keep in mind that whenever you mix inks that have different viscosities and shear rates, it helps if you stir each component a little first. Doing so warms up and shears down the inks slightly, making them easier to mix.
Perhaps the greatest benefit of using this multidimensional gloss ink is that it will free up print stations on your press by eliminating the need to print a standard ink, flash the print, and overprint it with a gel. This means you’ll be able to print two layers of the special-effect ink using the same number of stations on press that were required to print one layer with the standard-ink/gel-overprint approach. As a result, you’ll realize faster press-setup times and smoother, glossier raised surfaces on your prints.
Printing 3-D graphics with multidimensional gloss ink brings other advantages as well. For example, you can print layers of the ink on top of each other in the same way you would layer a high-density design. When the artwork allows, you also can print the colors separately with a flash between each color, as demonstrated by the print in Figure 2. In this image, the red and white were printed through 110-thread/in. screens with 150-micron stencils. The blue was printed in two layers using identical 156-thread/in. screens with 100-micron stencils. The mesh counts and stencil thicknesses were determined by the amount of detail required in the simulated embroidery.
Another advantage of using multidimensional gloss ink is that you can produce a wide range of surface effects with your dryer. For example, rather than increasing drying temperature or time to achieve a gloss effect, you can leave the time and temperature around normal operating levels, which will cause your prints to develop a hard satin or plastic finish. By trying different dryer settings with multidimensional gloss inks, you’ll discover that many gloss levels are possible.
The prints in Figures 3A-3C show a few of the effects you can achieve with relatively minor adjustments to drying time and temperature. All these prints use the same type of multidimensional gloss inks, which comprise equal parts of thick, clear gel and standard, high-density ink. Each design was printed in multiple layers through 86-thread/in. screens with stencils ranging from 200-400 microns.
In Figure 3A, the dryer time and temperature were set as they would be for any standard plastisol print. Notice the hard, satin-like print surface. The print in Figure 3B was exposed to dryer temperatures 10-15% higher than normal, and the dryer belt was run about 10-15% slower than normal. These dryer modifications gave the print a semigloss surface finish. Used in combination with appropriate artwork, these settings made the print look like a nylon mesh garment.
The third print (Figure 3C) shows the results of even higher dryer temperature combined with a slower belt speed. Here, temperature was approximately 20-25% higher than normal, while belt speed was 20-25% lower. This combination produces a very high gloss if dryer conditions are carefully adjusted and controlled. Being able to offer this range of surface finishes to customers can be very advantageous for your business, and all it takes is simple dryer adjustments.
Figures 3a-3c Altering dryer settings to create different surface finishes
You can achieve a range of different surface finishes with multidimensional gloss inks simply by changing dryer temperature and speed.
Ink and stencil compatibility
The most influential factor in successful multidimensional gloss printing, as with most other kinds of high-density printing, is matching the stencil thickness to the viscosity of the ink and the detail in the artwork. I often see printers attempt to print a clear ink that is much too thin through a stencil that is much too thick. They usually do this in an effort to get adequate image height with only a single screen worth of ink. Printers generally make this common mistake when they begin to work with any type of raised, clear ink.
The results of such mismatches between ink and stencil show in the finished print in a number of ways. For example, the edges of the raised, glossy image area will look acceptable, but the center of the printed area will not have a sufficient ink deposit. When you print thin inks through thick stencils, you deposit less ink on the garment, and in production, the ink will continue to shear down and you’ll deposit less and less ink throughout the run. This can become a serious quality problem that, if unchecked, can affect the entire job. The printed area also will lack the smooth, glass-like surface you want, because printing thin inks through thick stencils produces an uneven and mottled texture.
A clear or gel ink with the correct properties of high viscosity and short body actually can be lifted from the ink bucket in chunks that exhibit a near-solid condition. However, when the inks are worked a little–either by mixing or printing action–they will shear down to a printable condition (Figure 4) and remain in that condition for the duration of the print run.
The high-viscosity inks that I recommend for the applications discussed here are designed to work with stencil thicknesses in the 400-micron range. Depending on the artwork, 600-micron stencils also may be used successfully, but this will be the maximum stencil thickness that will print properly. Printing with a very thick stencil works best if you follow it by printing additional ink layers with progressively thinner stencils. The successive layer or layers will help smooth out and improve the printed surface by gradually filling any low or rough areas of the print. This also helps increase the overall height and reduce press-setup time because you can now use the first screen to get as much height as possible without trying to make it print perfectly. You simply rely on the successively thinner layers to smooth out imperfections in the first layer.
The thick viscosity and the very short body of a top-quality clear gel ink are what create the evenly rounded edge definition and the smooth ink surface that characterize multidimensional gloss prints. However, these same properties also make the ink extremely difficult to print through a thick stencil. Testing is underway with new mesh types that may facilitate the use of thicker stencils or allow greater ink deposits. But until such materials become available, your best option for improving setup times, production efficiency, and print quality is to use two or more screens with 400-micron (or thinner) stencils instead of a single, thicker stencil with ink that is modified to enhance its printability.
Preparing screens and printing
For best results, you should produce all of your screens for multidimensional gloss applications with good, low-elongation mesh that has a fairly thin thread diameter. You should maintain screen tension at 35 N/m or higher in order to ensure that the mesh will snap-off and release the ink in a slow, smooth, and controlled manner. As with most specialty printing, more screen tension is always better, but it is not absolutely necessary in these types of applications.
Before you start printing, make sure that your screens are clean and properly prepared. Your press’s printheads and platens should be level, and the off-contact consistent and individually controllable for each print station. When printing any high-density or multidimensional ink, slightly more off-contact distance than usual is necessary. In addition, each successive ink layer should be printed with an increased amount of off-contact to compensate for the height of previously printed layers.
You also may need to decrease the speed of your print strokes when working with multidimensional gloss ink, although probably not as much as you would with a standard high-density ink. Triple-blade squeegees with durometers of 60/90/60 seem to work best in most instances, but single durometer blades rated between 65-70 shore also work well. Squeegee angle should be increased for these applications–if you use an automatic press, the machine’s maximum angle setting will generally work reasonably well. Squeegee pressure should be as light as possible in order to transfer the maximum amount of ink to the garment and minimize the chance of changing the ink’s viscosity.
When using any specialty printing technique, it is very important to control all the basic screen-printing variables that influence print quality. Setting up the job properly is crucial to your success on press, and you’ll also need to be able to adjust the press during production as the inks warm up and shear down to lower viscosity levels. Squeegee pressures, as well as flash temperatures and times, will need to be reduced over the course of the run in order to maintain the proper ink characteristics.
Rise to the challenge
Specialty inks are difficult enough to use without having to struggle with basic issues like screen tension and press control while trying to master the inks. The more control you have over all production variables, the faster you’ll be able to setup and operate your press for multi-dimensional gloss applications and the higher the print quality you’ll achieve. Successfully printing a 3-D image and then enhancing it with different surface characteristics can be rewarding, both in terms of the satisfaction you get from mastering the technique and the appeal the prints will generate among your customers. Have fun as you learn to get creative with multidimensional gloss printing!
About the author
Michael Beckman holds a bachelor of fine art degree in printmaking from Northern Arizona University, where he was the master printer for the school’s visiting-artist program and an honors graduate. Involved in the screen-printing industry for more than 17 years, he has worked for many top printing operations in positions ranging from artist and art director to technical manager and general manager. Beckman serves as a technical consultant to the industry and is credited with the original development of high-density ink and printing processes, as well other specialty-decorating methods. He can be reached at MB Screen Printing Inc. in Portland, OR by e-mailing mbsp@comcast.net.


Subscribe

Magazine
Get the most important news
and business ideas from Screenprinting Magazine.
Most Popular
-

 Case Studies2 months ago
High-Density Inks Help Specialty Printing Take Center Stage
-

 Art, Ad, or Alchemy2 months ago
F&I Printing Is Everywhere!
-

 Andy MacDougall2 months ago
Functional and Industrial Printing is EVERYWHERE!
-

 Columns3 weeks ago
8 Marketing Mistakes Not to Make When Promoting Your Screen Printing Services Online
-

 Editor's Note3 weeks ago
Livin’ the High Life
-

 Marshall Atkinson3 weeks ago
How to Create a Winning Culture in Your Screen-Printing Business
-

 Thomas Trimingham2 months ago
“Magic” Marketing for Screen Printing Shops
-

 News & Trends2 months ago
What Are ZALPHAS and How Can You Serve Them in Your Print Business?