Articles
Published
20 years agoon
The demand for innovative and exciting garment graphics is on the rise. Fortunately, screen printers have hundreds of specialty inks at their disposal today that can be printed in countless combinations using a variety of printing techniques to achieve an almost limitless range of eye-catching results. This article will focus on several of the most popular special-effect inks and explore ways that you can modify your prepress and printing procedures to make the most of these formulations.
Engineering the print
With so many types of specialty inks and printing methods available, it can be tough selecting the best inks and techniques for a job. Before you can take a special-effect job to press, you need to ensure that your artwork will be able to take advantage of the properties offered by the ink(s) you intend to use. The graphic should employ the ink’s unique visual characteristics in a creative and technically feasible way. You’ll need to make sure that you can produce screens that will deliver the ink in a predictable manner. You’ll also have to employ printing techniques that are compatible with the design and ink, as well as practical from the standpoint of production efficiency.
The engineering of the print is critical. We’ve all printed a wonderful specialty ink and ended up with less-than-extraordinary results, and we’ve all used simple inks and straightforward printing techniques to create appealing, high-quality results. In both cases, success or failure aren’t determined by the inks themselves, but by how carefully all the details involved in producing the print are planned for and executed. Trial and error and extensive experimentation play a big role in successful printing with special-effect inks. The best prints are generally created by those willing to make changes and give the print a second, or even a third, attempt, rather than just accepting the first result off the press.
Puff inks
The first type of specialty prints I’ll discuss are created with puff inks. Puff inks have been around in one form or another for years. They are usually similar to standard inks in viscosity and printing characteristics. What sets them apart is that they contain blowing agents of different types in various amounts. The blowing agents release air when exposed to heat, causing the ink film to swell or puff. While puff inks are manufactured in many different ways and have different nomenclature, they all have very similar performance characteristics.
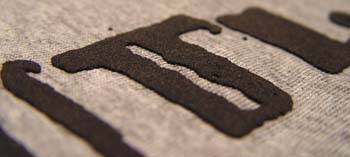
Puffs are usually available as a concentrated additive for conventional plastisol inks or as a ready-to-use printing base. Puffs are simple to use, and you can vary the amount and type of blowing agent in the ink to create different effects. You can vary the deposit thickness of puff inks by using lower or higher mesh counts or different stencil thicknesses. A fairly standard black puff ink, printed through a thick stencil, is shown in Figure 1. The ink was thickened slightly, and a low mesh count was used to print it. The result is a low-rising, semi-square-edged image that appears similar to a high-density print, but has different surface characteristics–namely a softer texture. The look and feel is much like a thick, suede fabric.
You also can use a puff ink as an underprint to create an interesting special effect. For example, you could print the puff ink as a pattern of tightly packed small dots, carefully flash the ink, then overprint it with a standard ink. The expansion of the dots during curing lightens the overprinted color and creates a bumpy texture similar to that of a basketball or football. Different dot patterns will yield different textures and effects.
Finally, puff ink can serve as an underprint that is not flashed. Printing standard ink directly on top of the puff without flashing in between can lend an extremely soft texture to the image. The overprinted colors help stabilize the ink and ensure a proper cure.
High-density inks
High-density inks have been around only for a few years. They are a little more difficult to work with than puff inks. In general, high-density ink is fairly thick and has a viscosity designed to work with stencils up to 200 microns thick. The ink’s high viscosity and very short body create the proper definition and the smooth, even surface and crisp edge. The ink surface is normally fairly soft and very matte, and it is able to hold very fine detail when printed with mesh counts and stencil thickness that match the art requirements. Figure 2 illustrates the detail that is possible with high-density ink when all the variables are tightly controlled.
High-density ink commonly is used to simulate patches and appliqués. The patch found on the back of some blue jeans is one example. These inks also are particularly useful in simulating embroidered or stitched materials and different types of fabric. You also can layer high-density inks in combination with other types of inks. In Figure 3, a high-density ink was printed in a twill pattern. A standard silver gel was printed on top of the high-density ink. Finally, an ultra-gel clear was printed last to fill the spaces left in the high-density pattern. Almost any type of ink can be combined with high-density inks to create numerous effects and surface finishes.
When combining inks for a print in which both matte and gloss finishes are desired, you’ll need to make careful adjustments to print order, ink-deposit thickness, and dryer temperatures. High-density ink also can create a raised base that you can print on with standard inks. The very smooth surface of the high-density ink makes an excellent printing surface because it can hold a great deal of detail.
Some less-obvious applications for high-density inks include using them to help standard inks perform better in production. The high-density inks are very opaque and usually won’t need to be underprinted, even on dark garments and with fine mesh counts. This characteristic also can save press space and provide a very rich color and matte finish that can’t always be produced using standard underprinting techniques. And because high-density ink has such a matte surface, you can use it when excessive flashing–or the use of gloss inks in combination with standard inks–causes an unwanted surface shine to develop. Also keep in mind that you can take advan-tage of the fast flash times allowed by high-density inks in some production situations.
On press, you can change the surface of high-density inks and add texture. Printing a smoothly coated screen without an open image area in sequence after flashing the high-density ink can create a very smooth, rubbery texture on the print. Using extra squeegee pressure and a very hard blade durometer will help. A printing base or any other kind of ink can be used on the surface of the blank screen–it only serves as a lubricant to prevent squeegee wear. This technique presses the screen into the printed surface of high-density ink. In a variation of this method, the bottom surface of the blank screen can be textured in any number of ways and used to impress a kind of subtle brand or pattern in the soft surface of the high-density ink.
High-density ink doesn’t experience much edge spread, so it’s excellent for achieving extremely high detail in printed images. Additionally, the ink’s softness and raised surface enables you to capture various types of surface texture. For example, you can apply a texture to the platens on your press and then print garments with a high-density ink. One possible result is shown in Figure 4.
Texture also can be applied with a heat-transfer press after printing. Wrinkled foil, transfer paper, or other textured materials can impart unique effects to high-density prints, which readily accept the textures. You also can smooth some or all of a print in much the same way as you add texture or other effects with a heat-transfer press. Foils and wrinkled foils can enhance an image, and their partial adhesion to the print creates a nice antique effect. Different times, temperatures, and pressure settings on the transfer press will produce different effects.
Another interesting effect uses mesh marks to add texture to the high-density ink (Figure 5). Use a very low mesh count–something in the 24- to 36-thread/in. range–and print using a normal or low off-contact instead of the usual additional off-contact commonly needed with high-density ink. The mesh marks will remain very obvious in the surface of the print.
Gel inks
You can use gloss or gel inks to produce almost all of the same effects that are possible with high-density inks, with the added benefit that you can control the surface gloss level simply by increasing or decreasing the dryer time and temperature. The most common, and probably the best, way to create this type of ink is to mix a standard high-density–or better yet, a multi-dimensional ink–with ultra gel at a ratio of approximately 50/50. (For more information, see “In the Thick of Things,” Screen Printing, Nov. 2003, p. 34.) The most important aspect of printing these inks is to make sure they have proper viscosity and shear characteristics. If the inks are too thin or shear down too quickly, then most of the techniques I discuss here will be difficult, if not impossible, to duplicate.
Ultra gel makes an excellent base component for some unique types of inks. It can be combined with a pearlescent to create a kind of pearl gel. In Figure 6, pearl-gel ink was printed in the same manner as a traditional high-density ink, using 86-thread/in. mesh screens with stencils 200 microns thick. The ink was printed in multiple layers and dried using standard dryer settings.
Ultra gel also can be mixed with a variety of decorative particles of different types and sizes, such as glitters, jeweltones, crystallinas, and metallics. The ink can usually hold as much as 35% by weight of most types of particles. The type of material is only limited by what particle size the screen mesh will allow you to print. Experimentation is needed whenever you mix a new particle type with gel ink.
In Figure 7, ultra gel was used as a base for a very small blue jeweltone flake. The ink was made with about 25% flake and 75% ultra gel. It was printed in multiple layers with 86-thread/in. screens featuring 400-, 300-, and 200-micron stencils. The dryer was adjusted with increased temperature and decreased belt speed to create a high-gloss surface. Many different sizes and colors of glitter and jeweltone flakes are available, and combining some of these colors and sizes can lead to a variety of different effects.
You can produce a very nice translucent ink by adding a very small amount of puff additive to the gel clear, and you can tint this mixture with various colors to simulate stained glass, frosted tape, or gum rubber. Adjusting dryer time and temperature can help you achieve the gloss level you’re after. In the case of most translucent effects, you’ll need to set the dryer close to a normal time and temperature to prevent gloss.
As with high-density inks, standard inks can be printed on top of these raised clears and gels. An extraordinary amount of detail can be achieved with this technique. The colors printed on top of these inks take on a surprising amount of richness and shine, creating yet another unique appearance. Additionally, particles such as caviar beads, large-sized glitters, and other materials can be sprinkled, brushed, or dipped onto the wet, raised, gel ink for a very creative effect. With a little ingenuity, you can apply these materials using a standard printing press for higher production speed than is possible with manual application methods.
Also note that there are some very effective new inks available that exhibit high adhesion properties. These inks allow the particles, especially the glitters, to be applied using much thinner deposits of ink. In some instances, the flakes can be mixed with this adhesive base and printed through a very coarse screen in a single step. This technique leaves the flake sitting on top of the shirt, creating what is currently a very popular look commonly referred to as sugar glitter, salt glitter, or California glitter.
Metallic gels
New metallic gel inks are very similar to the gel inks discussed previously. One of the most useful is a silver gel ink that behaves much like top-quality clear gels, but has a very strong chrome-like appearance. You can tint it with almost any color and print it with a very high gloss, or use the dryer’s temperature control to prevent gloss. Layering this ink as you would high-density ink and then printing halftones or other standard colors on top of the raised surface creates some very nice effects. All metallic inks have a tendency to oxidize or tarnish over time, but the new silver and even newer gold gels seem to resist this tendency to a large degree.
In Figure 8, tinted silver gel was printed in multiple layers through 86-thread/in. screens with 300-micron stencils. Then, halftone blends using more tinted silver gels were printed over the initial silver gel through 305-thread/ in. screens. Silver gel ink has no problems printing through fine mesh counts, unlike some of the older metallics available. The new silver gel also can be printed in combination with other specialty inks for even more unique effects. For example, you can print it through a standard screen on top of a raised clear gel to create a foil-print appearance.
Stick with thick
Please remember to take my observations as general guidelines and not strict instructions. Always modify everything to suit your own printing facility, creativity, and goals. The most important and rewarding thing in working with special-effect inks is the experimentation involved. Good luck exploring these techniques!
About the author
Michael Beckman holds a bachelor of fine art degree in printmaking from Northern Arizona University, where he was the master printer for the school’s visiting-artist program and an honors graduate. Involved in the screen-printing industry for more than 17 years, he has worked for many top printing operations in positions ranging from artist and art director to technical manager and general manager. Beckman serves as a technical consultant to the industry and is credited with the original development of high-density ink and printing processes, as well other specialty-decorating methods. He can be reached at MB Screen Printing Inc. in Portland, OR by e-mailing mbeckm1@attbi.com.


Subscribe

Magazine
Get the most important news
and business ideas from Screenprinting Magazine.
Most Popular
-

 Case Studies2 months ago
High-Density Inks Help Specialty Printing Take Center Stage
-

 Art, Ad, or Alchemy2 months ago
F&I Printing Is Everywhere!
-

 Andy MacDougall2 months ago
Functional and Industrial Printing is EVERYWHERE!
-

 Columns3 weeks ago
8 Marketing Mistakes Not to Make When Promoting Your Screen Printing Services Online
-

 Editor's Note3 weeks ago
Livin’ the High Life
-

 Marshall Atkinson3 weeks ago
How to Create a Winning Culture in Your Screen-Printing Business
-

 Thomas Trimingham2 months ago
“Magic” Marketing for Screen Printing Shops
-

 News & Trends2 months ago
What Are ZALPHAS and How Can You Serve Them in Your Print Business?