Articles
Published
14 years agoon
Thinking of oneself as a manufacturer of screen printing rather than as a screen printer can be the conceptual key to standardizing and ultimately upgrading production. Successful manufacturers try to leave nothing to chance. They purchase reliable raw materials from reliable suppliers. As they make production improvements, they measure and document everything. Once they optimize production, they document work procedures and insist on check-offs at each step in the manufacturing regimen.
Thinking of oneself as a manufacturer of screen printing rather than as a screen printer can be the conceptual key to standardizing and ultimately upgrading production. Successful manufacturers try to leave nothing to chance. They purchase reliable raw materials from reliable suppliers. As they make production improvements, they measure and document everything. Once they optimize production, they document work procedures and insist on check-offs at each step in the manufacturing regimen. Let’s take a look at factors that influence stencilmaking and how to standardize these factors for best results.
Ambient conditions
Most jobs don’t require clean-room conditions, but all shops can benefit from daily dusting and a few laps with a wet mop to reduce airborne dirt, dust, and lint. Temperature and relative humidity should be controlled, because they can affect exposure time directly, as well as dimensional stability and registration and the ink behavior on press.
Into the stretch
Successful stencils begin with several important elements that, strictly speaking, don’t involve making stencils at all. Mesh should be selected for the requisite ink deposit, with a mesh count that correlates with fineness of line and halftone detail, and be stretched properly on a frame that will not yield.
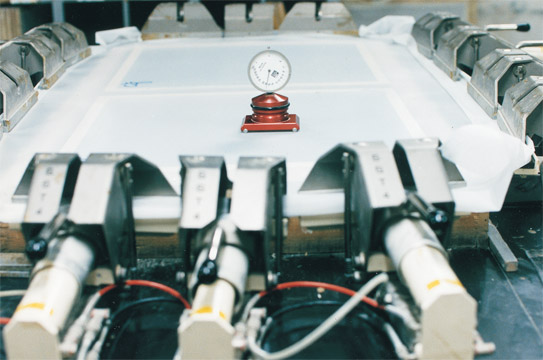
Stretching affects the off-contact distance—and, therefore, the amount of stencil flexing during printing and consequent stencil wear—and the dimensional stability of the stencil, which ultimately affects registration. Mesh manufacturers publish information on optimal stretching for every screen mesh they manufacture. Just ask. Arbitrary terms such as tight or bongo-drum-head tight aren’t good enough. Measure mesh tension with a tensiometer (Figure 1).
Dmax, Dmin, and delineation
Most shops don’t use CTS imaging yet and, therefore, must use intermediate artwork. The art should have sufficient density—a Dmax of 4.0, measured on a densitometer, is ideal—to block light from the image areas, sufficient clarity (a low Dmin) to transmit light into the stencil material’s non-image areas, and sharp edge definition (acutance) between the two.
If the non-image areas of the artwork lack clarity—if they are translucent, but not transparent—and if the density is low, then the artwork is hopelessly compromised and the stencil will be, too. If the image edges lack acuity, even prints made from low-Rz, high-quality stencil materials will look sawtoothed, with poor mesh bridging. Having said that, in the real world, one can get by with inkjet artwork with a density of 2.8-3.5, though that is, again, a compromise. The point is that photographic stencils can never be better than the artwork used to generate them, nor can the final print be better than the stencil.
Vacuum contact, fiat lux
The contact frame should draw a vacuum of 20 in. Hg at a minimum—and beyond that, beware of Newton rings. The vac-uum blanket should be black, and the contact glass should be cleaned annually, whether it needs it or not. The exposure unit (Figure 2) should be of high quality in terms of spectral output that matches the sensitivity curve of the stencil material (call it efficiency), light intensity, and light geometry, by which I mean the extent to which the light emanates from a point, so that the light incidence to the stencil is as nearly perpendicular as possible.
If the exposure distance is moveable, it should be set to expose at a distance that is at least 1.5 times the diagonal of the image area of the screen. This ensures even illumination of the stencil, avoiding hotspots and underexposed areas on the same stencil. Spectral output should be measured with a spectrophotometer; intensity with a radiometer. The above doesn’t apply to shops that use digital direct-exposure equipment, which does not use any intermediates at all.
Imaging properties
Once beyond the screen fabric, artwork, and light source, the first step toward stencilmaking standardization is the selection of the stencil system as to available stencilmaking skills, length-of-run capability, and imaging properties. Then look at the particular stencilmaking product that can best meet the requirements of the job as to ink and washup-solvent compatibility, exposure speed—fast for a weak light source, or for rapid stencil throughput in high-volume production—and imaging properties.
Imaging properties refer to the stencil’s ability to impart to the print the two principal measures of image quality: acutance, often referred to as edge sharpness; and resolution, which is fineness of detail. With the highest resolution work, the two are interrelated but, most of the time, they can be evaluated independently. It is possible to have superb acutance and low resolution, as in the case of a print made with a knife-cut stencil.
Prints can also have high resolution but poor acutance, as with fine mesh using too few coats (or no face coats) of emulsion and image-non-image edges that are sawtoothed. Poor acutance can also result from lower quality emulsions that have low solids content or that are manufactured with coarse filler particles that are large and granular. You can measure resolution and acutance (see SGIA’s Technical Guidebook, B184).
EOM and Rz value
The thickness of the stencil on the substrate side of the fabric—the EOM (Figure 3), or thickness of emulsion over mesh—also affects both the Rz value (the stencil’s surface roughness) and the thickness of the ink deposit, though only at the image-non-image edge, and for a distance of about 0.4 mm. The importance of a low Rz value in gasketing ink and avoiding sawtoothing is well understood, and the Rz can be measured with a profilometer as part of production documentation. The effect of an excessive EOM, and how it can result from the best of intentions to reduce the Rz value, is not as widely understood.
A common misunderstanding is that thickness of ink deposition depends on the thickness of the stencil. That just isn’t true—except at the image-non-image edge, the 0.4 mm mentioned above. As line or halftone resolution becomes finer, however, image edges become closer. Thus, with fine lines or halftone dots, the thickness of the stencil affects the ink deposit. If the stencil is too thick, high resolution detail may not print at all; and if it does print, the resultant high column of ink may collapse. If the print is process color, an excessive initial ink deposit can interfere with the lay-down of successive colors that overlap. With his characteristic good humor, MacDermid Autotype’s Steven Abbott, PhD, calls this phenomenon PITS (piling ink tone skewing). As a general rule of thumb, EOM should not exceed 10% of total mesh thickness for high-resolution line or halftone work, and 25% for general printing. For consistent results, use a thickness gauge to measure EOM.
Excessive stencil thickness is a problem for the inexperienced who multicoat direct-emulsion screens using intermediate dryings and face coats to achieve a low Rz value. Without care and skill, direct-emulsion EOM can reach 20 µm, even as the Rz values lessen to acceptable levels. Capillary films (Figure 4), which have a backing sheet in place during drying to prevent contraction of the film emulsion into the mesh structure on the substrate side of the mesh and which hold the emulsion flat and independent of the mesh weave during drying, carry their own risks—especially if the film thickness isn’t properly correlated to the mesh count. Even if it is, while the Rz value will be low, the EOM is typically 5-7 µm, though with at least one dual-cure capillary film on the market, it’s possible to achieve an EOM of 2-3 µm.
Indirect films offer the best combination of readily achievable low Rz value and thin EOM. Further, their EOM can be altered subtly by adjusting the exposure time. Indirect films typically have very low Rz values at an EOM of 3-4 µm. Properly processed indirect films can hold up for runs of 2000-4000 impressions—well within the requirements of many jobs—although they are best used with mesh counts of 156 threads/in. or higher.
Consistent coating of direct emulsion is best achieved with an automated coating machine. This allows controlled coating speed, angle, and pressure—variables that affect coating thickness. At present, few coating machines maintain an emulsion-coating-trough fill level, which is another significant variable, especially when working with large screens. The coating trough (Figure 5) should be selected carefully, too, as the thickness of its leading edge will also affect coating thickness. Be consistent in the coating regimen. Measure and document variations.
Follow the screen-preparation procedures recommended by the manufacturer of the stencil material you use to the letter. Indeed, follow the directions at all stages of the stencilmaking process. It is in the manufacturers’ best interest that you succeed—and in yours, too.
The wetter the better
Capillary and indirect films can, and should, be applied to the mesh immediately following the degreasing rinse, obviating the drying step required before coating direct emulsion and, perhaps more importantly, virtually eliminating any opportunity for pinhole-causing airborne dust or lint to settle on the mesh. This is a good place to mention the all-too-widespread practice of placing dry screens over capillary film and wetting through the mesh with a spray bottle. This is illogical and compromises the factory-coated emulsion thickness that is a principal advantage of using capillary film in the first place. Consider this: Just as mesh meters the ink during printing, it should be used to meter water when adhering capillary film. The spray-bottle technique invites uneven wetting and water-dwell times on the film, with consequently different stencil thicknesses across the same stencil.
The drier the better
A commercial stencil-drying cabinet with filtered air input is a good investment. Dry stencils at temperatures no higher than 100ºF. Measure the dryness of emulsion or capillary film with a moisture meter to be sure that the stencil is dry enough to expose. Moisture meters can detect residual or interior moisture.
Optimizing exposure
Controlling a stencil’s exposure is key to imaging properties, durability (mechanical toughness, flexibility, adhesion/mesh penetration), and full molecular cross-linking, which affects chemical resistance of the ink on the front end and ease of stencil removal on the back end of the workflow. One industry school of thought suggests that aiming for a consistent washout increment on a grayscale is the best way to control exposure. This is a subtle tool, however, and is reliable only if stencil thickness is absolutely consistent—and if washout water temperature and pressure are closely controlled.
I’ve found it more reliable in evaluating optimal exposure to make a step-wedge test and look for the first exposure increment where the stencil material reaches its full color density and the outline of the artwork can no longer be seen. With direct emulsions and capillary films, the stencil maker can increase exposure time above that increment, as long as that does not reduce details that are needed for the job. This ensures cross-linking of the stencil material for durability and mechanical resistance, solvent resistance, and easy stencil removal—a fully cured stencil is less vulnerable to being locked in by solvents.
With indirect films, the first maximum density increment is usually very close to optimal and cannot be increased by much at all without risking over hardening of the stencil and resultant poor adhesion. Control the exposure of any stencil material not exposed by digital direct exposure by using a light integrator with a cell filter to compensate for any shifts in spectral output as the bulb ages.
The deliberate underexposure of direct stencils to keep details from closing up is a recipe for disaster and heartbreak. A complement of emulsion on the squeegee side of the mesh that should be hardened to hold onto the mesh will be washed away. Post exposure will harden what emulsion remains, but less emulsion remains, so there’s less to harden, less to hold onto the mesh, and the resultant stencil is weaker and more vulnerable to mechanical damage.
Conclusion
Successful screen printers should try to leave nothing to chance, and that includes several things we’ve not yet mentioned that affect print quality and consistency: ink rheology, floodbar control, and squeegee durometer, angle, and pressure.
I once heard Joe Ulano say, “The reason most people and most companies are average is that, somewhere along the line, they stop paying attention to detail.” Paying attention to detail—that really does seem like the key to standardizing the production of stencils and exceeding customer expectations.
Have a comment about this article? E-mail it to the editors at screen@stmediagroup.com.
Donald Marsden
Donald Marsden has been associated with Ulano in a wide range of activities since 1972. He has lectured and published technical articles in the US and abroad. He is a member and chairman emeritus of the Academy of Screen Printing Technology and is a graduate of Princeton University.


Subscribe

Magazine
Get the most important news
and business ideas from Screenprinting Magazine.
Most Popular
-

 Case Studies2 months ago
High-Density Inks Help Specialty Printing Take Center Stage
-

 Art, Ad, or Alchemy2 months ago
F&I Printing Is Everywhere!
-

 Andy MacDougall2 months ago
Functional and Industrial Printing is EVERYWHERE!
-

 Columns3 weeks ago
8 Marketing Mistakes Not to Make When Promoting Your Screen Printing Services Online
-

 Editor's Note3 weeks ago
Livin’ the High Life
-

 Marshall Atkinson3 weeks ago
How to Create a Winning Culture in Your Screen-Printing Business
-

 Thomas Trimingham2 months ago
“Magic” Marketing for Screen Printing Shops
-

 Case Studies3 weeks ago
Screen Printing for Texture and Depth