Articles
Published
23 years agoon
As someone who toils daily in the manufacturing of stencil systems, it is in my best interest to ensure that anyone who makes screens for a living is highly trained, knowledgeable, and most of all, qualified to troubleshoot problems. So I have to admit that my motives for writing this article are purely selfish!
For any screenmaker, optimizing stencil performance centers on proper exposure. And the only way to guarantee correct stencil exposure is to understand some key screenmaking variables and their influence on the exposure process.
We’ll consider the primary variables as they apply to both direct emulsions and capillary films. We will then consider how to best evaluate optimum exposure for the various types of chemical formulations found in stencil materials. Finally, we will touch upon some of the more practical aspects of producing quality screens on a daily basis.
The right kind of light
Exposure lamps used in screenmaking come with a wide variety of spectral outputs, intensity levels, and geometries of light delivery. These are features not seen with the naked eye, yet they are critical influences on important areas of stencil performance, including resolution, durability, and even reclaimability.
Every stencil material, whether direct emulsion or film, uses a sensitizer that reacts to specific wavelengths of the light spectrum. Good exposure starts with the right kind of light. So the first thing we will talk about is establishing how much of the exposure unit’s useful spectral output is actually used by the stencil material being exposed.
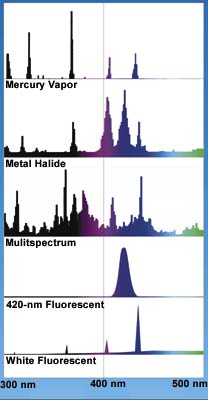
Only a fraction of the rated input power of a lamp is converted into output of the correct wavelengths of light for hardening a stencil. This useful portion of the output is known as actinic light, with wavelengths corresponding to blue, violet, and ultraviolet. As Figure 1 illustrates, metal-halide, multispectrum, and certain specialty fluorescent tubes produce light that is very rich in these wavelengths. Other types of lamps are not suitable for high-quality stencil production.
Two types of light-sensitive chemistry are used in direct photostencils. Diazo and dual-cure types can be grouped together, as it is the diazo sensitizer in both that primarily determines the length of exposure and the degree of latitude in exposure time. So-called “one-part” photopolymer emulsions and films employ “SBQ” sensitizer, which reacts much faster than diazo when exposed with the correct type of lamp. We will discuss SBQ separately.
Figure 2 shows the output spectrum for a metal-halide exposure lamp, overlaid with two curves, one representing diazo absorption and the other showing diazo sensitivity. The sensitivity curve identifies the light wavelengths at which the sensitizer will react. The absorption curve, which peaks at 373 nanometers (nm) in the UV range, illustrates the way that light output from this particular lamp is blocked by a diazo-sensitized stencil.
Notice that the peak in sensitivity corresponds to the tail of the absorption curve. At this point, light is being absorbed with less intensity, but with more penetration. In short, metal-halide lamps, with peak output of 390-420 nm in the blue-violet range, will penetrate the whole emulsion layer throughout the entire exposure period. They do not bleach through one layer to get to the next, as do other types of lamps. This brings us into some complex technical territory, which we will get into later when we examine optimum exposures and degrees of exposure latitude. But because of the way metal-halide lamps harden diazo stencils, they are clearly the best choice for such stencil materials
Figure 3 shows a comparable situation when a photopolymer emulsion is exposed with a multispectrum lamp (sometimes referred to as tri-metal-halide or iron lamps). Here, the absorption peak is at a shorter UV wavelength of 342 nm. This shifts the peak of sensitivity into the 360-390 nm range, where multispectrum bulbs have their strongest output. This makes them the best choice for optimizing exposure of photopolymer emulsions and films.
Because diazo and photopolymer stencil materials differ in wavelength sensitivity, we see a somewhat complicated relationship in their relative photographic speeds. As an example, take a photopolymer emulsion that is designed to expose in 20% of the time required for a diazo or dual-cure product. The photopolymer emulsion will only give that kind of speed when it is exposed with a multispectrum lamp. With a metal-halide lamp, to which a photopolymer is less sensitive, exposure slows to 50% of the time required for a diazo/dual-cure product. With 420-nm fluorescent blue tubes, the longer wavelength output is so weakly absorbed by the photopolymer that most of the light leaks right through and out of the back side of the coating. The “fast exposing” photopolymer now requires about 75% of the dual-cure/diazo’s exposure time.
Resolution is no yardstick
Filled-in detail doesn’t necessarily mean that a stencil has been overexposed. Lack of resolution doesn’t necessarily mean a stencil has been adequately hardened. Image resolution is affected by too many other factors to be used as a guide for determining exposure time.
For instance, a rip in the exposure blanket or a poor vacuum caused by a leaking seal can kill resolution, even at a fraction of the correct exposure time. Similarly, incompatible combinations such as photopolymer emulsion coated on white mesh and exposed with a fluorescent-tube exposure system should be avoided. Combining any two of these variables may possibly yield acceptable results, but all three things together are a recipe for very low-resolution stencils.
Exposure Testing
Optimum exposure time is only determined by looking at the stencil’s depth of cure. The stencil has to be fully cured through its full thickness. Various techniques can be used to determine optimum exposure. One of the most well known is the exposure calculator, as shown in Figure 4. It utilizes a series of increasingly darkened neutral-density filters, overlaid on a repeating design, and it allows multiple exposures of 100%, 70%, 50%, 33%, and 25% to be simulated in one step.
After exposing and processing a test screen with a calculator, the finished stencil has to be evaluated by the color-change method, and not for resolution. As can be seen in Figure 5, residual unused diazo shows up as a strong yellow undertone. The correct exposure is determined as the time taken for the yellow diazo sensitizer to be completely bleached out. In a test situation, no yellow undertone should be seen on one of the middle sections of the calculator image. Complete exposure is only indicated when the color remains unchanged for two successive steps.
Once we’ve determined at which step exposure is complete, the exposure factor for that part of the calculator is multiplied by the test exposure time to arrive at the optimum exposure time. In an underexposure situation, the 100% exposure area, or Factor 1, always looks correct because there is nothing beside it on which to make a comparison. When this occurs, you must do another test, doubling the exposure time used in the first test.
This type of exposure calculator works very well with diazo stencils. With dual cures, however, two separate color changes often happen simultaneously, with the extra dual-cure component causing a fainter but more persistent color change. The trick then becomes determining just when, exactly, the diazo part stopped changing color.
No color change occurs with photopolymer stencils, and although the exposure calculator discussed previously may be useful for determining the degree of resolution available at several different exposure levels, it does not indicate the extent of cure. An alternative method is the use of a grayscale-sensitivity guide, an example of which is shown in Figure 6.
This phototool features a 21-step non-halftone grayscale, with density increases of 0.15 at each step. As exposure times increase, more grayscale steps become hardened. If used correctly, the sensitivity guide will help us determine optimum exposure with only one test. In almost all cases, a solid step 7 after development indicates a correctly exposed stencil (Figure 6).
If the initial test hardens to just Step 5, then the optimum exposure time will be double the test exposure time. Six steps require an increase of 40% for optimum exposure. Eight steps indicates an overexposure situation and possible loss of detail in the stencil, as well as fewer pinholes due to scratches, dust, etc. Exposure time should be reduced to 70% of the test exposure time. Nine steps indicate a double overexposure. The biggest advantage of this method is that it can be used to control the degree of cure of any type of stencil–diazo, dual-cure, or photopolymer.
The last recommended method for gauging exposure does not use a test film at all. It employs a digital radiometer to determine the point at which all the sensitizer in the coating has been used up. Here is how it works: A 365-nm filter is fitted into the light integrator’s photocell, and the photocell is placed in the vacuum frame behind the coated mesh. The placement of the photocell behind the mesh is very important as we will see in a moment. Then the exposure is started.
At the beginning, due to the extremely high absorbency of the sensitizer, no light is able to reach the photocell, and the radiometer registers a reading of zero. During the exposure, as sensitizer is used up, the emulsion coating effectively be-comes “transparent” and allows more light to reach more areas of the emulsion coating. An increasing amount of light is measured by the radiometer, and then the light gradually levels off.
The information collected by the integrator can be displayed in a graph (Figure 7), with the optimum exposure indicated by the leveling off of the curve. The intensity of light measured behind the stencil indicates that the sensitizer has been thoroughly bleached out; no sensitizer is blocking transmission of light to the photocell, which means the stencil is fully exposed.
The diazo-emulsion curve finishes flat, but dual-cure emulsions display a lesser and longer-lived gradient, due to the additional photochemistry that also complicates evaluations during the color-change method. Unfortunately, this exposure-testing method does not work with photopolymer products. This is due to high absorption caused by residual sensitizer, even at the end of the exposure process. We will touch more on this later when we discuss post-exposure effects.
Now comes the tough part, but this should explain why the efficiency of the light source and the quality of the lamp are so important for producing a stencil that performs well on the press. Most of the time, in the real world, it is impossible to create a perfectly exposed screen that is consistently hardened from one side to the other and from top to bottom. The main reason this kind of perfection is so difficult to attain is that light intensity is not evenly distributed over the whole screen during exposure.
For example, with a typical “point” light source, which is best for reproducing good detail, the lamp would have to be pulled very far back from the vacuum frame to prevent “hot spots” in the center and underexposed areas at the outer edges of the stencil.
Two possible scenarios can lead to underexposed areas of a stencil. One is inappropriate lamp choice, meaning the lamp is not tuned to the sensitivity of the stencil chemistry. In this situation, the underexposed portions of the emulsion are concentrated at the foundation of the stencil where the emulsion adheres to the mesh. When this layer of emulsion is underexposed, the entire coating delaminates quite easily.
In the second scenario, the stencil is just as underexposed as in the first case, but the stencil will hold up better in use. Here, the stencil would be exposed with the proper lamp, such as a metal-halide system with a dual-cure emulsion. Because the entire layer of emulsion is hardened simultaneously as discussed earlier, a disastrous “top cure” can be avoided. Emulsion closest to and farthest from the mesh is hardened, and though the emulsion coating is still underexposed, the resulting stencil will be more durable than the one in the first scenario.
One result of using a good bulb is a stencil with much wider exposure latitude, which is evidenced by fewer pinholes and less scumming during development. Note that when a doped bulb (e.g., metal halide) gets old and weak, its spectrum gets closer to that of a mercury-vapor bulb. The longer wavelength intensity drops, while the UV output remains relatively constant.
Fluorescent exposure systems provide more uniform coverage for an even cure, but can lead to a compromise in detail, particularly with fine halftones. It is difficult for the film positive to cast a sharp shadow on the emulsion when lit from all angles.
Care also has to be taken when exposing large screens with more than one exposure lamp to give wider coverage. Stencil areas where lamp light overlaps can suffer a loss of detail, usually in the direction perpendicular to the orientation of lamps that are side by side. Highly magnified examples of such loss with fine detail on 305-thread/in. mesh are shown in Figure 8.
The role of the light integrator
Up to this point, we have set optimum exposure times for all of our mesh and emulsion combinations. We’ve learned to expose screens that produce wanted detail without unwanted pinholes. Now, how do we keep things running this way?
This is where our integrator steps in, compensating for lamp degradation and power fluctuations. It is important to match the photocell filter to the sensitivity curve of the emulsion, since a disproportionate amount of stencil hardening is caused by those wavelengths that are most penetrating and usefully absorbed. Remember, photostencils are considered “UV sensitive,” but it’s not just about UV light. Depending on the type of stencil material, the required wavelengths might reach outside the UV spectrum and into the blue and violet range. The photocell filter has to be able to tell the integrator when adequate amounts of those wavelengths have reached the stencil.
For example, a narrow-pass 365-nm UV filter used with a metal-halide bulb makes the integrator blind to fluctuations in the bulb’s longer wavelength (blue and violet) output, which so effectively exposes diazo and dual-cure products. The 365-nm photocell would be more suitable for use with a multispectrum lamp. For the metal-halide lamp, a photocell in the 390- to 420-nm range is more advisable. Lamp manufacturers can be helpful in identifying the correct photocell for specific emulsion chemistries.
Post exposure
Post exposure can be a useful technique for improving the resistance properties of a stencil, but the benefits depend on the type of emulsion used. Let’s look more closely at the impact of post exposure with different emulsion types.
Diazo emulsion or film In an underexposed diazo stencil, a yellow undercast signifies unused diazo sensitizer. This partially exposed sensitizer doesn’t wash out from the stencil during processing, as it has already reacted with, and become attached to, the polymers and resins that make up the stencil. So after drying, it is possible to re-expose the screen, bleaching out the remaining diazo and further crosslinking the stencil to improve its solvent or water resistance.
Depending on the degree of initial underexposure, however, the final stencil may be fully crosslinked, but may only be a thin skin stuck to the print side of the mesh. It will be less durable than a correctly exposed stencil where the mesh has been physically encapsulated front and back with hardened emulsion. Post-exposing a correctly exposed screen offers no benefit whatsoever, as the diazo has already been used up.
Dual-cure emulsion or film When underexposed, the situation with dual-cure products is the same as for diazo emulsions. Post-exposing the unreacted diazo can further crosslink the stencil and improve its solvent and water resistance.
But unlike purely diazo stencils, correctly exposed dual cures can also benefit from post exposure. The reason is that the secondary crosslinking system can be made to polymerize further, even after all the diazo is used up. This usually im-proves solvent resistance and can also result in easier reclaiming, since the hardened polymers and resins resist ink and solvents during printing that can make weaker stencils difficult to remove.
Photopolymer emulsion and film Photopolymer emulsions benefit most of all from post exposure. Unlike diazo, which can be used with 100% efficiency if the exposure time is long enough, photopolymer molecules can be very stubborn. Only a portion of them reacts very fast to create the short exposure times photopolymer emulsions are known for. The rest of the photopolymer molecules are not aligned correctly and crosslink only with difficulty. Increasing the exposure time causes a loss of resolution and detail with little payback in terms of improved stencil durability.
However, the potential of this unused photopolymer can be realized with post exposure. The reason is that during development, when the stencil is wet, some of the unreacted molecules will re-align and be available for crosslinking the second time around, thus resulting in improved solvent and water resistance. In some cases, the improvement in water resistance can be dramatic.
Film positives and stencil exposure
Finally, I would like to mention the influence of the film positive on the exposure process, since image density and resolution of the film-output device have a major bearing on stencil quality. A high-quality imagesetter film positive will have a very low Dmin (background transparency) of around 0.05, which means the film is clear and transmits more than 90% of the light thrown at it. The Dmax (image density) will measure 3 or higher, translating to dense blacks that stop the maximum amount of light. This is the highest quality film positive we can use to achieve good resolution and proper exposure.
At the other end of the scale is laser toner on vellum. With a translucent background measuring around 0.3 (Dmin), the positive is stopping 50% of the available light. Exposure times must be doubled in order to allow enough light to pass through the positive to the screen. The Dmax is probably around 1.0, which stops 90% of the light but, unfortunately, allows the other 10% through to fog the stencil, making for difficult processing and poor edge quality. The use of a solvent spray or heat treatment to fuse the toner can increase density to 2.0. But this still is barely adequate for any fine detail because as little as 1% of light reaching unwanted areas of the stencil is enough to compromise good washout during developing.
Between these two extremes lie thermal-imagesetter and inkjet output. These sources of film positives generally deliver very good densities and can be used for exposure without concern for burning through.
One point to remember is that anytime that anything other than crystal- clear film is used to expose screens, then exposure calculators or grayscale-sensitivity guides need to be placed behind a sheet of this material when making an exposure test. Otherwise, the correct exposure time as determined in the test will always translate to underexposure with a real film or vellum positive.
The path to perfect stencils
Achieving quality stencils requires measurement, proper matching of exposure lamps and stencil materials, and knowledge about the exposure characteristics of different stencil chemistries. It also requires that we consider all the variables that can impact the process and affect overall stencil quality. By applying the principles presented here, we can make the process of screenmaking substantially easier, if not downright satisfying!


Subscribe

Magazine
Get the most important news
and business ideas from Screenprinting Magazine.
Most Popular
-

 Case Studies2 months ago
High-Density Inks Help Specialty Printing Take Center Stage
-

 Art, Ad, or Alchemy2 months ago
F&I Printing Is Everywhere!
-

 Andy MacDougall2 months ago
Functional and Industrial Printing is EVERYWHERE!
-

 Columns3 weeks ago
8 Marketing Mistakes Not to Make When Promoting Your Screen Printing Services Online
-

 Editor's Note3 weeks ago
Livin’ the High Life
-

 Marshall Atkinson3 weeks ago
How to Create a Winning Culture in Your Screen-Printing Business
-

 Thomas Trimingham2 months ago
“Magic” Marketing for Screen Printing Shops
-

 Case Studies3 weeks ago
Screen Printing for Texture and Depth