Articles
Published
12 years agoon
Eliminating problems and managing variables in garment screen printing lead to real improvement in quality and efficiency. This article focuses on five top culprits that slow the process down: screen tension, stencil exposure, stencil drying, squeegee quality, and flash curing.
Eliminating problems and managing variables in garment screen printing lead to real improvement in quality and efficiency. This article focuses on five top culprits that slow the process down: screen tension, stencil exposure, stencil drying, squeegee quality, and flash curing.
Screen Tension
Screen printing is next to impossible to control without proper and consistent screen tension. To deal with tension at all, you need to use a calibrated tensionmeter as part of a daily routine of managing tension on screens. Tension should be measured on every screen every time you stretch, retension, or pick out a screen to enter into the production cycle.
Higher tension levels produce better print results, improve registration, and increase production speeds. Appropriate tension levels for a particular mesh count and thread diameter vary based on the fabric strength, frame type, and—in some cases—stretching device. Most meshes used for garment printing can be tensioned easily to 25 N/cm and higher. Tension should not be considered a goal unto itself. Choose tensions that that can be consistently achieved and maintained given your shop’s conditions.
High-tension screens have less resistance to knocks and pokes and will break more easily, and therefore need to be handled with more care. Off-contact distances must be reduced when higher screen tensions are introduced to the press. Failure to lower off-contact accordingly can result in the mesh breaking on press. When raising tension levels, it is a good idea to increase operating tension gradually, and establish timely communication with the pressroom so appropriate adjustments are made.
Screen-tension uniformity refers to consistent tension within one screen. Maintaining tension uniformity is important for preventing image distortion and registration problems. Uneven warp and weft tension can create inconsistent registration, unpredictable ink deposit, and destructive moiré. For best results, variations should be within ±1.0 N/cm.
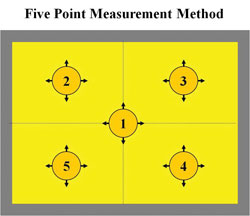
Tension measurements should be taken in at least five places on the screen. This is known as a five-point measurement method. To establish your measurement locations, divide the screen into four equal quadrants, each with a corner joining at the center (Figure 1). Measurements are taken in the center of the four quadrants and in the center of the screen. Warp and weft measurements should be taken in all five points.
For multicolor prints, selecting screens with similar tensions will help ensure consistent printing results. This issue is especially important when printing four-color-process work or on any job where the quality requirements are high. Tension differences screen to screen can result in inaccurate registration, as well as different printing effects on the image. As a rule of thumb, variations of no more than 1.5 N/cm screen to screen will help ensure registration and print quality on multicolor work.
Stencil exposure
Underexposure is one of the most common problems in the industry today. Incorrect or inconsistent exposure can create costly problems in production, including stencil breakdown on press, excessive pinholes, sawtoothing, loss of detail, inaccurate image reproduction, and reclaiming difficulty.
An exposure calculator simulates between up to ten different exposures with incremental neutral-density filters, all on the same piece of film (Figure 2). A single exposure can give us all the information we need to determine the correct exposure for a given set of conditions. Chances are you have an exposure calculator in your screen room right now, and chances are it is rarely used.
Successful screenmaking requires the use of this tool on a regular basis. Each stencil/mesh combination must be tested. Exposure times vary with stencil thickness, stencil brand/type, mesh count/thread diameter, exposure lamp, and exposure distance. Each combination will yield a different result. Even after establishing a correct exposure time, regular tests should be made to double check accuracy and confirm exposure-lamp operation.
Screen drying
Shortcuts taken to rush a screen to press lead to improperly dried screens being exposed, creating a whole host of problems on press including pinholes, stencil breakdown, poor edge definition, and reclaiming difficulty. Consequently, the so-called shortcut becomes a costly, long delay. Consider the following tips for optimizing screen-drying conditions.
Increase air temperature with a heater. Evenness of the heat is also important. The heater must be directed properly inside the cabinet or drying space to minimize hot spots and wide temperature swings. Do not exceed temperatures of 105°F (40°C) as higher temperatures can pre-harden unexposed stencils.
Install a dehumidifier in the drying area. At a relative humidity of 100%, the air can hold no more water. Once the maximum drying temperature is reached, the only way to reduce relative humidity is with a dehumidifier. This should be standard equipment in every screen room.
Create an air exchange system for effective airflow. Moving the air around with a fan is not as effective as exhausting the wet air and providing an intake of new air into the dryer. Blowing the same humid air around will do little to improve drying times. Creating the proper airflow conditions can be much more effective than just increasing temperature or reducing humidity to dry the screens. Don’t use a dirt-caked fan directed at the screen to create airflow. In this case, instead of airflow, you create a dirt blower that will create pinholes in great quantities. Installing air filters over all air exchanges can help keep the dust down (furnace filters work well).
A screen vacuum can help speed the screen-drying process along considerably. They can easily be assembled by purchasing a wet/dry shop vacuum and adding a specialized aluminum screen vacuum nozzle in place of the regular vacuum nozzle (Figure 3). These screen nozzles are available from screen making suppliers and are designed to eliminate damage to stencils and mesh. Vacuuming off excess water on degreased mesh and exposed stencils makes for faster dry times. Note that stencils must be exposed properly and the screen nozzle must be kept clean and free of dings and burrs.
Squeegee quality
The squeegee’s importance cannot be understated. Its interaction and interdependence with screen tension is absolute. Without a quality squeegee and a properly tensioned screen, the ink transfer will not happen correctly, resulting in a whole list of problems.
A square squeegee blade is preferred for most printing, and the edge of the blade is critical to a good print. While a dull squeegee will still push ink through the screen, it requires excessive pressure and a slower stroke to do so. Poor edge quality can also cause print streaking and uneven ink deposits.
It is impossible to keep your squeegees sharp without a basic squeegee sharpener (Figure 4). The edge of the squeegee wears down during the friction of printing, and needs to be sharpened on a regular basis. Replacing squeegee material is costly, so putting in a new blade in place of sharpening is not a cost-effective option. Here are a few squeegee-sharpening recommendations:
1. Always allow the squeegee to rest for 12-24 hours before attempting to sharpen. Swelling from inks and solvents will soften the blade and can cause it to get chewed up during sharpening.
2. Use an appropriate grinding grit for the amount of material that is to be removed. In other words, select a coarse grit for removing a lot of material, and a fine grit to just polish the edge.
3. Remove as little material as possible at a time so as not to melt and distort the polyurethane squeegee, and to extend the useful life of the squeegee blade. Use multiple passes on grinder type sharpeners, using smooth slow motion with minimal pressure.
4. Make sure the squeegee edge is straight and that free height is even to the handle along the squeegee’s entire length.
5. Always sharpen new blades after they are inserted in a squeegee handle/holder. In most squeegee holders the blade becomes distorted from the clamping screws and uneven placement. The new blade must be sharpened to ensure the length is trued and parallel to the holder.
6. Implement a regular schedule and procedure for sharpening squeegees. Don’t wait until print problems stop production to address this critical maintenance issue. Also, maintain your squeegee sharpener according to manufacturer recommendations.
Repeated sharpening will slowly shorten what is called the free height of the blade. This refers to the dimension of the blade extending out of the holder. As the free height is reduced, it cannot flex as well and becomes stiffer to print with, regardless of durometer. A squeegee in this state will act like a harder (higher durometer) blade, making it more difficult to print with and changing ink deposit and print quality.
Inks, solvents, environmental conditions, and time will slowly harden the squeegee material, increasing its durometer and reducing its suppleness. The increase in stiffness will necessitate excessive squeegee pressure and will lead to poor print quality. Squeegee replacement should be scheduled on a regular basis and the cost factored into your operations. As a rule of thumb, polyurethane squeegee blades have a useful life of one year or less depending on their formulation, use, and maintenance.
Thoroughly cleaning your squeegees (and holders) immediately after printing will minimize ink contamination during printing. Having streaks of other colors show up in white ink during printing creates misprinted shirts and will cost valuable production time as you stop the press to deal with the problem. Having some squeegees designated for only white can help avoid this situation as well.
A buildup of ink from inadequate cleaning can also lead to squeegee marks and streaks from dried ink stuck to the squeegee’s edge or flaking and falling into the ink during printing. Do not allow squeegees to soak in any type of solvent for extended times. The polyurethane will swell and can permanently lose its resilience.
Flash curing
Flash or spot curing is used to set or dry to the touch one or more ink layers before printing the next. Flashing is necessary for creating an underbase layer, controlling dye migration, printing light inks on dark garments, printing multiple colors on nylon, solidifying multicolor prints, and printing special-effect inks.
Flashing is also a crutch for many printers, used to compensate for improperly prepared artwork, incorrect color/print order, poor registration, poor ink preparation, incorrect mesh counts, and poor screen tension. Ink problems such as screen buildup and smearing with butt-registered colors are often addressed with flashing as well. In these cases, flashing simply bandages the problem and can be an efficiency killer.
Flash time, distance, and temperature are the primary control points with a given flash unit. Together, these three variables dictate the heat exposure on the ink. Finding the most efficient balance can help a printer save countless hours, reduce scrap and improve production speed.
Flash time or dwell is the main adjustment for flash curing inks. Once the flash distance and heat level are setup, the flash time is the fine tuning to bring the ink just to gel stage. The term flash curing is misleading because the goal of flashing is not to cure the ink. Flash curing is only used to bring the ink to 160-275°F (71-135°C), depending on the ink.
While common practice, excessive flashing not only wastes production time, but it also can create other problems. Over flashing, or fully curing, an underbase layer can hinder adhesion of the subsequent colors. It will also overheat the platens, which can cause ink to start gelling in the screens. The high heat can make fabrics shrink, scorch, and cause the platen adhesive to melt. Additionally, over flashing synthetics can trigger dye migration into the ink film, and some inks may shift color if the flash heat is excessive.
Flashing plastisol ink is influenced by the same variables as fully curing the print and is not a one-time-fits-all situation. Variables include fabric type and weight, shirt color, ink color, ink thickness, ink modification, room temperature and relative humidity, and platen temperature. As these change, your flash dwell will need to be adjusted accordingly to maximize efficiency.
Flash distance is measured from the bottom of the panel to the surface of the garment. The closer the distance is set, the higher the cure efficiency and production rate. It is also important to level the panel over the platens and to ensure the platens are leveled one to another.
Flash temperature can be controlled, provided the flash unit has a heat controller/regulator. Those flash units without this option run at the same temperature all the time. Generally, temperature is not frequently adjusted unless the fabric type is sensitive to heat. The distance and dwell time are the chief means of regulating flash exposure.
Measuring flash temperature
Measuring ink temperature during flashing is best achieved using a non-contact infrared thermometer immediately after the print exits the flash unit. These hand-held devices measure the infrared radiation coming off an object. Aimed a few inches away, they report readings as surface temperature. Lasers are available to ensure the sensor is properly aimed at the desired object (Figure 5). Small, inexpensive models with lasers sell for less than $50 and are quite effective.
To get a good reading on the flashed ink, set the thermometer to max temperature mode, then simply aim the reading sensor on the ink immediately after you rotate the platen from under the flash unit. Units with lasers are particularly useful to confirm you hit the ink itself and not just the shirt. The display will show the highest temperature read on the ink. Because ink will cool very quickly after being removed from the flash unit, the reading can not reflect the true temperature the ink reached. However, if the reading remains at or below 275°F (135°C) the ink is usually not being over flashed.
Best practices are to first adjust the flash settings so gel just occurs on the ink, then use the non-contact thermometer to measure the ink temperature as it comes out of the flash. This becomes your baseline for that set of conditions. Many variables come into play, so this temperature will be a bit different for each circumstance. Finally, check ink temperature during the run and adjust the flash time so the ink does not drastically exceed the baseline temperature originally measured.
Press platens progressively heat up as a run continues when flash units are in use. Warm platens preheat the plastisol ink before it is flashed, reducing the needed dwell time. Until the platens warm up, a longer flash time will be required during starting up. The best option is to pre-heat platens under the flash with four revolutions. If this is not possible, the flash time should be checked and adjusted once the platens are warm.
Conclusion
The five issues we have discussed here are just some of the variables that influence the garment-printing process. Perform an audit of these areas in your operation. Don’t assume they are running effectively. Take action to implement solutions to any problems you find. I guarantee you will see improvements in your print quality, efficiency, and production flow.
Dawn Hohl-Nowlin is a technical trainer and consultant on screen printing. Her industry experience includes 18 years with SPTF/SGIA, overseeing screen- printing workshops, developing training resources, and conducting process-related research. She is a member of the Academy of Screen Printing Technology. She can be reached at uellc@comcast.net.


Subscribe

Magazine
Get the most important news
and business ideas from Screenprinting Magazine.
Most Popular
-

 Case Studies2 months ago
High-Density Inks Help Specialty Printing Take Center Stage
-

 Art, Ad, or Alchemy2 months ago
F&I Printing Is Everywhere!
-

 Andy MacDougall2 months ago
Functional and Industrial Printing is EVERYWHERE!
-

 Columns3 weeks ago
8 Marketing Mistakes Not to Make When Promoting Your Screen Printing Services Online
-

 Editor's Note3 weeks ago
Livin’ the High Life
-

 Marshall Atkinson3 weeks ago
How to Create a Winning Culture in Your Screen-Printing Business
-

 Thomas Trimingham2 months ago
“Magic” Marketing for Screen Printing Shops
-

 Case Studies3 weeks ago
Screen Printing for Texture and Depth