Garment Printing
Published
20 years agoon
Do the words "high-density," "caviar bead," "metallic-flake," and "puff" make the hair on the back of your neck stand on end and cause your artists to roll their eyes? Was your first job with specialty garment inks a botched attempt in which you rushed the order through an already stuffed production schedule and took too little time to research the application and the materials it required?
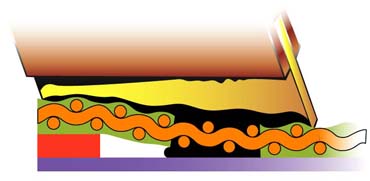
Do the words "high-density," "caviar bead," "metallic-flake," and "puff" make the hair on the back of your neck stand on end and cause your artists to roll their eyes? Was your first job with specialty garment inks a botched attempt in which you rushed the order through an already stuffed production schedule and took too little time to research the application and the materials it required? Success with special-effect garment inks and coatings comes from assessing the basic elements of the printing process–from artwork through production equipment–and understanding how each step in the process affects the final print. Most often, prepress errors and lack of testing are the root of the problem when shops fail in special-effect printing. This article will provide an overview of the most important prepress considerations for decorating garments with special-effect inks. By combining the basic concepts discussed here with your own production experience and careful experimentation, you’ll be able to develop reliable and repeatable procedures for any type of specialty ink. Designing for special-effect printing To achieve the best possible results with a specialty ink, it’s important to make sure your artists are familiar with the way in which the ink is designed to be used and the visual effects it will impart. Specialty inks are best used to support and accent a design by adding a unique optical characteristic or texture. Size and position of design elements How much of a design is made up of a specialty ink depends on the features of the specialty product itself. High-density inks, for example, work best with smaller design elements, such as text and lines that are not extremely thick and do not span large areas. Specialty decorating materials like flock, caviar beads, and christalina will not work as well on small design elements and thin lines because these elements don’t provide enough surface area to create a visible effect (or won’t hold enough adhesive to support the decorating material). The design elements these products are used to create must be large enough to take full advantage of the light-refracting or texture-creating attributes of the specialty coatings. Artists must always take into consideration the performance characteristics of a specialty ink and make allowances for the behavior of the product. For example, images that will be printed with puff inks may need additional open space around design elements (usually 0.25-1 point), which will allow the puff ink to expand as desired. Puff inks also can be used under other colors to produce multicolor puff effects. When a puff ink is overprinted, its expansion will lead to a raising, texturing, and lightening of the overprinted color(s). Artists also need to keep in mind that large printed areas of puff can curl and bend, while thick layers of the ink can expand in unpredictable and inconsistent ways, especially if the ink has been modified with excessive amounts of puff additive. The puff example demonstrates the wide variety of ink-related considerations that can impact a design. It also highlights the need for designers to fully understand the nature of the inks being printed and underscores the importance of testing specialty products before taking them to production. Overall, the best approach to creating artwork for special-effect printing is to conceive the printing process in reverse order–curing, printing, screenmaking, film-positive generation, and design creation. As you work through the process in reverse, you’ll be able to identify the limitations you have to contend with at each step and then make adjustments in preceding steps to accommodate those limitations. Print order and number of colors Frequently, specialty inks must be printed last in the print sequence. This is often the case with specialty decorating materials that rise beyond the surface of the substrate, because they can interfere with the printing of other colors that may fall close to the raised edges (Figure 1). On the other hand, overprinting raised areas can sometimes lead to unique effects in the finished print. Print order can dictate many aspects of a design, not the least of which is the actual number of colors (stations) available on press for use in printing the design. With some special-effect materials, garments must undergo additional processing steps after printing and may need to be removed from the press before the specialty coating is applied. Large glitter and metallic flakes, caviar beads, and flocking are often applied to printed adhesives off press or on one of the last print positions. While specialty press attachments and accessories are available for some of these products (like flocking applicators for automatic garment presses) the first introduction most shops have to using adhesive-locked products are labor-intensive off-press methods. Ink color and opacity Some specialty inks can lead to interesting effects when used as underlay colors that are overprinted with conventional inks. But when using special-effect inks for underlays, care must be taken to communicate the desired effect to production staff and choose the appropriate combination of underlay and overprint colors. Using reflective or flake-bearing inks as an underlay can lead to attractive designs with a deep, layered look. But the overprinted color must be translucent so that light can penetrate the ink and reflect from the glitter of metallic particles. With proper color selection, such prints can take on the appearance of a custom-painted show car. Dense, opaque colors are typically needed for prints in which high-density inks will be layered. Creativity is king An artistic note about special-effect inks: Most specialty inks come with manufacturer-recommended usage guidelines. But don’t be afraid to bend the rules and try something unconventional to achieve a specific visual effect! It is never wrong to take the properties of the product into account and play with alternate procedures that may create a unique, new look. Just keep in mind that you must be able to ensure proper curing and verify the durability of the final prints through washability and print-adhesion tests. A grand artistic effort that will not stay on the product is costly and embarrassing, but a creative and effective use of special-effect inks puts your shop ahead of the curve. Imagesetting and screenmaking considerations Proper design creation must be matched with effective positive generation and screenmaking procedures to ensure quality results when printing special-effect inks. The following sections highlight key considerations: Positives and stencil production Because of the extended exposure times and tight registration requirements of images printed with specialty inks, high-quality positives are essential. What you’re after is the greatest degree of contrast in the dark, imaged areas of the film relative to the clear areas of the positive (high Dmax, low Dmin) in order to prevent light transmission into image areas and provide maximum exposure in non-image areas. With low-quality positives, the extended exposure times required for the thicker stencil films used with many specialty inks are guaranteed to cause problems. Creating lenticular images with high-density inks is perhaps the most challenging because this application requires the best of positive, screen, and press registration. Without good positive registration, you won’t be able to meet tight registration requirements in subsequent steps of the process. For those unfamiliar with the term lenticular, this refers to images produced with layers of high-density inks in various colors. Carefully stacking layers of different high-density inks results in an image that is actually two or three images in one (Figure 2)–the image that is vis-ible changes with the viewing angle (Figure 3). Ink-particle size and mesh selection The primary mesh consideration with specialty inks is making sure that mesh has large enough openings to pass any pigment or specialty parti-cles borne by the ink. Glitters, metallic flakes, small solid particles, and even thicker inks all require mesh that has larger openings and, possibly, a larger thread diameter. As a general rule, you should select mesh with openings at least double the width of the largest particles in the ink. An even better choice would be mesh with openings triple the width of the largest particles, because this would prevent multiple particles from wedging in openings and creating blockages (Figure 4). If you print an adhesive to which flock, glitter, or other particles will be affixed, mesh selection (and stencil thickness) also are important concerns. Adhesive products must be printed thick enough on the substrate to hold the particles firmly in place, even during washing. Using caviar beads as an example, the best adhesion occurs when at least half of each bead is imbedded into the adhesive (Figure 5). Ink and coating manufacturers can provide the specifications for adhesive thickness to use with their specialty particles. Mesh tension All inks benefit from being printed through mesh tensioned to a high level, but with high-density inks, high-tension screens are a must. High-density inks depend on thick layers of ink produced from thick stencils that raise the mesh above the substrate. But the mesh/stencil combination is a dynamic imaging platform that will flex and stretch greatly under pressure from an equally dynamic and flexible squeegee. As a result, the greater the span from one edge of an opening in a thick stencil to the other, the greater the deflection of the mesh as it is brought into contact with the substrate. In larger open spaces, this deflection leads to concave prints with thick ink deposits on the edges and thin areas in the centers (Figure 6). Using high tension levels leads to lower off-contact requirements and minimizes the deflection that causes such concave prints. Other considerations While special-effect inks often have properties that make two or more different ink types compatible, you may experiment with certain com- binations that just don’t produce the expected or desired results. For example, it’s likely that you’ll run into difficulties if you combine a puff additive with christalina or metallic inks. The point here is always to thoroughly test untried combinations before you take a job to press. Also be aware that the old saying, "less is more" often applies to the use of special-effect products. Just because you develop techniques for printing multiple special-effect ink types in a single image doesn’t mean you should. Often, using more than one specialty product in a design becomes distracting and creates a confusing overload that diminishes from the overall impact of the print. Finally, take into consideration the customer and the final use of the garment, including the care, washing, and durability of the product. Your customer-service staff and designers must communicate to the customer the general properties of the products, costs, and production/ performance limitations. Some special-effect products are not as durable as standard inks, and the customer will need this information along with proper washing and care instructions. Learn to walk before you run The best–and often the only–way to successfully produce goods using special-effect inks is to set aside time from your production schedule to test, practice, and experiment with them. Creative design work and careful testing will lead to a great product and satisfied customers every time. About the author Douglas Grigar has a history in the screen-printing industry that spans two decades. He has worked as a freelance artist and held positions of production manager and general manager for sportswear and licensed-products printing companies. Grigar is now an independent consultant who provides training services and conducts technical seminars and workshops. He can be reached at dgrigar@hotmail.com.


Subscribe

Magazine
Get the most important news
and business ideas from Screenprinting Magazine.
Most Popular
-

 Case Studies2 months ago
High-Density Inks Help Specialty Printing Take Center Stage
-

 Art, Ad, or Alchemy2 months ago
F&I Printing Is Everywhere!
-

 Andy MacDougall2 months ago
Functional and Industrial Printing is EVERYWHERE!
-

 Columns4 weeks ago
8 Marketing Mistakes Not to Make When Promoting Your Screen Printing Services Online
-

 Editor's Note3 weeks ago
Livin’ the High Life
-

 Marshall Atkinson3 weeks ago
How to Create a Winning Culture in Your Screen-Printing Business
-

 Case Studies4 weeks ago
Screen Printing for Texture and Depth
-

 News & Trends2 months ago
What Are ZALPHAS and How Can You Serve Them in Your Print Business?