Thomas Trimingham
Better Bitmap Backgrounds for DTG Printing
How to prep, edit, and define the background of graphics for the best DTG results.
THERE IS AN INTERESTING side effect to the expansion of direct to garment (DTG) printing into apparel decoration. With the shortening of order sizes, the need for faster delivery, and the increase in the amount of required orders, the amount of artwork that needs to be developed and prepared for digital printing is dramatically increasing at the same time. What does this mean? It can be hard to predict large shifts in business needs, but it’s safe to bet this will mean one change: artwork will have to be prepared faster, in larger quantities, and even automatically whenever possible.
The tough part of managing a large increase in artwork preparation is dealing with an enormous variety of things like resolutions, color modes, value ranges, and overall qualities. All of these art variables make it very difficult to completely remove some level of human intervention. Although it’s possible to stay “hands off” with a system that’s an internet portal only, so that whatever they approve is what they get, this isn’t always a great recipe for providing a customer with a high-quality, finished product. The term “garbage in, garbage out” is often used when there are no quality checks prior to printing. For those shops that have a quality or art approval check in the process, and some human intervention, it’s important to be able to quickly and efficiently deal with the backgrounds of digital artwork so edits or preparations can be made without taking too much valuable time.
A useful first step in the process of editing backgrounds is to group edits into categories. Although there isn’t a system that will always work for every file, a set of similar steps can often be helpful in saving time. New art staff can also be easily trained using a system approach. Some basic categories are: Background removal for RIP/production preparation, background swapping to replace one for another, background masking for composition, and adjusting hue/saturation or clarity for impact.
General Steps to Practice
Before you go editing a bitmap file’s background, make sure to take a look at a few basic elements: the resolution and size of the file, the edge quality of the graphics, and if the colors in the image are out-of-gamut for the printing device. These are all important considerations prior to editing the image because if you’re starting with a file that isn’t the best it can be, then you will never have a high-quality result with the final version. It’s far easier to correct overall image problems in the beginning rather than edit the file and have to backtrack later.
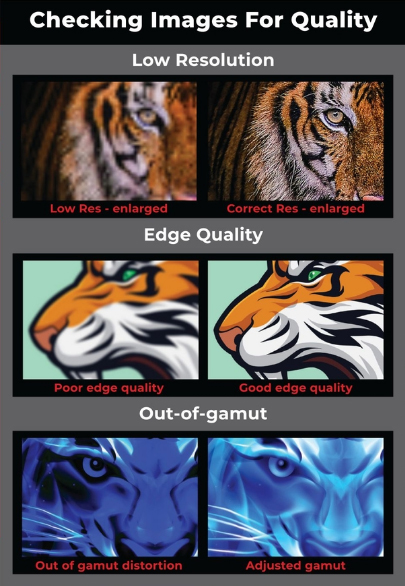
The following are some general steps to review and then some actions that can be taken depending on what challenges your file presents (see Figure 1):
Advertisement- Resolution/file size. If your file is a scan at a low resolution, or if it’s a screen capture or internet image, you may be dealing with a low-resolution file. The ideal file for digital printing has a final printing size of at least 300 dpi. Although you can print a lower resolution, the final product will have some visual fuzziness or clear pixelation. To adjust the resolution will depend on how bad it is. You can try resampling the file, but if that doesn’t work you will have to clean it up, recreate it, or ask your client to be OK with poor-quality printing. At the very least, it’s always a good move to ask your customer for the highest quality file possible to start with.
- Edge quality. Sometimes you will get a file submitted that obviously was resampled already or somehow had the entire file blurred by a filter. In these cases, your edge quality of any sharp contrasting shapes will be fuzzy. This can cause your final print to look out of focus or poorly printed, and it may also cause some underbase rips to create an accidental white edge to your borders if you’re printing on a dark shirt. To correct this, you can try a filter or two to sharpen your image. If that doesn’t work then check if your customer has a better file. If they don’t, you’ll have to recreate it.
- Out-of-gamut colors. This is a tricky issue to deal with. Often, you will see this happen when a customer uses some channel filters in Photoshop that multiply or overlay colors, which then burns them and causes oversaturation. You will get a burst of intense color in certain areas that can look great on the monitor, but they will print unpredictably on a DTG machine to correct colors that are too saturated for your DTG machine, it’s a good idea to work on carefully selecting the hues you want and isolating them. You could desaturate the entire image image, but it will often make it dull and less appealing. If you select your problem colors using the color range tool, you can then make the adjustments just where you need them and leave your other colors bright and balanced.
Background Removal for RIP Preparation
One of the most common reasons to edit out the background of an image for DTG printing is to prepare it for RIP processing. Many of the more popular DTG machines can require the removal of an image background (and also any non-printing areas inside of the image) prior to processing the image. This step ensures the RIP software doesn’t accidentally print the image background in addition to the design.
To accomplish this step on an image, there are many ways to extract it in Photoshop. Two of the most common are to use the color range tool or the magic wand tool if the background is consistent in color and/or value range. You will have to practice with different selection settings to dictate where the selection edges will stop related to the closest variation in hue or value. If you set the fuzziness too high then you may select colors that are beyond where you want, and if it’s too low then you may not get all of the background. Sometimes you can use both tools together and set the magic wand to 5 or 10 in the Photoshop property bar and slowly add to a selection in different areas. This will often be faster than starting over and slowly creating a path.
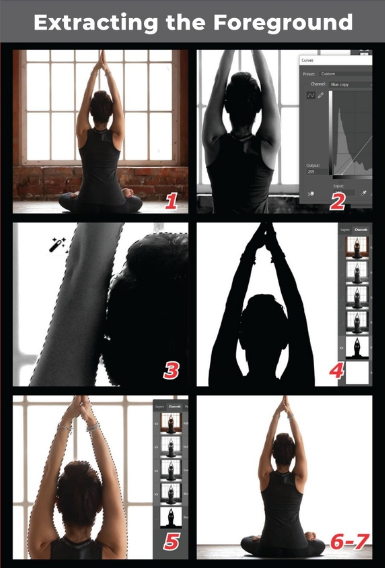
Before you create a path to extract a background, you may want to try one or two other methods first. With an image that has a very complex group of shapes, or a faded, transparent, unclear edge between the foreground and background, it can take an enormous amount of time to create a decent background extraction path using the pen tool. There are some other specific tools you can use in Photoshop to shortcut this process if your background to foreground edges are not as distinct (see Figure 2).
- Try using one of the image channels. In the channel dialog, choose one of the image channels that appears to have the most contrast. Make a copy of this channel so it becomes an alpha channel below. (It will say blue/copy, for instance.)
- Using this copied channel, you can then use the levels or curves command to increase the contrast a degree to see if you can get a better edge quality between the foreground and the background.
- Use the magic wand or quick selection tool to select the background. Don’t forget to add any additional negative shapes using the “add” command (shape key).
- Once you have selected the background you can then inverse your selection and make the foreground area solid black.
- At this point, if you have to, you can go in and use the burn, dodge, or other Photoshop tools to finish editing your copied channel, which has now become a high-contrast mask.
- Hold the control/command key and make a selection of your mask, then go to your layers pallet and select/copy/paste your foreground onto another layer.
- Turn off the original image and add a layer below your new layer and make it solid white or black to look at the edges of your extracted image. Edit as necessary and finalize your design.
- You can use a similar process for a wide variety of images where the background needs to be removed. Of course, there are always exceptions when a much more detailed path or mask must be created to properly extract everything, but the goal is to do the least amount of detailed, time-consuming work on production tasks.
Replacing One Background for Another
A common step in editing images is having to replace a background with another image or backdrop. Sometimes there are things in the background that are distracting or the overall image will look a lot better with another type of background, so it’s best to replace it.
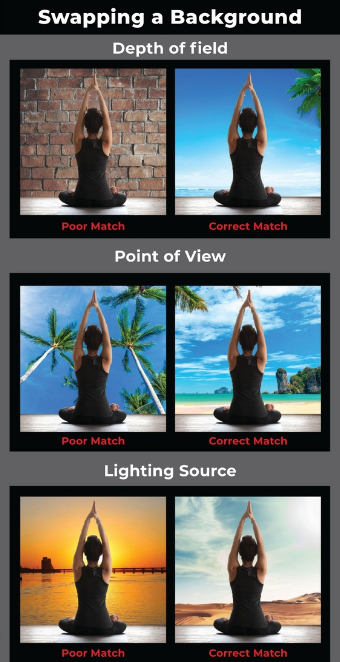
AdvertisementThe key to doing this step well is to consider several attributes in the original image and source files properly to make these specs before you try to start masking (see Figure 3):
- Depth of Field. If the original image had a very short depth of field and the background is right up against the foreground, it will probably be a good idea to find a replacement background that’s also close to the viewer. If the depth of field doesn’t match in the new background it can have a clearly “pasted on” look to the final composition.
- Point of view and horizon line. It’s always a good idea to find a source file for a new background that has a similar point of view and horizon line than the original file. If the original image was shot “worm’s eye view” from low to high and a background is swapped in from a standing point of view, the result will look very awkward and not mesh well.
- Lighting direction and intensity. Find a source for a new background that has the same location for a light source and intensity as the original photo. Although it’s possible to change the lighting in an image, it’s a very time-consuming process and should be avoided if possible. This means if your original image was shot in the early morning with the light behind the photographer, you will want a similar light direction and angle in a replacement background.
Once you’ve found a suitable background replacement for your image, you can copy the new background layer behind your masked out layer with your foreground elements, then you can adjust the saturation, hue, and even blur it slightly to create a realistic blending of elements.

Background Masking for Composition
When you’re masking out a background for a composition, this simply means you will only be using part of the original photo in a larger design composition. In a sense, it’s exactly the same as the first option where you’re extracting the foreground element; you need to follow all those steps. The major difference is the final image will likely be nested inside of a shape with many other shapes in a larger composition. One example of this could be a pool table where you would like to move the balls around into a different orientation. You would have to mask out the balls you wanted to move, and then mask some of the table to cover where they used to be. In this case, you wouldn’t be changing the background entirely, but the steps to create the floating pieces are the same. The final result would likely be the original photo layer of the table, then each ball that was moved would be on an extra layer, and then an additional shadow layer would be added underneath to establish the illusion
Background Adjusting Hue, Saturation, or Clarity
A final rationale for masking out a background is to adjust the color, hue, or how sharp or blurry the image is. One of the common ways to make a foreground element pop is to slightly desaturate the background (take out some of the color intensity) and then slightly blur the background so it appears to be farther away. This type of editing is common where the foreground image needs to pop against other images in the background. An example of this could be a racecar that needs to be highlighted against other cars in a photo. The image is first masked to “float” the car that will be left unadjusted and the background can then be duplicated, placed behind the new layer, and then adjusted into a different saturation and clarity. Sometimes an additional layer can be added to make the foreground look like it’s in motion or have a slight glow to make it defined even more (see Figure 4).
All these methods and reasons for extracting a graphic from a background are very useful to apparel decorators who wish to quickly prepare images for DTG compositions and production art steps. There’s no substitute for experience with the tools of Photoshop to edit images quickly and professionally, but with the right plan and some consistent practice, the editing of image backgrounds can be a lot easier and less time consuming.
AdvertisementLet’s Talk About It
Creating a More Diverse and Inclusive Screen Printing Industry
LET’S TALK About It: Part 3 discusses how four screen printers have employed people with disabilities, why you should consider doing the same, the resources that are available, and more. Watch the live webinar, held August 16, moderated by Adrienne Palmer, editor-in-chief, Screen Printing magazine, with panelists Ali Banholzer, Amber Massey, Ryan Moor, and Jed Seifert. The multi-part series is hosted exclusively by ROQ.US and U.N.I.T.E Together. Let’s Talk About It: Part 1 focused on Black, female screen printers and can be watched here; Part 2 focused on the LGBTQ+ community and can be watched here.


Atlantis Headwear Goes Solar for Sustainable Future

Comfort Colors Announces New Proprietary Dyeing Process Called “Pigment Pure”

10 Production Scheduling Secrets That Will Have Your Team Ready to Rock


Bulletins
Get the most important news and business ideas from Screen Printing magazine's news bulletin.

-

 Case Studies2 months ago
High-Density Inks Help Specialty Printing Take Center Stage
-

 Art, Ad, or Alchemy2 months ago
F&I Printing Is Everywhere!
-

 Andy MacDougall2 months ago
Functional and Industrial Printing is EVERYWHERE!
-

 Columns3 weeks ago
8 Marketing Mistakes Not to Make When Promoting Your Screen Printing Services Online
-

 Editor's Note3 weeks ago
Livin’ the High Life
-

 Marshall Atkinson3 weeks ago
How to Create a Winning Culture in Your Screen-Printing Business
-

 Thomas Trimingham2 months ago
“Magic” Marketing for Screen Printing Shops
-

 Case Studies3 weeks ago
Screen Printing for Texture and Depth