Garment Printing
Published
19 years agoon
Professional garment screen printers are under constant pressure to come up with innovative, new special effects, as well as the printing techniques to produce them. The demand for special-effect prints has given us an almost endless list of applications and inks, including puffs, glitters, metallics, pearlescent, gels, and high-density formulations. One of the most interesting applications that has emerged from the development of such specialty inks is what is known as the lenticular garment graphic.
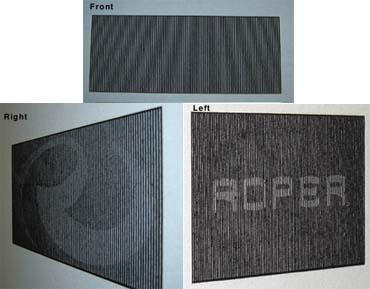
Professional garment screen printers are under constant pressure to come up with innovative, new special effects, as well as the printing techniques to produce them. The demand for special-effect prints has given us an almost endless list of applications and inks, including puffs, glitters, metallics, pearlescent, gels, and high-density formulations. One of the most interesting applications that has emerged from the development of such specialty inks is what is known as the lenticular garment graphic. For more than a decade, sign and retail-display producers have been using lenticular printing to turn static, two-dimensional designs into dynamic images that appear three-dimensional or animated. In graphics printing, these optical effects are achieved by placing a clear, ribbed plastic film over two or more printed images that have been spliced together in a way that takes advantage of the light-bending abilities of each rib or lens on the film. The image that is visible changes with the angle from which the graphic is viewed, which creates the illusion of depth or motion in the print. Lenticular prints for garments also create the illusion of depth and motion, but they bear little resemblance to their graphics-industry counterparts and are produced in a much different way. In simple terms, lenticular garment prints are created by layering multiple colors of high-density ink in stacks of various heights so that different images are revealed depending on the viewer’s angle with the print. To be honest, calling these prints lenticular is not accurate since the refraction of light through a lens doesn’t come into play. A more accurate term for this type of image would probably be a latent print, because the process produces latent images that are only visible when the print is viewed at an angle, rather than straight on. But the term lenticular seems to have taken hold, so we’ll stick with it just to avoid confusion. Lenticular garment prints generally are designed to contain two or three images that each become visible at a different viewing angle. In essence, the process integrates multiple one-dimensional images to create a three-dimensional perception. The results can be quite stunning when artwork is carefully designed and proper printing techniques are followed. This month, we’ll look at the nuances of lenticular garment printing by considering key steps in the process. Keep in mind that mastering the process takes practice and that we can learn much from the mistakes we make along the way. An overview When a printing technique has potential customers looking twice to make sure what they are seeing is what they actually saw at first glance, it is screen printing at its finest. But to achieve the kind of lenticular garment print that stops viewers in their tracks, we have to control every step of the production process. Lenticular garment prints typically feature high-density inks that are arranged in a series of vertical stacks or ribs (Figure 1). (Figure 1 Reference: Lenticular garment graphics feature ribs of high-density plastisol arranged in a vertical orientation. Layers of the ink are stacked to create the ribs, which include segments in a contrasting color that appear along their side walls. From the front, the viewer only sees the surface of the ribs (or in some designs, a base image on the garment between the ribs). But when the print is viewed from the either side, the contrasting segments merge and appear as new images.) To a viewer, one image should be visible when viewing from the right side of the print, a new image appears when the print is viewed straight on, and still another image appears when the print is viewed from the left. The printing process creates uniform raised image areas with remarkably sharp edges. Getting these sharp, raised areas requires specially prepared screens and careful execution on press. Each image must be lined up precisely in each ink stack so that it resolves correctly at the angle from which it is to be viewed. Printing a lenticular design requires more than simply using a high-density ink and a non-standard emulsion; successful lenticular printing requires a mastery of multiple procedures that differ from normal production techniques. The simple truth is that lenticular printing will push the limits of any garment printer’s abilities. As with virtually any print technique, artwork determines success or failure in lenticular printing. The artwork must be created with the lenti-cular printing process in mind. It is much more difficult to jam a lenticular effect into an existing design than to create a design specifically for lenticular printing. As with all high-density printing, extreme detail should be simplified or limited. The base image that falls outside of the high-density stacks (the image that is visible when the print is viewed from straight ahead) can be as complicated as desired, but the latent images concealed in the ribbed portions of the design should remain simple and straightforward. Bold type and easy-to-interpret logos work best for these latent images. Additionally, the color of latent images should be in sharp contrast to the masking color of the ribbed areas to emphasize the optical effect as the viewing angle changes. The line direction and weight of the ink stacks also are critical because they determine the print’s "flip" effect between each image. Normally, the image shifting that occurs in lenticular prints is most apparent when the ink stacks are thin and lined up vertically for side-to-side viewing. However, the ink stacks can be arranged in different orientations to support other viewing angles. In most applications involving high-density inks, registration difficulties are minimized by limiting the number of shared edges between image elements. But shared image edges are the basis for lenticular garment graphics, which makes the entire printing process more difficult. When separating graphics for lenticular printing, we generally want to use a layering technique (Figure 2). (Figure 2 Reference: Each element of a lenticular design must precisely conform to the same pattern of stacks, including the latent images that appear when the print is viewed from the sides. The latent images are broken into segments and arranged so that the pieces for the left-viewed image are printed to fall along the left side wall of each stack and pieces for the right-viewed image fall along the opposite side wall of each stack.) In the ribbed portion of the print, the first layer of ink is solid or continuous underneath the second layer, which is solid under the third, and so on. Individual layers include knocked-out areas that contain portions of the latent image. Each layer, including latent image areas, is printed at the same line weight, so when the graphic is observed from straight ahead, the viewer sees a series of uninterrupted vertical lines over the background image. Ideally, we want the viewer to look past these vertical lines and only see the background image from this direction. Prepress considerations Prepress is a critical aspect of lenticular printing. Matching stencil thickness to ink viscosity and image detail is paramount. This type of printing requires a stencil that is substantially thicker than those required for most standard textile prints. The thickness of the stencil correlates directly to the thickness of the printed ink film, which should be about 90% of the stencil thickness after curing. Most standard garment prints are produced with stencils between 25-80 microns thick. The best lenticular prints, however, are usually printed with fairly viscous high-density inks though 100-to 250-micron stencils. We have several ways to produce the thick stencils required for lenticular printing. One method that is efficient and provides the most consistent stencils with reasonable durability is to use a thick capillary film on the print side of the screen along with a coating of a compatible liquid emulsion on the squeegee side. This is called a direct-indirect stencil. Most high-density inks possess rheological characteristics (such as a short body and high viscosity) that aid in achieving sharp definition, crisp image edges, and a smooth, even print surface. The best results with such inks in lenticular applications are achieved by using a 100- to 250-micron stencil on a low-elongation, 83-thread/in. yellow mesh fabric with a thread diameter of 70 microns and a tension level of approximately 30 N/cm. The finer thread diameter will give us a substantially larger open-area percentage, which allows the more viscous high-density ink to pass through the screen with less resistance. The dyed mesh will reduce light scatter and minimize undercutting during the long exposure times required for stencils of this thickness. I suggest using a clear, pure-polymer capillary film to keep exposure times as short as possible. It’s also a good idea to use retensionable frames to ensure proper and consistent tension. Additionally, we must make sure that the mesh threads are perfectly aligned with the frame edges. Just as the thicker stencil requires more time for exposure, it also requires more time for development. Soaking the exposed screen prior to developing is very beneficial. This will make removal of unexposed emulsion easier and help ensure that the stencil walls are completely perpendicular to the mesh, which will maximize ink transfer during printing. On press Consistent lenticular printing results are easiest to achieve on an automatic press. But a manual press can be effective for producing samples and test prints. The background portion of the design is usually printed first, without knockouts for the lenticular portion. This background image is then flashed to stabilize the print surface for the stacks of high-density inks that will be printed over it. Note that the ink used for the background may need to have a flattening agent added so that it matches the finish or texture of the high-density inks. This reduces the chance that the design will be compromised if the lenticular portion falls out of registration a bit. If the print is designed for a dark garment, all rules for dark-garment printing apply: A white underbase should be printed first, then flashed, and highlight white should be used for any white areas of the design. The high-density portion of the lenticular print comes next. At this point, the flood stroke becomes extremely important. I recommend using a constant-force vector floodbar, which will ensure that the thick stencil openings are completely filled with ink during the flood stroke and that the ink will release completely from the screen during the print stroke. Use a standard single-durometer squeegee with a shore hardness of 70 or a multilayer squeegee with 60/90/60 durometer. I’ve also had excellent results with an 80-durometer constant-force squeegee. Squeegee angle will require some on-press adjustment to optimize ink transfer. Minimal squeegee pressure is the order of the day for most high-density printing, and it is the rule for lenticular applications as well. Using proper off-contact also is critical. Off-contact should be set so that the screen mesh peels away from the garment immediately after the squeegee passes. For the initial high-density screen, the distance should be equal to your standard minimum off-contact, plus the stencil thickness. Each subsequent high-density screen will need additional off-contact to compensate for the thickness of the preceding ink layer. Registration is absolutely critical for each high-density screen. Each strip of ink must be lined up perfectly with the previously printed strip. Any misregistration will destroy the dimensional illusion and blow the whole job. The press must be completely level and true, or this level of registration cannot be achieved. If a press won’t hold regisration, it can’t be used to print quality lenticular images. The height of the high-density ink stacks also is important and may need to be adjusted on press by adding or reducing the number of ink layers used to build the stacks. If the lines are too low, the latent image may be difficult to see. If the lines are too high, they can begin to run together visually and cloud the latent image. When everything is nearly perfect and registered properly, the latent image will reveal itself. Assuming that all platens are registered, the attention now should turn to the inks. The viscosity of a high-density ink will drop as the flood and print strokes move it back and forth during the course of the print run. As the ink shears down, squeegee pressure should be reduced to keep the ink from over filling the stencil. Other press variables will change over the production run as well. Flash times and temperatures will need to be reduced as the run progresses and the press platens and inks heat up. Squeegee speeds and pressures will also need to be adjusted throughout the run to compensate for changes in the inks’ rheology. Line up for lenticular Lenticular printing is a challenging technique, but one that can open the door to countless special-effect opportunities and attract new customers. The process is not as difficult as it may seem, but as with any unfamiliar technique, you should walk before you run when adopting lenticular printing. Start small, with simple images, and focus on making the technique work as well as possible before moving to the next level. By achieving success at a lower level, you’ll gain the experience and confidence you need to succeed at the next level. Lenticular printing may not be for everyone, but with practice, experimentation, and patience, it’s a process that can give you a competitive edge. About the author Lon Winters is president of Denver, CO-based Graphic Elements, LLC, a state-of-the-art automated screen-printing and embroidery company dedicated to special-effect and photorealistic garment decoration. Winters has more than 20 years of experience in garment printing and applies his knowledge to research and consulting. His garment prints have won more than 30 industry awards, and he frequently speaks at trade events and authors articles for various screen-printing journals.


Subscribe

Magazine
Get the most important news
and business ideas from Screenprinting Magazine.
Most Popular
-

 Case Studies2 months ago
High-Density Inks Help Specialty Printing Take Center Stage
-

 Art, Ad, or Alchemy2 months ago
F&I Printing Is Everywhere!
-

 Andy MacDougall2 months ago
Functional and Industrial Printing is EVERYWHERE!
-

 Columns1 month ago
8 Marketing Mistakes Not to Make When Promoting Your Screen Printing Services Online
-

 Editor's Note4 weeks ago
Livin’ the High Life
-

 Marshall Atkinson4 weeks ago
How to Create a Winning Culture in Your Screen-Printing Business
-

 Press Releases1 month ago
Sports Inspired Clothing Market: The Influence of Sports on Fashion Forward Looks
-

 Case Studies1 month ago
Screen Printing for Texture and Depth